Your Tesla sat plugged in all night and still woke up with a dead battery. Home charging failures aren’t random accidents—they follow precise, predictable patterns buried in electrical physics, firmware logic, and hardware wear. Most owners spend hours guessing when the real answer hides across seven specific failure categories with diagnostic steps almost nobody bothers to check. The one causing your problem right now is almost certainly not what you think it is.
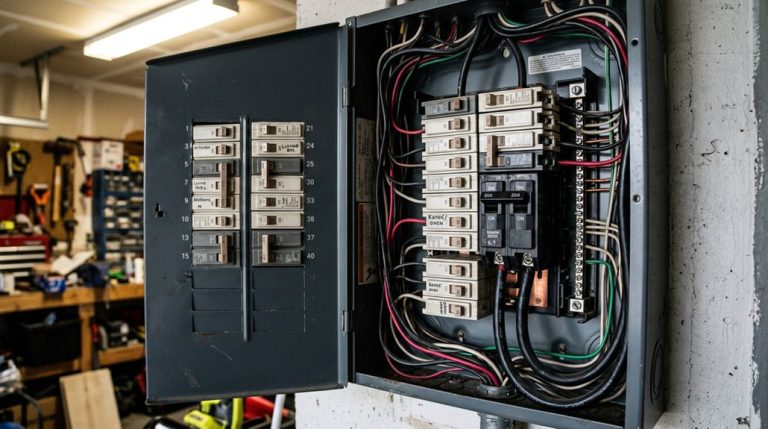
Breaker and Power Supply Faults That Cut Off Home Charging
When your Tesla refuses to charge at home, the power supply itself is often the first place to look — not the car, not the app, and not your Wi-Fi.
When home charging fails, start with the power supply — not the car, the app, or your Wi-Fi.
A 60-amp circuit supporting 48-amp continuous charging places real, sustained stress on every component in that circuit — breakers, lugs, and bus bars included.
Here’s where breaker diagnostics get interesting: a breaker tripping at 38–40 amps on a 60-amp circuit isn’t an overload problem. It’s a hardware problem. Heat buildup over several minutes of charging exposes loose terminations, corroded lugs, or a failing breaker that simply can’t handle continuous duty.
Supply grounding matters just as much. Poor bonding at your main panel can interrupt charging entirely, even when the Wall Connector itself is perfectly functional. Before assuming the charger’s at fault, confirm voltage is actually present at the terminal block — because sometimes the problem lives upstream.
Nightly charging sessions running 4–6 hours create a high continuous duty cycle that many breakers and panel components were never designed to sustain, which is why failures often surface overnight while the household is asleep. Most home charging relies on AC Level 2 power delivered through a dedicated Wall Connector, meaning the circuit must sustain output consistently across the full session without the relief that shorter, intermittent loads would otherwise provide.
Home charging issues with a Tesla often come down to something invisible at first—unstable voltage, inconsistent current draw, or a household circuit that looks fine on the surface but struggles under sustained load once charging actually begins.A smart EV power monitoring plug that tracks real-time voltage and current helps by showing exactly what your home outlet is delivering during charging, making it easier to spot when the issue is electrical supply rather than the vehicle itself.
Tesla Wall Connector Light Codes That Diagnose Charging Problems
Once you’ve confirmed the breaker’s holding and voltage is present at the terminal block, the Wall Connector itself becomes your next diagnostic layer — and it communicates its status more clearly than most people realize. Those LED meanings aren’t decorative; they’re a structured fault-reporting system.
At startup, seven LEDs shine for up to five seconds. After that, the unit settles into operational states you can read instantly.
| LED Pattern | Color | Meaning |
|---|---|---|
| Solid | Green | Ready to charge |
| Solid | Blue | Connected, no charge requested |
| Pulsing | Blue | Establishing vehicle connection |
| Streaming | Green | Charging in progress |
| Pulsing | Green | Commissioning indicators active, broadcasting SSID |
A red dot means a fault — check the error-code table immediately. Commissioning indicators specifically confirm whether your unit is still mid-setup rather than mid-failure (a distinction that saves unnecessary service calls). Complete commissioning with the vehicle unplugged and Wi-Fi connected. Unlike a Supercharger, which bypasses the onboard charger entirely by delivering DC directly to the battery, the Wall Connector feeds AC power through the vehicle’s onboard charger — meaning faults can originate from either the connector or the vehicle itself.
Tesla Charging Error Codes for Overheating and Electrical Faults
When your Tesla throws a charging error code, it’s fundamentally handing you a diagnostic report — and grasping what those codes mean is the difference between a quick fix and an expensive misdiagnosis.
Overheating codes (CC_A011 through CC_A013) flag thermal stress at the wall connector or charge handle, typically from sustained high-power draws that push older or mis-wired outlets past their safe operating limits. A Wall Connector installed on a dedicated 60-amp circuit with proper 6-gauge wiring significantly reduces the thermal stress that triggers these overheating codes.
Faulty outlet codes (CC_A010, CC_A014, CC_A020) and voltage fault indicators (CC_A006 through CC_A008) point further upstream, targeting receptacle integrity and circuit capacity issues that no amount of unplugging and reconnecting will permanently resolve without an electrician’s involvement. If CC_A009 appears after installing a home charger, it signals a miswiring or grounding issue that requires an immediate call to a licensed electrician.
When a Tesla refuses to charge at home, many owners immediately suspect the charger or wiring, but one of the most overlooked causes is right at the connection point itself—dust buildup, moisture, or slight contamination inside the charging port or on the connector pins. An EV charging port cleaning brush helps maintain a clean, secure connection between the vehicle and charger, reducing the chance of communication errors or incomplete seating that can quietly interrupt the charging process.
Overheating Error Codes
Overheating error codes — CC_A011, CC_A012, CC_A013, and CC_A041 — are Tesla’s way of telling you the heat is building up somewhere in the connector path before something fails or catches fire. These aren’t battery warnings. They’re connector ventilation and ambient monitoring signals targeting the wall connector, charge handle, or building wiring.
| Code | Trigger | Location |
|---|---|---|
| CC_A011 | Heat detected | Charge handle |
| CC_A012 | Heat detected | Wall connector |
| CC_A013 | Heat detected | Plug interface |
| CC_A041 | Wall connection hot | Building wiring |
Tesla responds by reducing amperage automatically — sometimes stopping charging entirely. That’s the protection working correctly. Repeated alerts mean something needs inspection, not another restart attempt. Using a non-certified charger increases the risk of triggering these overheating codes, as uncertified hardware lacks the engineering tolerances required to safely manage the thermal demands of Tesla’s charging system.
Faulty Outlet Codes
While overheating codes target the connector and handle, faulty outlet codes — CC_A010, CC_A014, and CC_A020 — shift the problem upstream to the receptacle itself, the plug interface, or the power delivery path feeding your charger.
These codes don’t implicate your battery; they implicate your wall. Contact corrosion, loose terminal connections, or incorrect torque on a 240V receptacle creates rising resistance under sustained load — and resistance means heat, reduced charge rates, and eventually a full stop.
Your Tesla detects unsafe delivery conditions and quits. Smart car, frustrating morning.
Outlet inspection is your first move: check for discoloration, looseness, or warmth at the plug face. If the same error appears only at your home outlet, the receptacle is your culprit, not the vehicle. A properly installed 240V Level 2 circuit on a 60A breaker, handled by a licensed electrician with a correct load calculation, eliminates many of these resistance-related fault conditions before they ever appear.
Voltage Fault Indicators
Faulty outlet codes point the finger at your receptacle and wiring, but voltage fault codes — primarily CC_A006, CC_A007, and CC_A008 — take that accusation further upstream into the quality and stability of the power your circuit is actually supplying.
CC_A006 flags overcurrent conditions, while CC_A007 and CC_A008 specifically target voltage irregularities. Your Tesla expects stable, in-range voltage throughout the entire charging session. When supply voltage fluctuates — due to loose connections, undersized wiring, or shared high-load circuits — these codes trigger.
Homes with smart metering can actually help here, since usage logs reveal grid-side instability that isn’t obvious otherwise. Poor voltage regulation at the source forces your charger to throttle down or stop entirely. Lower your charging amperage first, then investigate the circuit. Unlike traditional automakers, Tesla can push over-the-air software updates that adjust how the onboard charger responds to voltage irregularities, meaning your vehicle’s tolerance thresholds and fault responses can change without a service visit.
Cable, Connector, and Port Issues That Block Charging
Sometimes the problem isn’t your wall outlet, your breaker, or your Tesla’s onboard charger — it’s the six inches of hardware between them: the cable, connector, and charge port itself.
A damaged charging cable (look for frayed insulation, bent pins, or a connector housing that’s cracked or warped) can prevent the electrical handshake that Tesla requires before current flows, leaving you staring at a port light that blinks red and a battery that hasn’t gained a single mile overnight.
Debris and contamination are equally culpable — road salt, moisture, and packed dirt on the charge port’s contact pins interfere with communication signals, so a quick visual inspection and a dry cloth (or compressed air for stubborn grime) should be your first move before assuming anything more serious is wrong. For a more thorough clean, use CRC electronic cleaner with a Q-tip to scrub each connector pin on both the vehicle’s charge port and the charger plug itself.
Unlike many traditional vehicles, Tesla handles a surprising number of hardware-adjacent faults through over-the-air updates, which means a software patch can sometimes resolve charge port communication errors without any physical intervention on your part.
Damaged Cable Warning Signs
Before you blame your Tesla’s software or your home electrical panel, take a hard look at the physical hardware between the wall and your car—because a damaged cable, connector, or charge port is one of the most common and most overlooked reasons charging stops working.
Your cable’s outer jacket is your first wear indicator—look for cuts, kinks, melted spots, or discoloration. These aren’t cosmetic flaws; they signal compromised conductor integrity underneath.
Soft or discolored sections suggest heat damage from excessive resistance.
If charging only works when you reposition the cable, that’s a classic intermittent internal break.
Insulation testing can confirm internal conductor damage invisible to the naked eye.
Don’t gamble on a visually “fine” cable that behaves suspiciously—damaged charging hardware warrants immediate replacement or service.
Just as Tesla’s onboard neural networks process continuous sensor data to flag hazards in real time, your car’s charging system also monitors connector integrity and will interrupt charging when it detects anomalies at the charge port.
Port Debris and Contamination
Dirt, road salt, and moisture can quietly shut down your home charging session before a single electron moves—and it’s one of those failure modes that’s easy to overlook because the fix is embarrassingly simple.
Contamination inside your charge port creates resistance, triggers heat warnings, and causes intermittent or failed connections. Connector hygiene isn’t optional—it’s seasonal maintenance you actually need.
Watch for these red flags:
- “Charge handle too hot” alerts appearing immediately after insertion
- Intermittent charging stops before reaching your target state of charge
- Visible salt residue or moisture pooling inside the inlet
Clean the port using a microfiber cloth or Q-tip, allow moisture to fully dry, then reinsert the connector. If alerts persist, the problem runs deeper than debris. North American Model 3 vehicles use NACS single-phase AC charging at around 7 kW, meaning even a minor resistance increase from contamination can disproportionately affect charging efficiency compared to higher-power setups.
Firmware and Settings That Stop Tesla From Charging
When your Tesla refuses to charge at home, the culprit is sometimes buried in software rather than hardware — and that distinction matters enormously before you start pulling fuses. Your Wall Connector depends on wifi commissioning to stay current, and without a solid network connection, it can’t pull the firmware updates that fix known charging bugs.
Tesla recommends setting your router to 2.4 GHz only during initial setup, with WPA2 security enabled — dual-band or unsupported configurations routinely block the commissioning process entirely. Once connected, firmware downloads automatically. If a manual update fails, power-cycle your circuit breaker and retry before assuming anything is broken.
Three red blinks signal high-temperature limiting, and Tesla specifically ties that behavior to outdated firmware. Your charger can’t self-correct what it can’t download. Confirm your firmware status first — it’s the fastest diagnostic step that most people skip straight past. Tesla pushes major firmware updates approximately once a month, with smaller bug-fix patches delivered in between, meaning a recently introduced charging fault may already have a silent fix waiting to install. If connectivity issues persist, check that no VPN or firewall is blocking access to Tesla’s servers, as restricted domains will prevent the vehicle from syncing with home network settings entirely.
Vehicle App Settings and Schedules That Prevent Charging
Firmware and wifi issues can quietly sabotage your Wall Connector, but sometimes the hardware and software stack is working perfectly — and your Tesla still won’t charge because you told it not to. App schedules are the most overlooked culprit. You may have configured an overnight charging window (say, 10 p.m. to 6 a.m.) and completely forgotten about it.
Sometimes your Tesla won’t charge because you told it not to — and forgot.
Three scheduling traps that catch owners off guard:
- Conflicting schedules: Your Wall Connector and vehicle app can each hold separate schedules, and they’ll fight each other silently
- Location mismatch: App schedules are location-tied — if your saved “Home” pin doesn’t match your actual parked coordinates, the schedule won’t trigger
- Off-peak settings: Utility-linked rate scheduling intentionally blocks charging outside designated low-cost windows
Check both your vehicle settings and Tesla app simultaneously. One active schedule on either side is enough to keep your battery sitting idle all night.
When to Call an Electrician for Tesla Home Charging Problems
Some Tesla home charging problems are genuinely yours to solve — a forgotten app schedule, a tripped breaker you can reset yourself, a cable that just needs reseating.
But certain situations cross clear safety thresholds that make DIY troubleshooting genuinely dangerous.
Call an electrician when your charger won’t power on despite normal household power elsewhere, when breakers trip repeatedly during charging sessions, or when you notice overheating, burning smells, or visible damage near your outlet or panel.
These aren’t inconveniences — they’re warnings.
Poor grounding, miswired circuits, and undersized wiring can trigger Tesla fault codes while quietly creating fire risks behind your walls.
A charger issue that seems minor sometimes signals a deeper panel fault.
Permit requirements also matter here.
Improper installations that skip code compliance create liability and insurance headaches down the road.
A licensed electrician can test load capacity, verify circuit integrity, and fix what you genuinely shouldn’t touch yourself.
Frequently Asked Questions
Can a Smart Home System Interfere With Tesla Home Charging Sessions?
Yes, smart home interference can absolutely interrupt your Tesla’s charging sessions. Automations that fluidly adjust amperage or create charging schedule conflicts can pause, throttle, or prevent charging entirely, even when your physical charger works perfectly.
Does Extreme Cold Weather Reduce or Stop Tesla Home Charging Completely?
Extreme cold degrades charging speed but rarely stops it completely. At -20°F, you’ll notice cold degradation slash your charging rate markedly. Your battery insulation and Tesla’s thermal system work to recover charging speed as the battery warms.
How Long Does a Full Home Charge Typically Take for Each Model?
Full home charge times vary by model: Model 3 and Y take about 7–8 hours, Model S around 7–9 hours, and Model X up to 9 hours. Grasping this helps you avoid range anxiety and practice smart charging etiquette.
Is a Permit Required Before Installing a Tesla Wall Connector at Home?
Yes, you’ll likely need a permit before installing a Tesla Wall Connector. Most jurisdictions have strict permit requirements covering new 240V circuits, and inspection timing typically runs one to two weeks post-application.
Can Multiple Teslas Share One Home Charging Circuit Simultaneously?
Like slicing a pie, your Teslas split the available power — dual charging is possible through load sharing, where Wall Connectors automatically divide the circuit’s current between both vehicles simultaneously.