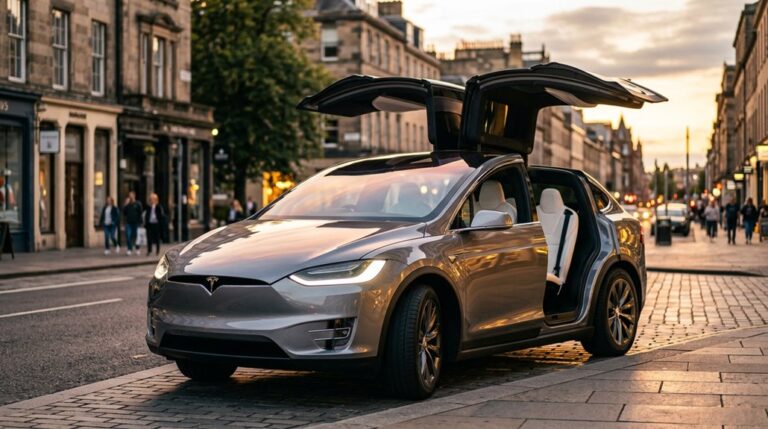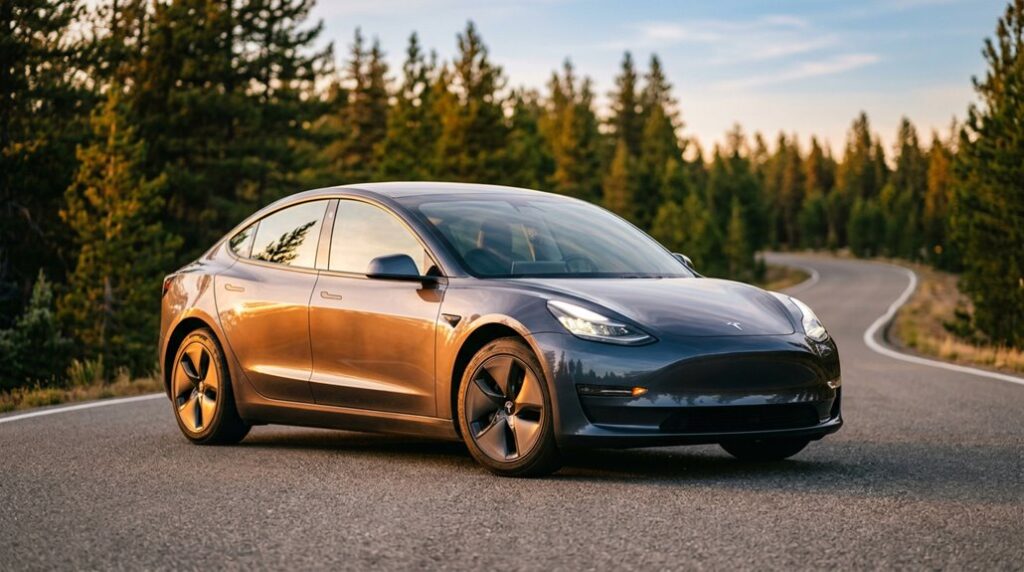
Over 2 million Tesla Model 3s are on the road, yet most owners have never once opened the manual—or even know it exists on the touchscreen. That’s not a small oversight. Your VIN holds hidden data, your hardware generation determines what your car is actually capable of, and your regional charging specs aren’t where you think they are. The gap between HW3 and HW4 alone rewrites what’s possible. Everything you assumed you knew about your Model 3 is worth questioning.
Which Model 3 Manual Version Applies to Your Car
Pinning down the right Model 3 owner’s manual starts with your VIN, because Tesla hasn’t published a single universal document that covers every build from 2017 onward — and pretending otherwise gets you into trouble fast.
Digit 10 identifies your model year and is your fastest first filter. Digit 11 narrows the assembly plant (Fremont versus Shanghai), which matters because LRW-prefixed VINs reflect Shanghai-built cars with distinct documentation. Restraint systems encoded in digit 6 also shift manual applicability — different airbag and seatbelt configurations produce different warnings and diagrams. Digit 8 separates drivetrain generations entirely. Proper VIN decoding means cross-referencing all these positions together against Tesla’s era-specific service tables, not running your number through one static decoder and calling it done.
All Tesla Model 3 VINs begin with 5YJ, the World Manufacturer Identifier assigned to Tesla Inc., which immediately confirms authenticity before you decode anything else.
How to Access Your Model 3 Manual on the Touchscreen
Pulling up your Model 3 owner’s manual takes about three taps — no phone, no browser, no hunting through a glove box that Tesla didn’t bother to fill with paperwork. Your touchscreen manual lives inside the vehicle itself, functioning as a true in-car reference rather than an afterthought.
The Model 3 owner’s manual lives in the touchscreen — three taps, no glovebox, no hunting.
- Open the app launcher from the bottom taskbar
- Tap the Manual icon (it won’t bite)
- Search or scroll to your specific topic directly
- Use touch-and-hold to pin the Manual for faster future access
The interface overlays content without abandoning your map, so you’re never fully blind to route guidance.
Controls, climate, and reference material share the same screen real estate — exactly how a software-first vehicle should operate. The same display that houses your manual also lets you check tyre pressure readings directly from the internal screen without needing a separate gauge or app. The touchscreen also functions as the central control point for nearly every vehicle feature, from lighting and mirrors to charging and driver assistance settings.
Where to Download the Official Model 3 PDF Manual
Tesla keeps the official Model 3 manual off the shelf and on the server — head straight to Tesla.com/ownersmanual, where documentation is organised by generation and model year rather than dumped into a single undifferentiated file.
Select your specific variant, and you’re reading software version 2026.8 documentation for 2024+ models, or the legacy portal for 2017–2023 builds.
For official downloads as PDF files, Tesla.cn hosts regional mirrors carrying version 2024.44.25.3, useful if you want offline reference without chasing an internet connection mid-diagnosis.
Third-party repositories like ManualsLib carry verified copies sorted by production year.
If you’re genuinely stuck, Tesla’s support line (1-877-79TESLA) will email a configuration-matched manual directly — no registration gymnastics required. The PDF format is universal for viewing and printing specific pages or the entire document, making it practical regardless of which device you’re using.
How to Identify Which Model 3 Generation You Own
Knowing exactly which Model 3 generation you own isn’t just trivia — it determines which features, hardware capabilities, and software paths actually apply to your car.
Your VIN’s 10th digit tells you the model year instantly (H=2017 through R=2024), while the 11th digit confirms the assembly plant (F=Fremont, C=China, B=Berlin, A=Austin), and together those two characters narrow down your hardware generation faster than any visual inspection.
Cross-reference that VIN data against your touchscreen’s Software Version screen (tap the Tesla “T” > Software) to confirm whether you’re running Hardware 3 or Hardware 4, since 2024+ vehicles ship with HW4’s higher-resolution camera suite and the distinctive red-lens front cameras that make the distinction visually obvious from ten feet away. If you still need confirmation, navigate to Controls → Software → Additional Vehicle Information on your touchscreen, where the hardware version is explicitly displayed as either HW3 or HW4.
Check Your VIN
Your VIN cuts through the guesswork when you’re trying to figure out exactly which Model 3 generation is sitting in your garage. This 17-character string passes a VIN checksum algorithm, so every digit earns its place. Find it at the standard plate location: lower windshield corner (driver’s side), frunk maintenance panel, or inside the Tesla app.
Four digits do the heavy lifting:
- Digit 4 confirms Model 3 identity (`3`)
- Digit 8 identifies your motor configuration (single, dual, or Performance)
- Digit 10 reveals model year using an alphanumeric code (`H` = 2017, `N` = 2022)
- Digit 11 flags the assembly plant (Fremont vs. Shanghai), which directly affects hardware generations
Cross-reference everything against Tesla’s official service documentation. Keep in mind that your VIN will not reveal HW version, MCU, or FSD purchase status, so use in-car software under Settings → Software → More information about the vehicle to fill those gaps.
Software Version Details
Once you’ve confirmed your VIN, the fastest way to pin down your Model 3’s hardware generation is already sitting in the car’s software menu. Navigate to Settings > Software > Additional Vehicle Information, and you’ll see a hardware label — HW2.5, HW3, or HW4 — no VIN decoder required. This readout became reliably available from software update 2024.38 onward, so your update cadence matters here; older builds may not surface it.
HW3 handles current FSD versions but runs closer to its compute ceiling (144 TOPS). HW4 — carrying 720 TOPS and 5MP cameras versus HW3’s 1.2MP — has considerably more headroom.
Software telemetry reflects this distinction too: HW4 vehicles track alongside FSD v12 feature rollouts, while HW3 systems largely align with v11-era behavior. HW4 is primarily found in vehicles built after January 2023, marking a clear production cutoff between the two hardware generations.
Touchscreen Interface Differences
The touchscreen layout tells you more about your Model 3’s generation than most owners realise. No instrument cluster behind the steering wheel is your first confirmation you’re inside a Model 3 (not an S or X). From there, the details narrow it down further.
- Single 15.4-inch center display (1920 x 1200 resolution) confirms Model 3 or Model Y hardware
- An 8-inch rear touchscreen means you’re driving a late 2023+ refresh
- Gesture controls and ambient lighting integration appear on newer builds through software menus
- Absence of a rear screen places your build firmly in the earlier generation
Driver data — speed, range, vehicle status — lives entirely on that center screen. Clean, deliberate, occasionally inconvenient.
That’s the Model 3 philosophy in one dashboard. The Tesla Semi takes a different approach entirely, using dual 15-inch screens flanking the driver’s seat in place of any traditional instrument cluster.
How to Find Your VIN and Software Version
Your VIN (all 17 characters of it) lives in three places simultaneously: the touchscreen under Controls > Software, the dashboard plate visible through the windshield from outside, and the compliance sticker on the driver-side door jamb. The touchscreen is your fastest option, since it also displays your current software version on the same screen — useful for confirming firmware status before troubleshooting or scheduling service. Cross-check all three VIN locations against each other, because mismatches don’t fix themselves and usually signal a documentation problem worth resolving before it becomes your problem. The driver’s side corner of the windshield displays the VIN facing outward, making it readable from outside the vehicle without opening a door or powering on the car.
Locating Your VIN
Knowing where Tesla hid your VIN saves you from fumbling around during a service visit, ownership transfer, or a quick insurance call.
Tesla spreads it across four locations, so you’ve always got a backup.
- Windshield verification: Check the lower driver-side corner from outside — no door required
- Doorjamb inspection: Open the front door and read the product plate on the pillar
- Touchscreen: Use the menus to go to Controls > Software for the full 17-character string
- Tesla app and documents: Cross-reference registration paperwork against the app to catch transcription errors
Each location displays the identical 17-character VIN, so consistency across all four confirms you’re looking at the right vehicle — particularly critical during pre-purchase inspections or title transfers. Your VIN also unlocks warranty and recall verification, confirming eligibility for coverage and flagging any open recalls tied to your specific vehicle.
Checking Software Version
Pulling up your software version takes about three taps and confirms whether your car is running the latest build or quietly sitting two versions behind. Tap the car icon (lower-left of the center display), select Controls, then hit software. Your build number appears immediately — something like 2025.45.102. For touchscreen troubleshooting, this screen is your starting point before contacting Tesla support. Alternatively, open the Tesla app and scroll toward the bottom of your vehicle’s home page; software details live there after app authentication confirms your account. Tap that section to pull release notes, which document exactly what changed. The release notes page provides a detailed feature and change overview for the current software release. Green arrow means an update is downloaded and ready. Yellow download icon means your car needs Wi-Fi. Clock icon means it’s staged and waiting for your go-ahead.
Why Your Model 3 Manual Doesn’t Match Other Owners’ Versions
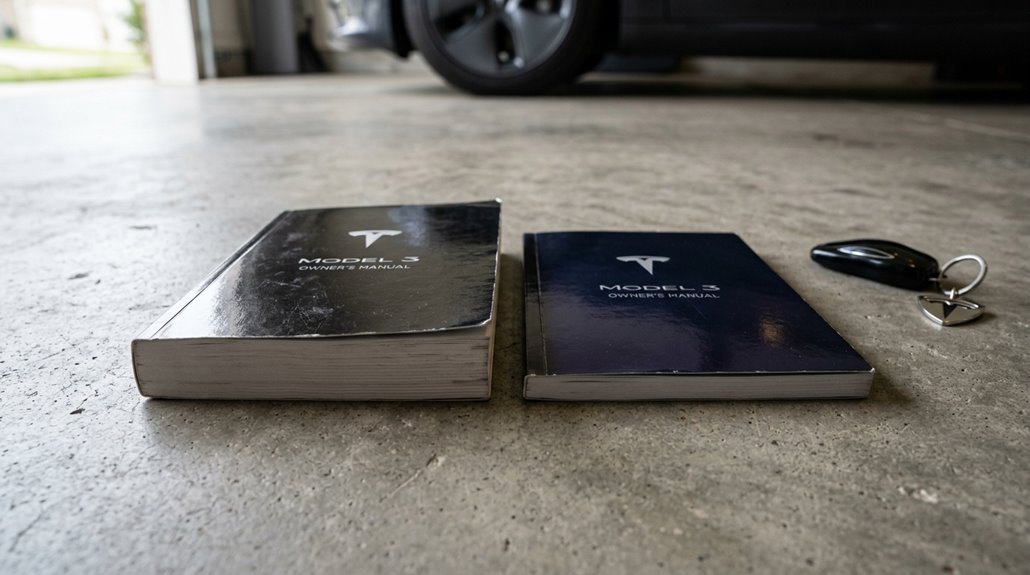
If you’ve ever compared notes with another Model 3 owner and found that your manual describes something completely differently than theirs, you’re not imagining it — the manuals genuinely aren’t the same document. Tesla builds owner manuals around your specific configuration, region, and software version, so feature discrepancies between two owners are completely expected.
Four reasons your manual diverges from someone else’s:
- Installed features — Autopilot, heat pump, ventilated seats, and tow packages each alter entire manual sections
- Production era — Highland (2024+) hardware removed stalks entirely, splitting documentation permanently
- Software version — Tesla silently edits manual text after OTA updates without announcement
- Market region — Regulatory differences change charging behavior descriptions, safety warnings, and available features
Same car, genuinely different manuals. For example, Tesla recently updated manual text to reflect that construction and accident alerts are no longer restricted to the U.S., suggesting an expansion of map icon coverage to additional regions worldwide.
EU vs. North America Model 3 Manuals: Key Regional Differences
If you’re comparing your EU Model 3 manual against a North American owner’s version, you’ll notice the differences run deeper than a few regional disclaimers — they reflect genuinely distinct hardware configurations.
European manuals specify three-phase AC charging up to 11 kW via CCS2 Type 2 infrastructure, while North American documentation centers on NACS connectivity with lower single-phase AC home-charging ceilings, and those aren’t just formatting choices; they describe physically different onboard chargers.
Layer in rear fog light operation (legally mandated across EU member states but largely absent from North American configurations), region-specific cellular modem hardware, and Performance variant power figures that can swing from roughly 460 hp on EU-spec builds to around 510 hp on U.S.-assembled units, and it becomes clear that your regional manual isn’t a translation — it’s a separate technical document for what is, in meaningful ways, a different car. The EU variant’s battery thermal management system automatically activates cooling at 48°C and heating at -7.5°C, thresholds that reflect deliberate engineering choices tied to regional climate expectations and certification requirements.
Regional Manual Variants
Although Tesla’s online owner’s manual looks deceptively uniform across markets, the EU and North American versions carry meaningful structural and regulatory differences that’ll directly affect how you operate, charge, and service your Model 3.
These regional variants aren’t cosmetic—they reflect deep compliance addenda tied to distinct regulatory systems:
- Charging terminology: EU documentation references Type 2/CCS2 connectors; North American versions use NACS language
- Regulatory alignment: EU manuals cite UNECE and EU type-approval standards; North American versions reference FMVSS and Transport Canada
- Navigation coverage: EU versions address multi-country routing and roaming; North American versions focus domestically
- Safety equipment language: EU manuals detail rear fog lights and roadside emergency gear; North American versions prioritize occupant protection compliance
Know your market’s version before troubleshooting anything. EU models support three-phase AC charging up to 11 kW, while North American models are limited to single-phase AC charging at around 7 kW, a difference your regional manual will reflect in its charging guidance and hardware specifications.
Key Specification Differences
The gap between a US-spec and EU-spec Model 3 runs deeper than most owners expect—it’s not just a different plug on the charge port. Charging differences start there, though: US models use NACS, capped at 7 kW single-phase AC, while EU models run CCS2 with three-phase current pushing up to 11 kW. That’s a meaningful real-world gap at home or destination chargers.
Battery chemistry diverges too—US Performance models use Panasonic cells built stateside, producing 510 hp, whereas EU Performance units are Chinese-manufactured with different pack configurations, outputting 460 hp. Software, route guidance SIM modules, rear fog lights, warranty coverage—every layer differs. Import a US car to Europe, and you’re rebuilding compatibility from the ground up, at considerable cost.
Salvage Title US imports face an additional layer of risk: Supercharger access is lost automatically under manufacturer restrictions, and restoring it requires passing a high-voltage test at an authorized Tesla service center in Europe, adding both travel and financial burden to an already complex ownership equation.
Highland Model 3 vs. Earlier Versions: What Actually Changed for Owners

When Tesla quietly rolled out the Highland refresh in late 2023, it wasn’t a new model — it was a surgical overhaul of nearly every system owners interact with daily. The aero enhancement alone dropped the drag coefficient from 0.225 to 0.219, a small number with real highway range consequences. Cabin quieting got serious attention too, with acoustic glass now wrapping the rear windows.
- Powered liftgate became standard equipment
- Rear-seat display added passenger-side climate and media control
- Ventilated front seats included across updated trims
- Ambient lighting integrated throughout the cabin
The suspension geometry, subframe, and bushings were all revised — meaning the car you’re driving now handles, rides, and behaves fundamentally differently than the pre-2023 version sitting beside it at a supercharger. Frequency-dependent damper valves were added to passively adjust suspension response to varying impact harshnesses, contributing to a ride that feels more refined and less crashy over bumps.
Model 3 Interior Upgrades: Seat, Dash, and Trim Changes by Year
The Model 3‘s interior has gone through three distinct evolutionary phases since 2018, each one addressing real complaints from actual owners rather than just chasing aesthetic trends.
By 2021, Tesla had already swapped chrome exterior trim for satin black, eliminated gloss interior accents, and quietly removed passenger lumbar support while adding a heated steering wheel — a trade-off that still divides owners today.
The 2024 Highland refresh pushed hardest on comfort and materials, introducing ventilated front seats, an 8-inch rear passenger screen, aluminum console accents, and a carbon matte dash option that replaced the wood panel trim nobody was defending anyway.
Early 2018 builds also saw rear seats redesigned mid-production cycle, a lesser-known change that reflected Tesla’s pattern of making running hardware corrections without announcing formal model year breaks.
Seat Material Evolution Changes
Tracking the Model 3’s seat evolution across model years reveals a clear upward path in material quality, comfort engineering, and tactile polish. Early builds kept things deliberately sparse—functional, not luxurious.
The comfort evolution accelerated meaningfully by 2021, then the Highland refresh landed like a proper upgrade rather than a cosmetic tweak. The 2025 model takes this further with ventilated seats added as a standard feature across its refined interior lineup.
Key seat materials milestones you should know:
- 2017–2018: Minimalist upholstery, no ventilation, higher road noise bleed-through
- 2019–2020: Incremental trim enhancements, pattern updates, vegan leather steering wheel signals broader shift
- 2021: Higher-quality materials, improved front-seat comfort, passenger lumbar removed
- 2023–2024 Highland: Softer front seats, front ventilation added, rear outboard seats heated and perforated
Each generation genuinely improved on the last—that’s rarer than it sounds.
The Model 3’s minimalist interior looks sharp on day one, but daily entry, wet shoes, and small spills can quickly start leaving marks that are harder to clean than most owners expect. Custom-Fit All-Weather Floor Mats for Tesla Model 3 create a full-coverage barrier across the footwells, helping trap dirt and moisture before it reaches the carpet so the cabin stays closer to its original condition over time.
Dashboard Redesign By Year
Seat materials tell half the interior story—the dashboard tells the other half, and it’s where Tesla made its boldest moves. Yearly materials and design choices evolved steadily, culminating in the 2024 Highland’s 15.4-inch screen, stalk-free steering wheel, and ambient lighting strip spanning the full cabin width. The 2026 model year marked a notable reversal when steering column stalks returned, restoring physical turn signal controls that had been removed in the controversial 2024 redesign.
| Year | Key Dashboard Change |
|---|---|
| 2017–2019 | Single 15-inch screen, no instrument cluster |
| 2020 | Noise reduction, subtle improvements |
| 2021 | Dash trim extended into door cards |
| 2024 Highland | 15.4-inch screen, ambient lighting added |
| 2024 Highland | Stalks removed, rear 8.0-inch screen added |
Each iteration stripped away complexity while adding capability—a genuinely rare combination in automotive design.
Trim And Finish Updates
While the dashboard and seats grab most of the headlines, trim and finish updates quietly define how premium a Model 3 actually feels to live with day-to-day.
Early builds leaned heavily on chrome brightwork and gloss black accents — functional, but divisive. Tesla gradually replaced those with matte finishes and contrasting veneers across dash and door panels, particularly from 2021 onward. The 2024 Highland took this furthest, ditching traditional wood entirely for a cleaner, more contemporary aesthetic.
Key trim evolution milestones worth knowing:
- 2019 blacked-out exterior chrome for a sharper visual identity
- 2021 reduced gloss black interior accents for subtler polish
- 2024 Highland introduced contrast-color paneling throughout the cabin
- Soft-touch surfaces expanded markedly across later interior revisions
For owners who want to go further, aftermarket options like matte carbon fiber trim pieces can replace factory panels entirely, pressing directly into place with adhesive tape for a cleaner, more personalized finish.
Acoustic Glass on Model 3: Which Windows Have It?
Not every window on your Model 3 is doing the same acoustic work. The refreshed Model 3 introduced laminated windows on the front door glass first, then expanded that treatment to rear side windows as part of Tesla’s broader cabin-noise strategy. The windshield also carries an acoustic interlayer, which cuts wind and road noise entering through the largest glass panel on the car. Noise testing consistently shows these three zones providing the biggest quieting gains.
What you won’t find acoustic treatment on: the rear hatch glass, triangle quarter windows, and roof glass, all commonly single-pane. Laminated construction uses a plastic interlayer to damp sound transmission, but panel gaps, tyre noise, and wind leaks still contribute meaningfully regardless. Tesla developed this acoustic laminated glass in-house through its Tesla Glass project, which has built expertise across both vehicles and energy products like solar roof tiles.
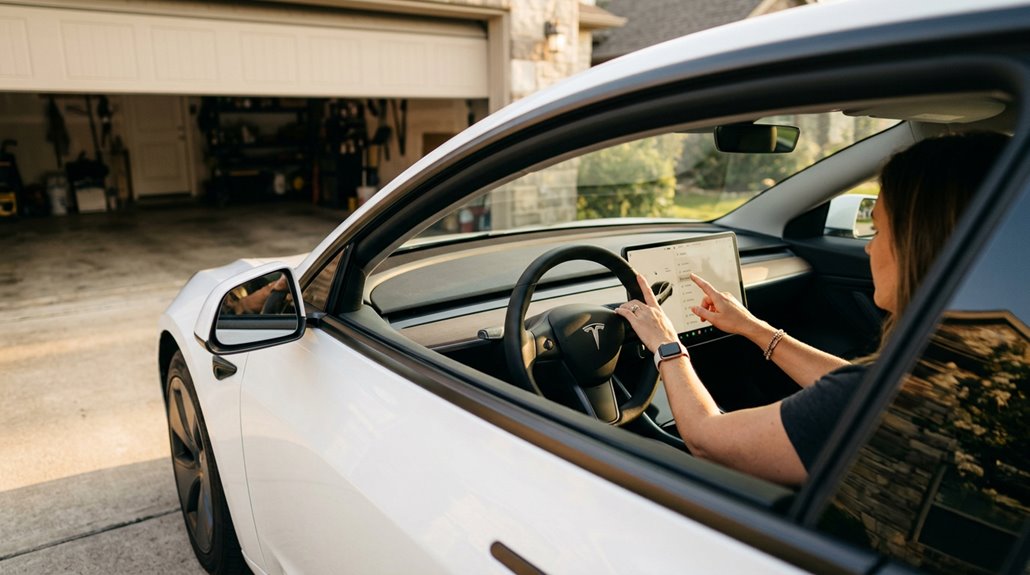
The 15.4-Inch Touchscreen: Specs, Layout, and Navigation
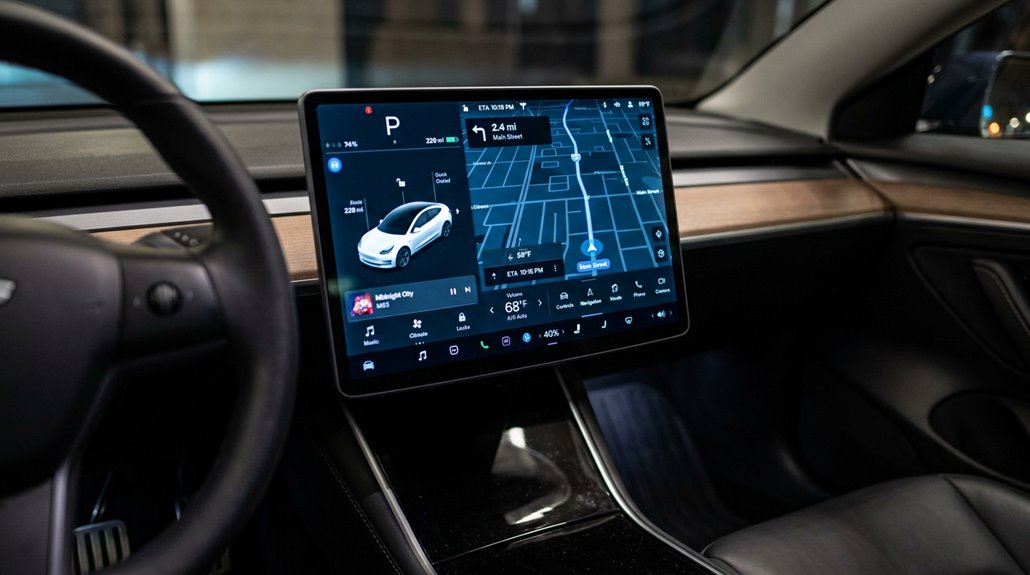
Tesla’s 15.4-inch touchscreen (running at 1920 x 1200 pixels across a 16:9 panel) replaces every physical button you’d find in a conventional car, consolidating climate, guidance, media, and even gear selection into a single horizontal LCD mounted dead-center in the dash.
You’ll steer through it using familiar smartphone gestures — pinch-to-zoom on the map, swipes between menus — so the learning curve is shorter than you’d expect from a system carrying this much responsibility.
One-touch shortcuts sit along the bottom toolbar, meaning you’re never more than a tap away from adjusting a vent, queuing a route, or pulling up Tesla Theatre mid-charge. The Model 3 also features an 8-inch rear touchscreen, added in the 2024 Highland refresh, giving back-seat passengers their own dedicated entertainment interface.
Touchscreen Layout Explained
At the center of the Model 3’s dashboard sits a 15.4-inch IPS LCD touchscreen — and that’s not a design flourish, it’s the entire control scheme.
Running at 1920×1200 pixels, it handles everything from climate to glovebox controls with minimal gesture latency across inputs.
The layout divides into distinct functional zones:
- Top status bar — quick-access car controls and live vehicle indicators
- Car status area — real-time speed, door states, and warning messages
- Navigation panel — maps, destinations, and routing adjustments
- Shortcut cards — media, tyre pressures, and trip data
There’s no instrument cluster.
Tesla moved all critical driving information here, so grasping each zone isn’t optional — it’s foundational to operating the car confidently. The interface has drawn consistent comparisons to an Apple iPad, both in its crisp display quality and its iOS-like onscreen menu structure.
The Model 3’s central screen handles everything from navigation to climate control, which means it’s constantly exposed to fingerprints, glare, and the kind of fine scratches that build up slowly but never fully go away. Tempered Glass Screen Protector for Tesla Model 3 Display adds a clear protective layer that helps preserve screen clarity and reduces daily wear, keeping the display easier to read and maintain over time.
One-Touch Navigation Features
With the layout locked in your head, the guidance system is where that 15.4-inch screen earns its keep. Tesla built quick routing directly into the touchscreen — no separate nav button, no buried menu. You tap the search bar, enter a destination, and the route appears. Simple.
Map gestures work exactly like your phone. Pinch-to-zoom adjusts your view, and a two-finger rotation reorients the map. Orientation preference (north-up versus heading-up) is togglable directly from the display. While driving, route guidance status stays persistent in the status bar so you’re never hunting for turn information mid-route.
Supercharger stops integrate automatically on longer routes, calculating charge stops based on your current battery state. The screen handles all of it — no companion app required. If you ever encounter issues accessing vehicle-related resources online, security solutions like Cloudflare may block access based on triggered actions such as submitting certain words, SQL commands, or malformed data.
What Every Icon in the Model 3 Top Menu Bar Does
The Model 3’s top menu bar is always sitting there in plain sight — whether you’re parked, driving, or plugged in — yet most owners tap through it without knowing exactly what half those icons actually do. Grasping top bar meanings eliminates guesswork and keeps your attention where it belongs. Icon behavior shifts situationally, meaning the same icon can do different things depending on vehicle state.
The top bar is always visible, yet most drivers never truly understand what they’re looking at.
- Battery/range display — tap it to toggle between percentage and distance units
- Lock icon — reflects real-time door lock status, left-side position
- HVAC icon — single tap opens the full climate panel
- Sentry/security indicator — shows whether Sentry Mode is active, inactive, or unavailable
Software updates can quietly reposition or replace these icons, so stay observant. When Sentry Mode is actively recording, a red light indicates this status to anyone near the vehicle.
How to Set Up HomeLink on Your Model 3
Before you can tap a button and watch your garage door glide open from your Model 3’s touchscreen, you’ll need to either purchase and install a HomeLink retrofit module (ordered through the Tesla Shop and fitted at a service center) or confirm your car already has one pre-wired behind the front fascia.
Either way, the setup requires your physical garage remote, a clear area around the door since programming can trigger it to open or close mid-sequence, and a fresh battery in that remote — a weak signal is the silent killer of most failed pairing attempts.
Once you’ve checked those boxes, you’re selecting the HomeLink icon from the Controls screen and working through the Create HomeLink flow, which walks you through naming the device, choosing a transmission mode (Standard, D-Mode, or UR-Mode), and completing a time-sensitive receiver-training window that gives you roughly 30 seconds to press the Learn button on your opener unit and get back to the car. If you’re skipping the service center and installing the module yourself, note that the adapter is compatible with Tesla Model Y and Model 3 and requires one M6 screw at 25 mm length, which you’ll need to source locally before starting.
HomeLink Setup Requirements
HomeLink isn’t standard equipment on many newer Model 3 builds, so if your car didn’t ship with it, you’ll need to order the retrofit module through the Tesla Shop before anything else happens. Tesla ships the retrofitted hardware directly to your chosen service center, keeping the activation workflow tied to an official appointment. You can’t just show up — checkout through the Tesla Shop comes first.
Here’s what the setup actually requires:
- A compatible HomeLink module (part numbers 1114984-00-B or 114984-00-B)
- A Tesla service appointment scheduled through the Tesla app
- An RF-compatible garage door opener, gate, or security device
- Software activation completed via Tesla’s Service Mode during installation
No module means no setup. It’s that straightforward. Cheap aftermarket modules may not work despite appearing identical to OEM units, as firmware differences between modules have been suspected as the cause of incompatibility.
Programming Your Garage Door
Once your module’s installed and activated, you’re ready to actually program it — and this part you do yourself, no service appointment needed. Park with your front bumper directly facing the garage door receiver. Fresh batteries in your remote aren’t optional — they’re your first remote troubleshooting move before anything else.
Open Controls, tap the HomeLink icon, select “Create HomeLink,” name your device, then choose your transmit mode (Standard, D-Mode, or UR-Mode — match it to your receiver). Hit “Start.” Now move fast: press your remote’s Learn button, and you’ve got roughly 30 seconds before the window closes. The headlights flash during active recording.
Miss that window and you restart completely. Battery recommendations apply here too — weak cells kill signal clarity. Tap “Save” and test immediately. To finalize the pairing, you’ll need to press the garage opener’s learn button on the unit inside your garage before training completes.
Rear View Camera: One-Touch Access and Display Settings
Shifting into Reverse is all it takes to pull up the rear camera feed automatically — no menu spelunking, no setup required. For quick access outside of Reverse, tap the camera icon on the right side of the steering wheel (a dedicated circle icon on 2024 models). Display customization is straightforward: touch-hold the feed, then drag it to any shaded relocation zone.
Shift into Reverse and the rear camera appears instantly — no setup, no searching, just seamless access.
- Swipe up or down to cycle between rear, front, and side camera views
- Side repeater cameras activate automatically when you engage a turn signal
- A vertical red bar signals Rear Cross-Traffic Alert detection
- Post-V12 (2025.14.1), the default layout places rear view at the bottom, side cameras at upper corners
Aftermarket options like the TESERY 8.9″ streaming mirror replace your factory mirror entirely and draw power directly from the vehicle’s power interface, giving you a 170° wide-angle rear feed that sidesteps obstructions from rear clutter, passengers, and reflective glass.
Always verify with mirrors — the camera’s a tool, not a replacement.
Wiper Controls, Auto Mode, and Status Bar Indicators
A single press of the wiper button on the steering wheel does two things at once: it triggers one wipe and pulls up the wiper control card directly on the touchscreen — no digging through menus required. You can also reach wipers through Controls > Wipers, or drag the wiper icon onto your bottom bar for permanent quick access.
Speed modes run from Off through four settings: two intermittent (I and II) and two continuous (III and IIII). Auto mode adjusts wiper sensitivity based on detected precipitation intensity — press the button again while Auto is active to temporarily increase sensitivity during heavier conditions.
Need washer fluid? Press and hold. The system sprays, then adds two follow-up wipes automatically. Periodically cleaning the edge of wiper blades helps maintain effectiveness and ensures consistent contact with the windshield. Status indicators on the touchscreen reflect your current wiper state the moment you activate them.
Voice Commands That Actually Work on Model 3
Activating Tesla’s voice command system on your Model 3 takes exactly one input: either press the right scroll button on the steering wheel or tap the microphone icon on the touchscreen, then wait for the confirmation tone before speaking.
The system runs on natural language processing (NLP), so you’re not locked into rigid keyword strings — phrasing “get me to 45500 Fremont Blvd” works just as reliably as the textbook “Route to 45500 Fremont Blvd.”
From there, you can fire off route commands like “Display Superchargers,” media commands like “Play Radiohead on Spotify,” communication commands like “Text message David,” and even climate or charge-port controls, all without touching the screen.
Tasks like opening the glove box, folding mirrors, saving dashcam footage, and adjusting seat heaters are all fair game — covering what experts estimate to be 90–95% of tasks drivers would otherwise handle through the touchscreen.
Activating Voice Command System
Tesla’s voice command system on the Model 3 runs through two activation points: the right scroll button on the steering wheel and the microphone icon on the touchscreen. The steering wheel button handles most driving scenarios — it’s positioned with steering ergonomics in mind, staying within thumb reach so you’re never fumbling.
- Right scroll button: Press and hold until the blue microphone icon appears on the touchscreen
- Audible chime: Confirms the system is actively listening before you speak
- Touchscreen tap: Use the microphone icon when parked or already navigating the screen
- Real-time transcription: Text displays your spoken command, addressing privacy concerns by showing exactly what the system captured
Speak naturally. No rigid phrasing required. The system processes dialog input and either executes immediately or surfaces on-screen options.
Effective Voice Command Examples
Knowing *which* commands actually work saves you from the frustration of talking to your car like it owes you an answer. Tesla’s voice system handles natural language remarkably well, accepting flexible phrases rather than rigid scripts.
Say “Navigate to [address]” for turn-by-turn routing, or use shortcuts like “Go home” and “Go to work” for preset destinations. Situation-aware responses mean “Take me to coffee” genuinely searches nearby cafés.
Climate control accepts “Set temperature to 72 degrees” or simply “increase climate.” Need the trunk? Try “Open trunk” — or the Easter egg phrase “Open flux capacitor” (yes, that opens the charge port).
Media commands like “Play [artist]” pull from connected streaming services instantly. These phrases cover roughly 90% of daily interactions without touching the screen.
Driver Profiles: Setup, Sync, and Customization
Once you adjust the seat, steering wheel, or exterior mirrors for the first time, the Model 3 prompts you to create a driver profile — and it’s worth taking seriously. Access it via the driver profile icon on the Controls screen, name it, and hit Create Profile. From there, profile syncing across multiple Teslas becomes possible through Tesla Profile cloud support.
Key features worth configuring immediately:
- Easy entry automatically repositions the seat and wheel for getting in and out
- Linked keys trigger automatic profile loading as you approach the driver’s door
- Phone keys support the same linking process as physical keys
- Cloud sync eliminates manual readjustment across shared or multiple vehicles
One profile, linked correctly, makes every session feel like the car was waiting for you.
What’s New in the Latest Model 3 Software Update
The headlining additions worth your attention: Comfort braking adjusts deceleration feel for a smoother, less abrupt stop in stop-and-go traffic, and Grok integration brings AI-assisted functions directly into the vehicle experience (think smarter voice interaction, not a gimmick).
The 3D Supercharger map also gets improvements, and driver profiles are now visible through the Tesla app. Some builds carry undocumented changes — worth monitoring owner forums after installation.
How to Read Tesla Software Release Notes on Your Screen
Once your Model 3 finishes a software update, the release notes appear automatically on the touchscreen — read them immediately, because that’s your clearest window into exactly what changed on your specific build. If you miss that prompt, you can pull them back up anytime by accessing Controls > Software, where the current version number also sits (useful for confirming which update branch you’re actually running).
Keep in mind that Tesla’s notes summarize major changes rather than cataloging every under-the-hood adjustment, so a line reading “minor fixes” can quietly mask real behavioral shifts in Autopilot, charging logic, or regional compliance settings.
Locating Software Release Notes
Every Tesla software update ships with release notes baked right into the touchscreen — tap the car icon in the bottom-left corner of the main display, steer to the Software section, and you’ll find the release notes sitting alongside your current version number.
In-car release notes update automatically post-installation, and app notifications through the Tesla mobile app (version 4.15.0 or later) mirror that same information on your phone.
A few things worth knowing:
- Release notes cover new features, bug fixes, and behavior changes
- The Tesla app requires software version 2022.40+ for full release notes support
- Blank notes after an update are temporary — exit the car, re-enter, and check again
- Third-party trackers like Tesla-info compile regional release note histories for cross-referencing
Reading Version Update Details
After an update finishes installing, Tesla drops the release notes directly onto your touchscreen — don’t skip them. These notes aren’t filler; they cover new features, functional changes to existing systems, bug fixes, and occasionally critical safety instructions tied to that specific build.
Release note clarity matters here because content varies by model, market region, and software version, so what your neighbor’s Model 3 received may differ entirely from yours.
For update verification, cross-reference what you’re reading against your current software version listed under Controls → Software. Some updates display only “Minor Fixes” (Tesla’s favorite non-answer), which means background engineering changes weren’t made public.
Treat every release note page as a version-specific addendum to your owner’s manual — revisit it anytime a new feature’s behavior seems unclear after driving.
Hidden Software Tricks and Easter Eggs in the Model 3
Tesla’s software layer runs deeper than most owners ever bother to dig into, and the Model 3 rewards curiosity with a surprising collection of shortcuts, voice-command quirks, and interface tricks that never make it into the standard documentation. Voice Easter eggs and Hidden Diagnostics sit buried inside menus most owners scroll past daily.
- Say “open butthole” or “close butthole” to trigger the charge port — Tesla’s most documented voice Easter egg
- Access the hidden service menu for sensor checks, diagnostics, and part testing
- Switch your battery display between percentage and estimated range inside Settings
- Drag-and-drop quick controls onto the bottom bar, pinning seat heaters, wipers, or defrosters for instant access
Dig once, and you’ll wonder what else you’ve been missing.
Wi-Fi Setup, Network Strength, and Over-the-Air Updates
Tap the connectivity icon in the upper right corner of your touchscreen to pull up available networks, enter your password, and you’re done — the Model 3 stores those credentials indefinitely and reconnects automatically whenever you’re back in range.
Keep your car within 20 feet of your router for three to four signal bars, which matters more than you’d think once you realize Wi-Fi downloads software updates dramatically faster than the LTE fallback connection. Tesla pushes over-the-air updates silently in the background, so parking overnight in Wi-Fi range means you’ll wake up to new features without ever touching a USB drive or visiting a service center.
Connecting to Wi-Fi
Wi-Fi is almost always your Model 3‘s fastest and most reliable data pipeline — cellular is fine, but a solid home network will consistently outperform it, especially in areas where LTE coverage is patchy or nonexistent. Head to your Wi-Fi settings screen, select your network, enter credentials, and tap Confirm. Your Model 3 stores those details permanently.
- Auto-reconnection kicks in whenever a saved network is in range — no manual intervention required
- 5GHz bands are supported (region-dependent), providing faster throughput than 2.4GHz
- Wi-Fi security: WPA2-protected networks connect cleanly; captive portal networks (hotels, public hotspots) are unsupported
- Hotspot troubleshooting: if your phone tether drops, check carrier tethering restrictions and confirm the hotspot isn’t broadcasting a captive portal login page
Over-the-Air Updates
Over-the-air updates are how Tesla keeps your Model 3 current without you ever visiting a service center — software fixes, new features, and map refreshes all arrive silently while the car sits parked. Tesla strongly prefers Wi-Fi over cellular for these downloads; the bandwidth difference is substantial enough that cellular delivery feels genuinely painful by comparison.
For reliable Wi‑Fi maintenance, keep your home network credentials saved and your car parked within range nightly. Update scheduling happens automatically once a stable connection is confirmed, though you’ll receive a touchscreen notification before installation begins. Avoid captive portal networks (those hotel lobby login pages) — the Model 3 won’t authenticate through them.
Tesla Service Centers maintain dedicated Wi-Fi networks that handle service-specific updates automatically, which is a thoughtful touch.
RWD vs. AWD vs. Performance Model 3: Which Should You Own?
Choosing between the RWD, AWD Long Range, and Performance Model 3 isn’t just a budget decision — it’s a drivetrain philosophy. Each variant suits a genuinely different owner profile.
- RWD: Best efficiency (~346-mile range), lowest ownership costs, ideal for commuters
- AWD Long Range: ~341-mile range with serious winter traction capability and 4.2-second 0–60
- Performance: 2.9-second 0–60, 162-mph top speed — but expect higher tire wear
- Key tradeoff: RWD saves money long-term; Performance costs more everywhere
You’re fundamentally choosing between frugality, balance, or outright speed. RWD keeps ownership costs minimal.
AWD Long Range handles winter traction without sacrificing range.
Performance does everything faster — including draining your wallet. Pick the philosophy that matches your actual driving, not your fantasy driving.
Understanding Your Model 3 Suspension: What the Specs Mean for Driving

Most people treat suspension as an afterthought — the invisible system between them and the road — but the Model 3’s chassis architectonics is debatably where Tesla’s engineering gets most interesting.
Up front, you’ve got a double wishbone setup with virtual steer axis geometry, which keeps your steering precise under load. Out back, an independent multi-link design handles vertical compliance without sacrificing lateral control. Both ends run twin-tube shock absorbers, and Performance models add responsive damping calibration that adjusts in real-time through Standard and Sport modes.
The 82 kWh battery pack‘s low mounting position drops the center of gravity dramatically, letting both suspension systems work at their mechanical advantage. The result isn’t accidental — it’s engineered ride dynamics built around physics, not marketing.
Autopilot vs. Full Self-Driving: Feature Breakdown for New Owners
Tesla’s chassis engineering puts the Model 3 in your hands with extraordinary mechanical precision — but what you do with those hands matters, because the software stack sitting above all that hardware is where ownership gets genuinely complicated.
Tesla hands you mechanical precision — what you build on top of it is where the real ownership story begins.
Three tiers exist, and confusing them carries real consequences:
- Basic Autopilot handles lane-centering and speed — highway-focused, no extras
- Enhanced Autopilot adds automatic lane changes, Autopark, and Summon
- Full Self-Driving introduces Urban Autosteer and traffic-control recognition (intersections included)
- Regulatory clarity remains critical — FSD is still supervised driving despite the name
Autopilot limitations are non-negotiable. Driver supervision isn’t optional phrasing buried in terms and conditions — it’s the legal and functional reality of every tier, regardless of what the marketing suggests.
Speed Limit Mode: How to Enable It and What the 3 MPH Buffer Means
Speed Limit Mode locks your Model 3’s top speed to anywhere between 50 and 90 mph, automatically drops acceleration to Chill mode, and requires a 4-digit PIN to enable, disable, or adjust — making it a legitimate safeguard for teen drivers, valet handoffs, or anyone else borrowing your keys.
You’ll set it up through Controls > Safety > Speed Limit Mode on the touchscreen (while in Park), or remotely through the Tesla app under Controls or Security.
Here’s the catch though: the mode isn’t a hard governor, meaning downhill grades and momentum can push your actual speed roughly 3 mph past the set limit, so treat the chosen number as a strong ceiling rather than an absolute one.
Enabling Speed Limit Mode
Enabling Speed Limit Mode takes about ninety seconds and requires the car to be in Park before you can configure anything — Tesla won’t let you set a speed cap while the vehicle is rolling, which is fair enough.
- Access via Controls > Safety > Speed Limit Mode on the touchscreen
- Create a 4-digit PIN (you’ll need this every time you toggle the mode)
- Set your speed between 50–90 mph using the on-screen controls
- Enable app alerts to receive notifications when the driver approaches your chosen limit
Once active, acceleration automatically drops to Chill mode — useful for teen drivers who don’t need launch-control enthusiasm.
Forgot your PIN? Your Tesla account credentials override it cleanly.
Understanding the 3 MPH Buffer
With Speed Limit Mode active and your PIN locked in, there’s one more detail worth grasping before you hand over the keys — the 3 mph buffer. Think of it as pre-limit psychology built into the system. As your speed approaches within 3 mph of your configured cap, Tesla triggers a chime, displays a touchscreen message, and pushes a mobile app notification. That’s buffer calibration doing its job — giving you a reaction window before the hard ceiling hits.
The buffer isn’t a second limit; it’s advance notice. On flat roads, it works beautifully. On steep descents, momentum can still push you past the cap despite the warning. The system aids awareness; it doesn’t replace active throttle management on your part.
Regenerative Braking Settings: One-Pedal Driving Explained
How much of your braking can a Model 3 actually handle without touching the brake pedal? In urban driving, the answer surprises most new owners. Regen tuning lives in your touchscreen’s driving controls, offering two settings: Standard and Low (sometimes labeled Reduced).
- Standard maximizes energy feedback, enabling genuine one-pedal driving through city traffic
- Low reduces lift-off deceleration, mimicking conventional pedal feel
- Cold or fully charged batteries temporarily limit regen strength automatically
- Enabling Apply Brakes When Regenerative Braking is Limitedkeeps deceleration consistent using friction brakes as backup
Standard regen recovers kinetic energy aggressively while slowing you efficiently. Low lets you coast longer but sacrifices recovery. Your driving environment, not personal preference, should honestly dictate which setting actually serves you better.
LFP vs. NCA Battery: What Daily Owners Actually Notice
Whether your Model 3 runs an LFP (lithium iron phosphate) pack or an NCA (nickel cobalt aluminum) pack shapes nearly every decision you’ll make as a daily driver—from how high you set your charge limit each night to how confidently you plan winter trips.
LFP owners charge to 100% routinely for calibration purposes, netting roughly 272 EPA miles, while NCA Long Range owners cap at 90% and still walk away with around 322 miles of usable morning range, because higher energy density does the heavy lifting even at a restricted charge ceiling.
Cold weather exposes the gap further—LFP packs precondition more slowly, accept regenerative braking reluctantly when temperatures drop, and deliver less predictable power output, whereas NCA packs handle winter driving with noticeably more composure.
Range Differences Daily Drivers Notice
The battery chemistry Tesla installs under your Model 3 quietly shapes every mile you drive, and most owners don’t fully register the difference until a long trip forces the issue.
LFP variants typically deliver around 272 EPA miles at 100%, while NCA Long Range packs push roughly 322 miles at 90%. That gap directly affects your daily buffer and charging frequency.
- LFP suits commuting well—cheaper, more cycle-resilient, and tolerant of routine full charges
- NCA’s higher energy density means fewer stops on 200+ mile days
- A 260-mile LFP pack at 100% can practically match a 320-mile NCA pack at 80%
- Long-term, LFP holds 89–93% health past 100k miles versus NCA’s 71–83%
Charging Habits That Actually Matter
Charging discipline quietly separates casual Tesla owners from those who actually grasp what’s happening inside the pack. LFP charging to 100% daily isn’t reckless — Tesla actually recommends it for calibration. NCA longevity, however, depends heavily on staying within 20%–90% routinely.
| Factor | LFP | NCA |
|---|---|---|
| Daily charge target | 100% recommended | 80%–90% preferred |
| Cycle life | 2,000–5,000 cycles | 800–2,500 cycles |
| High-SoC sensitivity | Low | High |
NCA rewards deliberate habits. Park it near 100% overnight repeatedly, and degradation accelerates measurably. LFP forgives you. That difference reshapes your entire ownership routine — NCA owners plan departure targets; LFP owners simply plug in. Chemistry determines discipline, and discipline determines how much capacity you’re actually sitting on at 80,000 miles.
Cold Weather Performance Compared
Both chemistries suffer in cold weather — that part’s unavoidable — but LFP and NCA don’t suffer equally, and the gap becomes obvious the moment temperatures drop below freezing. NCA packs retain stronger cold start behavior, deliver more consistent regen, and accept Supercharger power faster without extensive preconditioning.
LFP packs, meanwhile, feel noticeably sluggish until warmed up.
What daily owners actually notice:
- Winter charging: Cold LFP can start a Supercharger session painfully slow, ramping up only as pack temperature climbs
- Regen reduction: LFP delivers noticeably less one-pedal braking on cold downhill runs
- Short trip planning: Repeated cold starts prevent full warmup cycles, compounding range loss
- Range estimates: At 32°F, expect roughly 27% loss; near 9°F, closer to 40%
What Owners Can Actually Change vs. What Tesla Locks Down
Owning a Model 3 means steering a clear but often misunderstood boundary between what’s yours to modify and what Tesla keeps firmly under its own control.
Aftermarket wheels, vinyl wraps, suspension upgrades, brake kits, and interior cosmetic changes are genuinely yours to examine. Tesla doesn’t lock down physical hardware you can reach with a wrench or an Allen key.
Software locks, however, are a different story entirely. Autopilot behavior, Full Self-Driving capability, Pilot Assist on Autopilot, and even certain charging parameters live inside Tesla’s ecosystem, controlled remotely through over-the-air updates.
Tesla can push a software change overnight that subtly alters how your car behaves. You own the machine; Tesla effectively co-owns its brain. Grasping that distinction saves you money, frustration, and a few misplaced expectations.
LFP vs. NCA Battery Degradation: What Actually Happens Over Time
Regarding long-term battery health, the chemistry under your floor matters more than almost any other single factor. LFP’s phosphate stability gives it a structural edge under repeated cycling, while NCA degrades faster under heavy use.
The chemistry beneath your feet shapes your battery’s future more than almost anything else.
- LFP cells sustain roughly 5,000 cycles vs. NCA’s 1,000–1,500
- Real-world data shows LFP health at 89–93%, NCA at 71–83%
- Calendar aging affects both chemistries regardless of mileage
- LFP’s larger pack means fewer charge events per kilometer driven
NCA isn’t finished, though. Managed carefully (low storage SOC, moderate temperatures), it ages slowly. Calendar aging hits both equally hard when the car sits unused. Your driving intensity, local climate, and charging habits ultimately determine which chemistry serves your ownership better.
Should You Charge LFP to 100% Every Day?
The short answer is yes — Tesla actually recommends charging your LFP Model 3 to 100% for daily use, which runs counter to conventional lithium-ion wisdom that’s been drilled into EV owners for years. LFP battery chemistry operates at more stable voltages, making full charges far less punishing than NCA alternatives. Your daily rituals shouldn’t involve charging psychology battles over stopping at 80%.
| Charging Habit | LFP Impact |
|---|---|
| Daily 100% | Minimal degradation |
| Daily 80% limit | Slight longevity gain |
| Below 20% regularly | Permanent cell damage risk |
That said, keeping charge between 20–80% still edges out daily 100% for pure longevity. Reserve full charges for long trips when range anxiety actually justifies it.
Battery Preconditioning and Why It Matters in Cold Weather
Charging habits only get you so far if your battery’s sitting at -10°C when you pull out of the driveway. Cold starting impacts are real — lithium-ion cells slow their chemical reactions dramatically below freezing, which limits power output, strangled regen, and slower DC charging acceptance.
Cold batteries don’t lie — lithium-ion cells lose chemistry below freezing, and your range pays the price.
Preheat schedules fix this by warming the pack before you even open the door.
Use the Tesla app or Scheduled Departure to activate preconditioning 30–45 minutes early. Here’s what you actually gain:
- Faster Supercharger acceptance (cold packs throttle input current)
- Restored regenerative braking availability
- Reduced cabin heating drain on the main pack
- Better usable range from the first kilometre
Warm battery, fewer compromises. Simple physics.
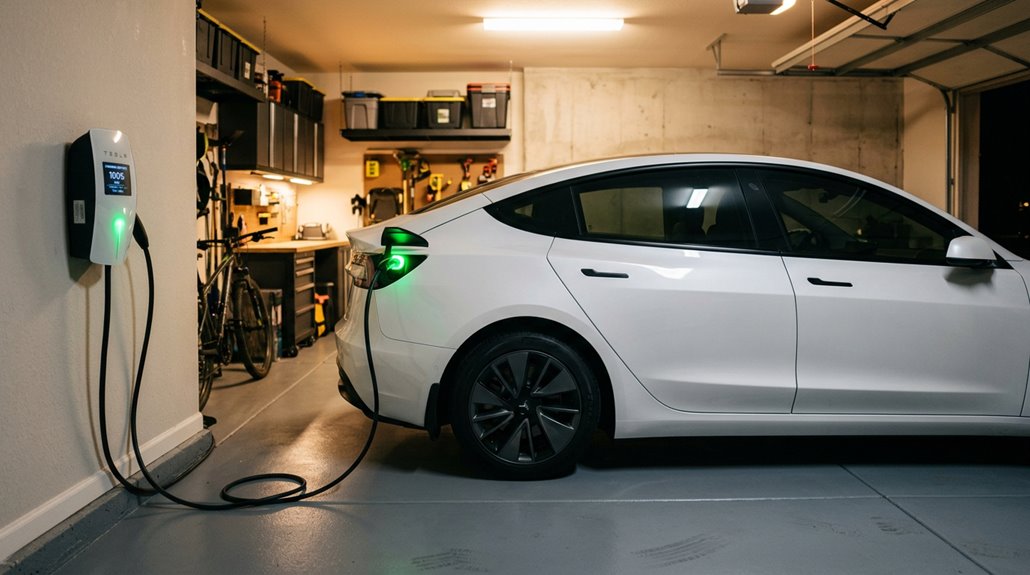
How to Read Charging Status and Battery Info on the Model 3 Screen
Once you plug in, the Model 3 doesn’t leave you guessing — the charge status display appears automatically at the top of the car status screen the moment the charge port door opens.
You’ll see charging power (in kilowatts), available current, range gained, and battery estimates showing either driving distance or percentage depending on your energy settings. Time remaining updates continuously as a live projection.
The charge indicators on the port itself tell the same story visually: blinking green means charging is active, solid green means you’re done, amber means the connector isn’t seated properly, and red means something’s genuinely wrong — check your touchscreen alert immediately.
The mobile app mirrors all of this, so you can monitor progress without returning to the vehicle.
Supercharging vs. Home Charging: Speed, Cost, and Which to Use
- Daily commuting: Level 2 overnight wins every time
- Road trips: Supercharging is non-negotiable for range recovery
- Cost control: Home charging keeps annual expenses predictably low
- Charging etiquette: Don’t Supercharge to 100% routinely — tapering above 80% wastes time and stresses cells
Match the tool to the task, and you’ll streamline both your wallet and your battery’s long-term health.
How to Maximize Range and Slow Battery Degradation Daily
Stretching every mile out of your Model 3 while keeping the battery healthy long-term isn’t about obsessing over a single habit — it’s about stacking several small, deliberate decisions that compound over time. Gentle driving matters enormously: aggressive acceleration burns energy fast and stresses cell chemistry. Keep daily charging at 80%, charging back up around 20–30%. Precondition while plugged in — not on battery power. Disable Sentry Mode and Cabin Overheat Protection when unnecessary.
| Habit | Range Impact | Battery Preservation |
|---|---|---|
| Charging to 80% daily | Neutral | High |
| Maintaining 70 mph cruising | +10–15% range | Moderate |
| Preconditioning while plugged in | Neutral | High |
| Disabling Sentry Mode at rest | Saves ~1 mi/hr idle drain | Moderate |
Model 3 Mobile App Features Worth Using Every Day
Most Tesla owners download the app, use it twice, and forget it exists — which is a shame, because the Model 3’s companion app is genuinely one of the more capable remote-control interfaces in the industry.
Most Tesla owners download the app, use it twice, and never open it again — which is a genuine waste.
Remote preconditioning alone justifies keeping it open daily, warming your cabin and battery before you’ve left the house. Charge scheduling lets you programme off-peak charging without touching the car.
Here’s what’s actually worth using every day:
- Remote preconditioning — conditions the battery for performance and range simultaneously
- Charge scheduling — set departure times and let the car manage the rest
- Sentry Mode monitoring — drains roughly 10–12% per 24 hours, so check selectively
- Smart Summon — genuinely useful in car parks, surprisingly reliable
How to Locate Your Parked Model 3 Using the App
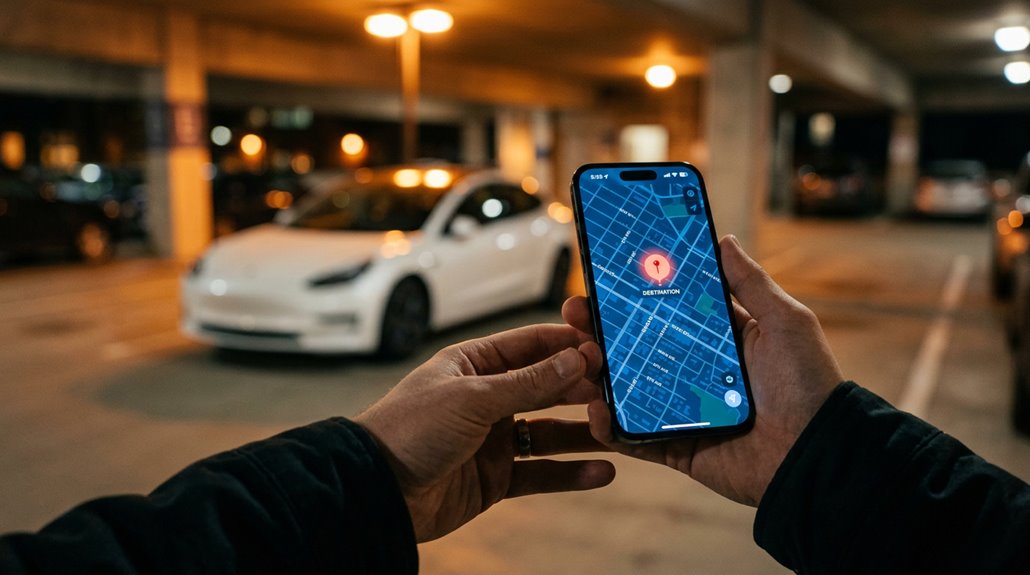
Losing your car in a multi-storey car park is one of those low-grade humiliations modern technology should’ve eliminated by now — and with the Model 3, it largely has.
Open the Tesla app, tap Location, and you’ll see your car pinned on a live map. Tap the right-arrow icon to push that Location straight to your phone’s default maps app for turn-by-turn wayfinding. App version v4.51.5 introduced a dedicated Vehicle Locator, which uses a responsive compass arrow on the home screen, updating in real time as you move and displaying distance in feet or meters.
Switch to satellite view (globe icon) to identify parking structures visually. In GPS-hostile garages, use horn or light-flash as a backup — the app’s precision can soften in dense concrete environments.
Remote Start, Valet Mode, and Security Lock Settings
- Valet Mode caps speed and limits feature access, keeping curious hands off your personal data
- Security Lock prevents unauthorized configuration changes without your PIN
- Guest access enables remote startup without transferring your key card
- The two-minute timeout isn’t a bug — it’s deliberate theft deterrence
Summon and Smart Summon: How They Work in Real Parking Lots
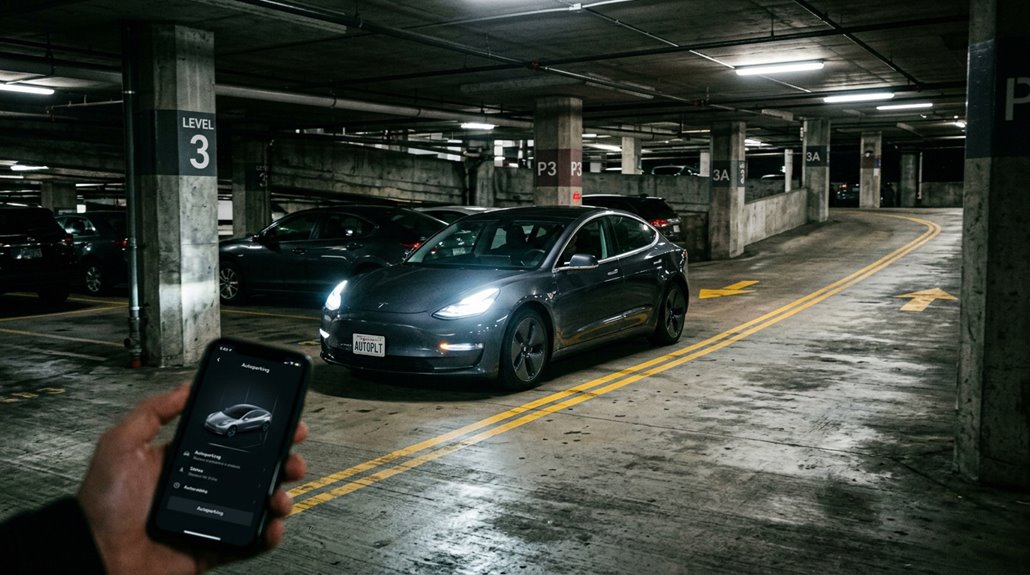
Parking lots are where Summon earns its keep — or exposes its limits, depending on how you use it. Basic Summon moves your Model 3 in a straight line, up to 12 meters, into or out of a space. Release the button, and it stops. Simple parking behavior, executed remotely through the Tesla app.
Smart Summon goes further, steering toward your GPS position while handling obstacle handling duties automatically — stopping when it detects parked cars or pedestrians crossing its path. It won’t reroute aggressively; it moves cautiously, sometimes frustratingly so. It’s strictly intended for private property (parking lots, driveways), not public roads.
Real-world use confirms it handles predictable layouts well but struggles with crowded lots, one-way lanes, and ambiguous intersections. Manage your expectations accordingly.
Tire Pressures, Rotation Intervals, and What the TPMS Tells You
Tire pressure is one of those details that quietly affects everything — range, handling, wear rate, and ride comfort — yet most owners check it far less often than they should. Always measure cold pressure before driving, or after the car’s sat long enough to stabilize. Tesla’s door jamb label is your reference point, not the tire sidewall.
- Cold pressure targets typically sit around 42–45 psi depending on your variant
- Your touchscreen displays live per-wheel readings (switchable between PSI and Bar)
- Soft TPMS warnings trigger around mid-30s psi; hard warnings hit at 25 psi
- Rotation frequency should land around every 6,250 miles to prevent uneven wear
TPMS is a monitoring tool, not a substitute for an accurate gauge.
Cabin Air Filter, Wiper Blades, and DIY Maintenance Limits
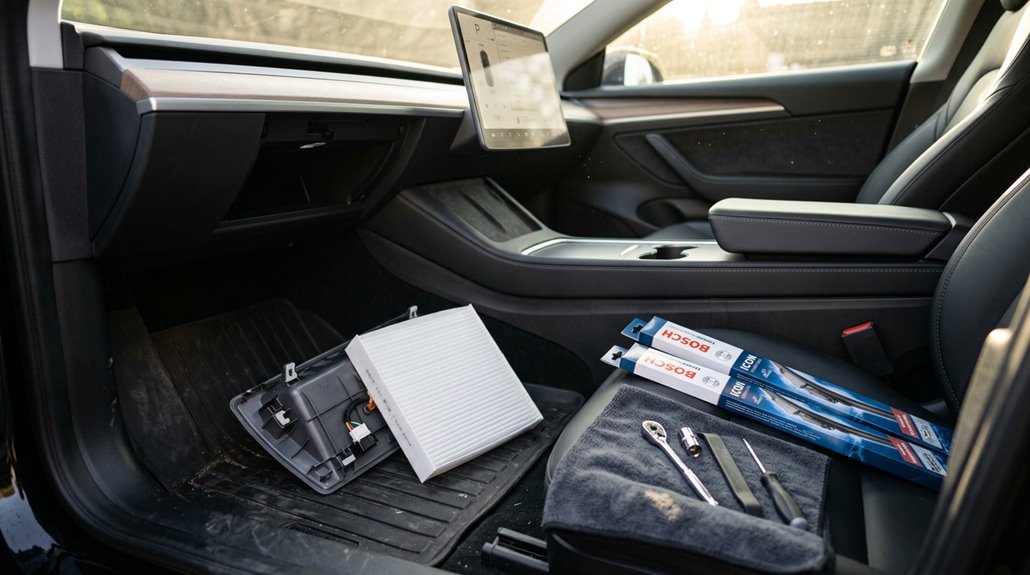
Unlike the tire pressure system that alerts you when something’s wrong, the cabin air filter operates in complete silence — it either does its job or quietly stops doing it, and the car won’t tell you which.
Tesla recommends a two-year filter lifespan under standard conditions, dropping to annual replacement in high-pollution markets like China.
High-mileage drivers should target 10,000-mile intervals instead.
Your Model 3 runs two filters simultaneously, both requiring replacement at once.
The DIY process takes roughly 20 minutes — a T20 Torx screwdriver, a trim tool, and patience gets you there.
Install new filters with arrows pointing rearward.
Blade replacement follows a similarly unglamorous but non-negotiable schedule.
Neither job requires a service center, and neither should wait.
Model 3 Frunk and Trunk: Storage Dimensions and Hidden Space
Most people buying a Tesla Model 3 think of it as a sedan and mentally halve its cargo potential before they’ve even opened a door — that’s a mistake.
Most buyers underestimate the Tesla Model 3 before ever popping a door handle — and that assumption costs them.
You’re actually working with 682 L (24.1 cu ft) total when you combine every available zone.
- Frunk: 88 L, roughly 72 cm wide × 35 cm deep × 23 cm high (Highland), with a 50 kg weight limit
- Rear trunk: 594 L behind the second row, approximately 37 inches between wheel covers
- Sub-trunk: underfloor hidden compartments running ~63 cm wide, 29 cm deep — perfect frunk organization overflow
- Practical split: keep clean items up front, bulky or dirty cargo in the rear
Those hidden compartments alone swallow an entire charging cable kit without touching main cargo space.
Towing Capacity, Roof Racks, and Cargo Limits on Model 3
The Model 3 can tow — just don’t expect it to haul a horse trailer across three states without serious Supercharger math. North American trims handle up to 2,200 lbs (998 kg) with Tesla’s official hitch package. Aero trailers reduce range loss markedly versus boxy enclosed units, which routinely cut range 40–50% at highway speeds. Stay disciplined on tongue weight (100 kg maximum).
| Spec | Limit |
|---|---|
| Tow capacity (with brakes) | 1,000 kg / 2,205 lbs |
| Tow capacity (no brakes) | 750 kg / 1,653 lbs |
| Maximum tongue weight | 100 kg / 220 lbs |
| Roof load rating | Per model-year manual |
Keep hitch maintenance current — inspect the receiver, wiring connector, and mounting hardware before every towing season.
How to Contact Tesla Support Directly From the Touchscreen
Once you’ve sorted your tow hitch setup and cargo math, it’s worth knowing how Tesla handles the other side of ownership — getting actual help when something goes wrong. Your Tesla app is the primary hub for touchscreen support, letting you skip phone queues entirely.
- Schedule service appointments directly through the app, no call required
- Use in-car chat via the app’s support section for common issue resolution
- Call 1-877-798-3752 (Monday–Saturday, 4 AM–9 PM PT) for vehicle-specific inquiries
- Access live chat through Tesla’s desktop site (bottom-right corner) — mobile doesn’t support it yet
Hold times can exceed 40 minutes by phone, so app-based contact typically wins for speed. Know your options before something actually breaks.
Roadside Assistance: What’s Covered and How to Reach It Fast
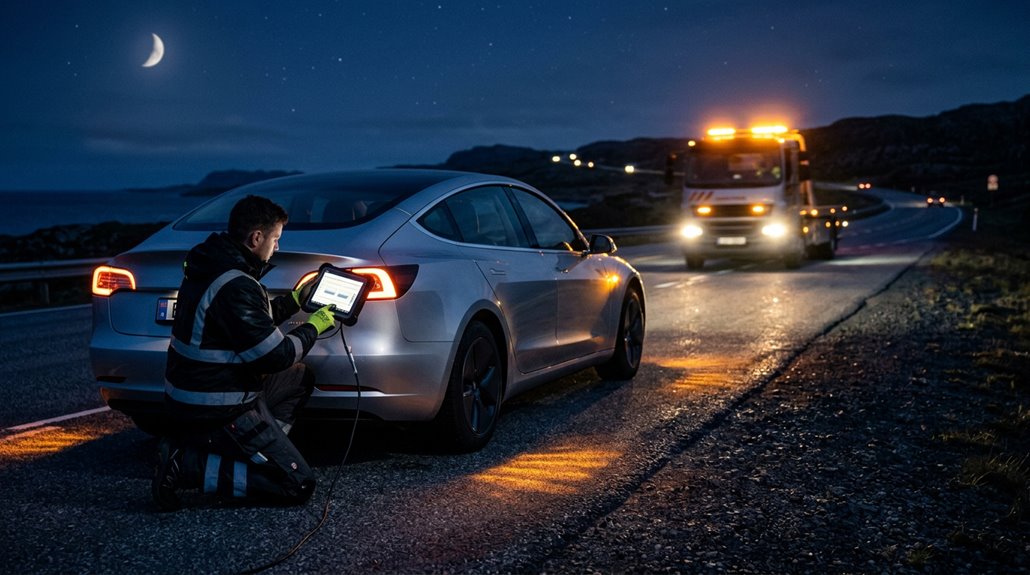
Roadside assistance comes baked into your Model 3’s New Vehicle Limited Warranty for 4 years or 50,000 miles — whichever arrives first — and it’s more capable than most owners realise until they actually need it.
Towing coverage extends up to 500 miles at no cost following a covered mechanical breakdown, which handles most urban recovery scenarios comfortably.
Flat tire assistance covers transport within 25 miles to the nearest service center, though tire replacement costs remain yours.
Keep basic emergency supplies in the frunk regardless — roadside etiquette still applies even with rapid response on call.
Reach Tesla 24/7 at 877-798-3752, or trigger a request directly through the app’s home screen.
Winching, charge depletion bailouts, and unauthorised third-party repairs aren’t covered, so know the limits before you need them.
Tesla Service Mode vs. What Owners Can Access Themselves
Here’s what you can actually access:
- Vehicle information panel — hardware specs and software build details
- Service Alerts — diagnostic fault messages worth screenshot-ing before any appointment
- Software Reinstall tools — local recovery options when things go sideways
- Touch Check diagnostics — useful for identifying unresponsive screen zones
Service Limitations are real here. Technician Tools go considerably deeper — Service Mode Plus requires professional subscription access entirely separate from what you’re seeing.