Tesla’s touchscreen isn’t just a pretty interface—it’s the entire brain of your vehicle. And the hardware generation running behind that glass quietly determines which features you’ll *actually* get, regardless of what Tesla’s marketing promises. Most owners never realize their MCU generation is silently dictating their experience. The gap between MCU1 and MCU3 isn’t a minor footnote; it’s the difference between a capable car and a genuinely powerful one. What’s really running your Tesla might surprise you.
What Is Tesla’s Infotainment System and Why It’s Different?
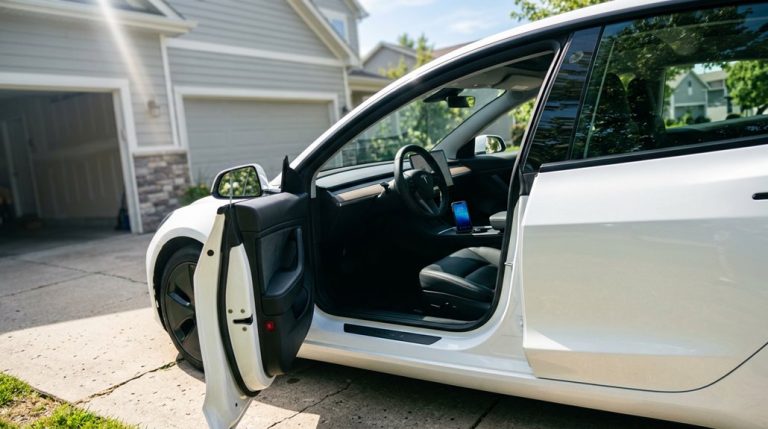
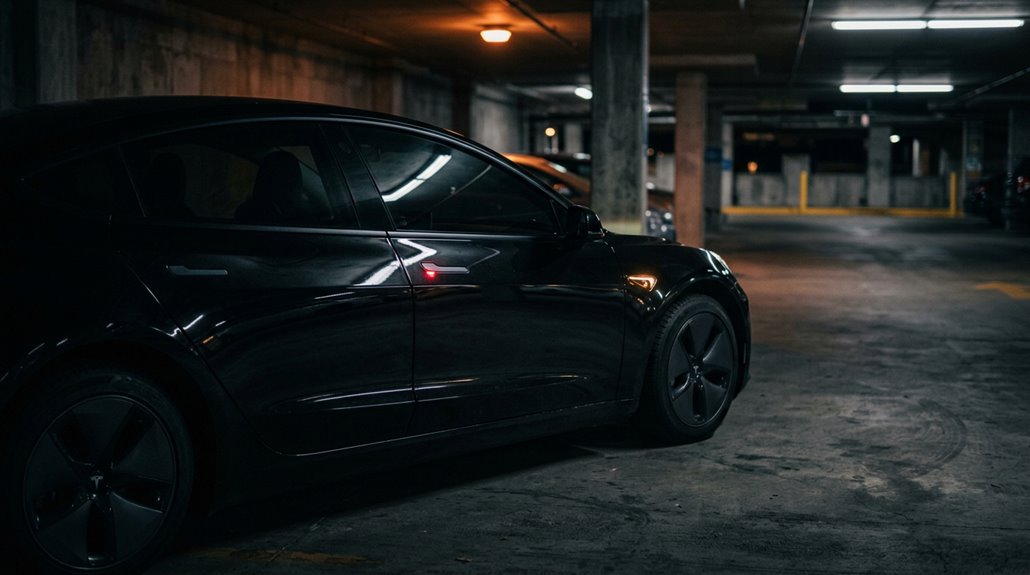
Tesla’s infotainment system throws out the traditional automotive playbook entirely — no physical knobs for climate, no dedicated instrument cluster, no layered menu systems borrowed from 2005 head unit design.
Instead, you’re working with a software-first platform built around a central touchscreen (15 inches on Model 3 and Model Y) that consolidates routing, media, vehicle controls, and real-time driving data into one unified interface.
This Touchscreen Philosophy sounds clean on paper, and largely it is.
But it introduces real UX Tradeoffs — muscle memory you built over years of tactile button use doesn’t transfer here.
Tesla’s approach prioritizes software agility over physical permanence, meaning features update over-the-air rather than requiring dealer visits.
You’re effectively driving a networked computer that happens to have wheels. The system is powered by an AMD Ryzen chip, delivering the fast performance needed to keep every function of that unified interface running smoothly.
The touchscreen also gives you direct access to practical vehicle data, such as the ability to check tyre pressure without ever stepping outside to inspect your wheels manually.
MCU1 vs MCU2 vs MCU3: What Each Generation Actually Delivers
Comprehending why Tesla’s infotainment feels faster or slower in one car versus another starts with knowing which Media Control Unit (MCU) is sitting behind that screen.
MCU1 runs on NVIDIA Tegra 3 hardware with 8GB eMMC storage — hardware differences here aren’t subtle, they’re generational. You’ll feel it immediately in map loading and UI lag.
MCU1’s aging Tegra 3 chip and 8GB storage aren’t a minor setback — they’re a generational gap you’ll feel every drive.
MCU2 upgrades to an Intel Atom E8000-series processor with 64GB storage, enabling video streaming and Caraoke while dramatically cutting software limitations.
MCU3 switches to AMD Ryzen, providing the fastest app loading, richest 3D visualizations, and the most complete feature set Tesla currently ships.
Think of it this way: MCU1 is a flip phone, MCU2 is a smartphone, and MCU3 is the smartphone with the good processor. New features are designed for MCU3 first, then backported to older units when technically possible.
How AMD Ryzen Changed Tesla Infotainment Performance
Swapping Intel Atom for AMD Ryzen wasn’t a spec-sheet exercise — it rewired how the entire infotainment stack behaves under load. The Atom E3950 was competent, barely. Ryzen Embedded hardware, paired with an RDNA 2 GPU, delivers up to 10 teraflops of compute power, which explains why graphics latency dropped dramatically and map rendering now feels instantaneous rather than apologetic.
App launch times more than doubled in speed. Browser scrolling on heavy sites actually works. Tesla Theater runs without the visual stutter you’d previously accepted as normal.
The power tradeoffs are real, though. One Model 3 configuration shed 22 km of WLTP range (roughly 3.6%) after the hardware shift. You’re essentially trading a small efficiency margin for an infotainment system that finally behaves like modern computing hardware. The discrete RDNA 2-based GPU activates specifically when running AAA games, separating demanding gaming workloads from standard infotainment tasks.
Tesla Infotainment Differences Across Model S, 3, X, and Y
Not every Tesla runs the same infotainment stack, and the hardware generation under your dashboard determines which features you actually get. Model S and X owners work with a dual-screen architecture — a 17-inch center display plus a separate driver-facing instrument cluster — while Model 3 and Y consolidate everything onto a single 15.4-inch, 1920×1200 touchscreen (which means your speed, wayfinding, and climate controls share one pane of glass).
Feature availability follows that hardware split closely, so an AMD Ryzen-equipped Model S pulling a rear-cabin touchscreen feed is operating in a fundamentally different software environment than a base Model 3 running the same firmware version. Model 3 and Y use a single integrated ICE cluster that combines both infotainment and Autopilot hardware into one unit, meaning any hardware upgrade requires replacing both systems simultaneously.
Hardware Generations By Model
Tesla’s four main models don’t share a single infotainment hardware generation—they’re spread across three distinct computing platforms, and knowing which platform your car runs changes everything from what features are available to whether an upgrade path exists. The MCU lineage isn’t uniform across the lineup. Model mapping reveals sharp chipset shifts depending on launch year and refresh status, and those gaps directly determine your upgrade windows.
| Model | MCU Generations Used |
|---|---|
| Model S | MCU1 (Tegra 3), MCU2 (Intel Atom), MCU3/Z (AMD Ryzen) |
| Model X | MCU1, MCU2, MCU3/Z |
| Model 3 | MCU2, HW4-era (newer builds) |
| Model Y | MCU2, HW4-era (newer builds) |
S and X carry the widest hardware variation. Model 3 and Y entered production after the Tegra era ended—cleaner histories, fewer surprises. MCU3, available in refreshed Model S and X since December 2021, uses an AMD Ryzen chip that unlocks AAA gaming titles like Cyberpunk 2077 directly from the touchscreen.
Display Size And Layout
Hardware generation tells you what’s running under the hood—display configuration tells you what you’re actually staring at every time you sit down.
Model S and X run 17-inch panoramic center screens at 2200×1300 pixels, paired with dedicated 12.3-inch instrument clusters (1920×1200). That dual-screen setup directly improves screen ergonomics by separating driving data from infotainment controls.
Model 3 and Y consolidate everything onto a single 15-inch horizontal display at 1920×1200, eliminating the instrument cluster entirely. This streamlined approach reflects a minimalist design philosophy that keeps the interior clean and modern.
Newer Model S, X, and refreshed Model 3 add 8-inch passenger displays (1440×900, 16:10) supporting media, climate, and games—meaning rear occupants aren’t completely ignored.
The Cybertruck pushes further with an 18.5-inch front display.
Bigger numbers don’t automatically mean better; layout and resolution density determine actual usability.
Feature Availability Differences
Depending on which Tesla you’re driving, the infotainment experience isn’t just visually different—it’s structurally different at the hardware level.
Model S and X run dual-display architectures, splitting routing, media, and third-party apps across both the center screen and instrument cluster simultaneously.
Model 3 and Y consolidate everything into one touchscreen, which imposes real cluster limitations on multitasking depth. You’re not getting the same split-screen flexibility.
Hardware compatibility further complicates upgrades—Model S/X infotainment units swap independently from their Autopilot computers, while Model 3 HW 2.5-to-3.0 upgrades historically required replacing both units together.
Feature parity across Tesla’s lineup is uneven by design, not oversight. Some capabilities are locked to specific hardware generations and platforms, meaning your vehicle’s birth certificate determines what software features you’ll ever access. Tesla even produced a dedicated comparison chart to help sales staff and customers navigate feature differences across the Model S, 3, X, and Y lineup.
How Tesla’s Software-First Design Replaced Physical Buttons
When Tesla introduced the Model S, it pulled off something most automakers hadn’t dared to try: replacing a dashboard full of dedicated buttons, knobs, and stalks with a single 17-inch touchscreen running a unified software layer.
That one architectural decision cascaded into everything — climate, media, navigation, and vehicle settings all collapsed into a menu-driven interface where a software update, not a hardware redesign, could add or modify features overnight.
You’re fundamentally driving a computer that happens to have wheels, and Tesla’s bet was that most drivers would trade tactile muscle memory for a system that could get smarter while sitting in your garage.
The screen-first approach also set an industry-wide trend, with brands like Volkswagen, Rivian, and Ford soon stripping out physical controls in favor of large center displays across their own EV lineups.
Touchscreen Replaces Traditional Controls
Tesla pretty much threw out the automotive rulebook when it centered the Model S around a 17-inch touchscreen and reduced the entire physical dash to two buttons: hazard lights and glove compartment.
Every function traditional cars hardwired into dedicated knobs now lives inside layered software menus. That shift has real consequences for touch ergonomics and menu depth.
Here’s what moved behind glass:
- Climate control and fan speed
- Wayfinding and rear camera
- Panoramic roof adjustments
- Lighting and vehicle settings
The tradeoff is straightforward: fewer physical controls mean faster software redesigns without retooling hardware.
Model 3 and Model Y pushed this further, eliminating the instrument cluster entirely.
One 15.4-inch screen (1920×1200 resolution) now handles everything. Clean? Absolutely. A learning curve? Also yes. The Tesla Semi takes a different approach, mounting dual 15-inch screens on either side of the driver’s seat in place of a traditional instrument cluster.
Software-Driven Interface Evolution
What you’re actually driving in a Tesla isn’t a car with software bolted on—it’s a software platform that happens to move.
Tesla’s centralized computing architecture consolidates climate, route guidance, driver assistance, and vehicle settings into a single software-rendered environment. No distributed modules, no mechanical gauges locked into fixed layouts.
Context-aware displays shift their information hierarchy based on what you’re doing—parking triggers proximity overlays, highway driving surfaces Autopilot visualization, charging pulls up energy data automatically. The system reads operational state and adjusts accordingly.
Adaptive themes and configurable display layers mean Tesla can restructure your entire cabin interface through an OTA push without touching the hardware. What you saw on your screen at delivery isn’t necessarily what you’re running today—intentionally.
Tesla’s fleet learning infrastructure supports weekly OTA updates across more than 2 million vehicles, allowing software improvements to reach every car simultaneously without a service visit.
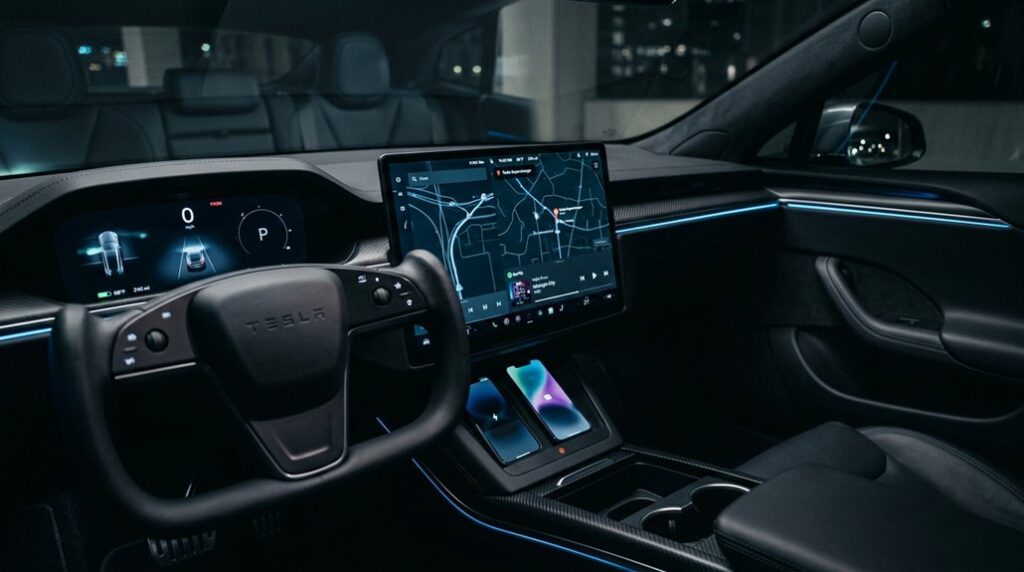
The Center Display as Tesla’s Primary Vehicle Control Hub
Strip away the stalks, knobs, and button clusters that define a traditional dashboard, and what’s left in a Tesla is a single touchscreen doing the work of all of them. No tactile feedback, no physical redundancy — just software making decisions your fingers used to make mechanically. That’s the trade-off, and it’s deliberate.
The display consolidates four operational layers:
- Vehicle controls — climate, lights, and drive mode selection
- Wayfinding — real-time routing, map orientation, and destination search
- Status monitoring — speed, door state, and live warnings
- Preference management — settings, shortcuts, and searchable options
Gesture guidance handles what buttons once did. You’re not driving a car with a screen bolted on — you’re operating a software platform that also moves. Third-party hardware like shortcut control units can supplement the touchscreen with four physical buttons that deliver eight functions through single and double presses.
Which Tesla Features Require Premium Connectivity?
Somewhere between “nice to have” and “you’ll notice it’s gone,” Premium Connectivity sits at $9.99 per month (or $99 annually) and gates a specific tier of cellular-dependent features behind a paywall. No data limits exist within the subscription itself, but drop it and several systems go quiet fast. Subscribers can verify their active status and expiration date directly from the vehicle by navigating to the Software menu.
| Feature Category | Requires Premium Connectivity? |
|---|---|
| Live camera (Sentry/Dog Mode app view) | Yes |
| Cabin entertainment (Netflix, YouTube) | Yes |
| Offline maps and basic route guidance | No |
| Live traffic visualization | Yes |
| OTA updates and phone pairing | No |
Wi-Fi workarounds recover most cabin entertainment functions. What you can’t recover without Premium Connectivity is live camera access remotely — that’s cellular-exclusive and non-negotiable.
What Tesla’s Major Software Updates Have Actually Added
Premium Connectivity determines what stays live over cellular, but the software underneath it’s what determines whether your car is worth connecting to at all.
Major OTA updates have reshaped Tesla vehicles from the inside out. Here’s what they’ve actually delivered:
- FSD behavioral changes — v14.2.2 introduced end-to-end neural routing impacts, altering braking curves and lane logic simultaneously
- Route planning intelligence — Automatic HOV routing and Speed Profiles created measurable driver behavior shifts without touching hardware
- Infotainment expansion — Grok with Route Commands turned voice input into an actual routing tool
- Safety pushes — Brake Confirm and OTA recall fixes arrived silently overnight
Your car’s capabilities genuinely compound with each release. Software isn’t maintenance here — it’s the product. As of mid-May 2026, 2026.14.6 has reached nearly 40% of the tracked fleet, making it the most widely distributed active update line.
How Over-the-Air Updates Work on Tesla Vehicles
When Tesla pushes an update to your car, it’s not emailing you a patch to manually apply — the vehicle pulls a firmware bundle through Wi-Fi or its built-in cellular connection and handles the rest on its own. Download happens silently in the background; you can keep driving. A green or orange arrow on the touchscreen confirms active bandwidth management is underway.
Once downloaded, a yellow clock icon appears — your cue to schedule or trigger installation immediately. Installation requires Park mode and suspends driving for roughly 15–30 minutes.
The real sophistication sits underneath: your gateway module distributes firmware to specific ECUs by hardware ID, all locally after the initial pull. Security implications are real here — Tesla encrypts these bundles through secure communication channels, keeping third-party injection effectively impossible. Major feature releases are commonly pushed about once a month, with smaller patches and bug fixes delivered in between.
How to Connect Your Tesla to Home Wi-Fi for OTA Downloads
That firmware bundle your Tesla just pulled down had to come from somewhere — and if you’re relying purely on cellular, you’re leaving speed and reliability on the table. Wi-Fi consistently outperforms LTE for large OTA payloads. Here’s how to lock it in properly:
Cellular gets the job done — but Wi-Fi is where large OTA updates actually belong.
- Head to Controls > Wi-Fi, select your network, enter credentials, and enable auto-connect.
- Prioritize your router placement — park within clean signal range, avoiding concrete walls that attenuate 5GHz frequencies.
- Skip the guest network entirely; Tesla needs stable, unrestricted bandwidth without portal interruptions.
- Disable band steering if your router merges 2.4GHz and 5GHz under one SSID — Tesla performs better with explicit band selection.
Strong signal strength means faster downloads and fewer interrupted installations. Simple math. If home Wi-Fi isn’t an option, phone hotspot or a Tesla service center network are reliable fallbacks for pulling down software updates.
How to Check Your Current Software Version and Update Status
You can find your installed software version by tapping Controls > Software on the center touchscreen, where the version string displays in a format like 2025.45.102 alongside release notes for that specific build.
Once you’re in that menu, the update status indicators do the heavy lifting for you — a green arrow at the top of the screen means an update has already downloaded automatically, a yellow download icon signals the vehicle isn’t on Wi-Fi mid-download, and a clock icon confirms the update is fully staged and ready to install.
The Tesla mobile app mirrors this information on the vehicle’s main page (with some layout variation depending on your app version and platform), and it’ll surface a dedicated Software Update section the moment a new build is queued for your car. Updates are rolled out in stages to a small percentage of vehicles first, allowing Tesla to gather feedback and identify issues before wider deployment.
Finding Your Software Version
Before you can meaningfully track updates or diagnose software behavior, you need to know exactly what build your car is running. Skip the guesswork — Tesla surfaces this through onboard diagnostics directly on the touchscreen.
- Tap Controls → Software to reveal your current firmware build string (formatted like 2025.45.102).
- The same screen links release notes tied to that exact version history entry.
- Your Tesla app syncs this data via app sync — scroll the main vehicle page to confirm the build matches.
- Hidden firmware details, including FSD stack versioning, sometimes appear alongside the primary build number.
That version string isn’t cosmetic — it’s your baseline for every troubleshooting conversation, update comparison, and feature-availability check you’ll ever run. You can also tap the release notes link displayed in the bottom area of the Tesla mobile app homepage to review detailed information about your current software release.
Checking Pending Updates
Knowing your build string is only half the equation — the other half is knowing whether Tesla’s already queued something newer for your car. Head to Controls > Software; if an update is staged, you’ll see a notification offering “Install Now” or “Schedule.” A green arrow at the top of the screen confirms an active download (Wi-Fi required).
No Wi-Fi? A yellow icon appears instead — classic wifi troubleshooting signal that you need a connection before anything moves. The Tesla app mirrors this, showing update notifications under its Software tab with states like “Downloaded, ready to install.”
Want fleet-level intel before your car even knows? Third-party trackers like TeslaFi or Tessie surface rollout timestamps by region and model — genuinely useful when you’re tired of waiting. On iOS, setting Tesla app notifications to Persistent ensures you catch update alerts even when they arrive overnight or while your phone is idle.
Tesla’s Infotainment Upgrade: Which Vehicles Qualify?
Not every Tesla qualifies for the Infotainment Upgrade—eligibility narrows quickly once you factor in both production date and onboard hardware. Legacy compatibility depends on two hard filters running simultaneously.
Here’s what actually determines your eligibility:
- Production window: Model S (2012–2018) and Model X (2015–2018), built March 2018 or earlier
- Hardware tier: Autopilot computer 2.0 or 2.5 only—check via Controls > Software > Additional Vehicle Information
- Platform exclusions: Model 3 and Model Y aren’t eligible, full stop
- Retrofit logistics: Installation happens at a Tesla Service Center—this isn’t a software enablement you trigger yourself
Confirm your eligibility before purchasing through the Tesla app.
Tesla’s pricing structure separates computer 2.0/2.5 owners from other eligible vehicles, so your hardware directly affects your final cost. The upgrade replaces the older NVIDIA Tegra-3 chip with MCU2, delivering a smoother media control unit experience alongside enhanced Autopilot visualizations.
Tesla Infotainment Upgrade Pricing:,500 Vs Tesla Infotainment Upgrade Pricing: $1,500 Vs $2,000 Explained,000 Explained
The price you’ll pay for Tesla’s Infotainment Upgrade isn’t arbitrary — it splits cleanly along hardware lines, with AP2.0 and AP2.5 vehicles running $2,000 (because that tier bundles the HW3.0 Autopilot computer into the scope of work) and all other eligible pre-March 2018 Model S/X vehicles landing at $1,500 plus applicable tax.
If your car needs the separate Radio Upgrade on top of that, budget an additional $500 regardless of whether you bundle it with the infotainment job or schedule it later — Tesla’s pricing holds either way, though service advisors routinely recommend doing both in a single appointment to avoid paying twice for labor setup.
Once you’ve confirmed your vehicle’s hardware version through the touchscreen under Controls > Software > Additional Vehicle Information, scheduling through the Tesla app locks in your quoted price before you hand over the keys. Vehicles that already have HW3 installed are quoted at the lower $1,500 rate, regardless of their Autopilot package tier.
Upgrade Eligibility By Model
Most Tesla owners assume this upgrade applies broadly across the lineup, but Tesla locks eligibility to a tight hardware window: Model S and Model X vehicles built in March 2018 or earlier.
The eligibility timeline exists because MCU2 became standard after that build date cutoff. Here’s exactly who qualifies:
- Model S built March 2018 or earlier
- Model X built March 2018 or earlier
- Model 3 — not eligible, full stop
- Model Y — not eligible, no exceptions
Tesla anchors eligibility to your vehicle’s build date, not its software version. That distinction matters.
You might be running recent firmware and still qualify based purely on legacy hardware. Check your build date before assuming you’re excluded — or included. The upgrade is priced at 2,500 plus tax and installation, with scheduling handled through Tesla Service only after you receive an official invitation.
Hardware Version Price Breakdown
Once you’ve confirmed your build date and know you’re sitting inside that eligibility window, the next variable is price — and it’s not a flat rate. Tesla splits the cost based on hardware mapping: $1,500 for most eligible Model S and X vehicles, $2,000 if your car runs Autopilot Computer 2.0 or 2.5. That $500 gap reflects legacy compatibility demands and installation logistics tied to those specific hardware configurations — not a fancier install process. Tesla’s support page and Shop both confirm this two-tier structure, listing the upgrade as “$1,500–$2,000” inclusive of installation.
Customer confusion largely traces back to older coverage still citing the original $2,500 price (since reduced roughly 40%). Ignore those. The current authoritative number lives on Tesla’s own product pages. Appointments for installation can be scheduled directly through the Tesla app.
Scheduling Your Upgrade
Scheduling the upgrade runs entirely through the Tesla app — no dealer phone tag, no third-party coordination. Appointment timing matters more than most owners realize, because pricing has shifted multiple times and your live app quote is the only figure that counts.
Before booking, confirm your computer type at Controls > Software > Additional Vehicle Information, then cross-reference your tier:
- Computer 2.0 or 2.5 hardware: $2,000 plus tax (includes HW3.0)
- All other eligible hardware: $1,500 plus tax
- Installation: bundled into both quotes, no separate labor charge
- Eligibility: primarily pre-March 2018 Model S and Model X vehicles
Price transparency here is straightforward — Tesla’s app generates the quote directly. Older forum posts cite $2,500, which is outdated. Trust the app, not the archives. The upgrade unlocks access to Tesla Theater streaming, including YouTube, Netflix, Hulu, and Twitch, directly through the upgraded infotainment system.
How to Schedule an Infotainment Upgrade Through the Tesla App
Tesla’s Infotainment Upgrade program targets a specific slice of the fleet—Model S and Model X vehicles built March 2018 or earlier—so the first thing you’ll want to nail down is whether your car actually qualifies. Pull up Controls > Software > Additional Vehicle Information on your touchscreen to confirm your computer type. That single detail determines both eligibility and pricing: computer 2.0 or 2.5 hardware runs $2,000 plus tax, while all other eligible configurations land at $1,500 plus tax—installation included either way.
Once eligible, app scheduling kicks in automatically. Open the Tesla app, locate the Infotainment Upgrade listing, and follow the prompts. Your payment methods on file handle the transaction directly. Before initiating the upgrade, ensure your battery is at least 50% charged to meet the installation requirements. If nothing appears, your vehicle likely sits outside the supported configuration set—contact Tesla’s Service team to verify.
Which Features Your MCU Generation Permanently Locks Out
Your MCU generation isn’t just a firmware label — it’s a hard silicon ceiling that permanently determines which features your car can run, regardless of how many software updates Tesla pushes to it.
MCU1 hardware (Tegra-based, pre-2018) lacks the GPU headroom, codec support, and security modules required for features like smooth video streaming, modern browser rendering, and richer UI visualizations that MCU2 and MCU3 (AMD Ryzen-powered) handle without breaking a sweat.
If you’re sitting on MCU1, no amount of waiting for an OTA update will conjure the processing capacity that simply isn’t there — your only real path forward is a physical hardware swap through Tesla Service. When a software update mismatch occurs across multiple MCUs, even basic infotainment functions like climate control and display output can become completely unresponsive.
MCU Hardware Capability Limits
Each MCU generation draws a hard line in silicon—a ceiling your software stack literally can’t push through, no matter how many OTA updates Tesla queues up. Your hardware’s physical constraints determine what’s possible, full stop. Four constraints define that ceiling:
- Compute headroom — MCU1’s Tegra chip simply lacks the CPU/GPU cycles newer UI demands.
- Thermal limits — Older units can’t sustain the heat dissipation newer workloads require without throttling.
- Storage bottleneck — MCU1’s original 8 GB eMMC choked on modern software builds entirely.
- Harness incompatibility — MCU2-to-MCU3 retrofits fail because wiring, power delivery, and chassis dimensions don’t translate cleanly.
Software optimization buys you efficiency, not capability. When a feature exceeds your MCU’s design envelope, no update closes that gap permanently. The MCU’s scope extends well beyond the screen itself, governing everything from amplifiers and Bluetooth to multiple CAN bus communications and the Ethernet bridge that ties vehicle systems together.
Locked-Out Feature Examples
Hardware generations don’t just set performance tiers—they draw permanent walls around entire feature classes, and no OTA update has ever demolished one of those walls.
If you’re running MCU1 (Tegra 3 silicon), you already know the locked out examples: no Tesla Theater, no Netflix, no Hulu, no YouTube, no Arcade titles. These aren’t software switches Tesla forgot to flip—the hardware literally can’t execute those workloads.
MCU2 narrows the legacy exclusions considerably, handling route guidance, media, and climate management competently, but certain later UI behaviors remain tied to Tesla’s newer stack.
Your infotainment generation isn’t a preference setting; it’s a hard architectural boundary determining exactly which feature classes exist inside your vehicle. Tesla’s third-generation MCU-Z introduced an AMD Ryzen SoC powerful enough to run advanced workloads, but researchers discovered its hardware also harbors a voltage fault injection vulnerability that cannot be patched through software updates alone.
Upgrade Paths Available
Once you accept that MCU generations draw hard system design limits, the logical next question is whether you can cross them—and the answer depends entirely on which limit you’re standing at. Your MCU legacy determines everything here.
Available upgrade logistics break down cleanly:
- MCU1 → MCU2: Tesla-approved, priced at $1,500–$2,000 depending on Autopilot hardware
- MCU2 → MCU3: No factory-approved path exists—full stop
- eMMC repair (MCU1): Recall-covered daughterboard swap, 8GB upgraded to 64GB
- Autopilot hardware: Separate compatibility checklist entirely—MCU upgrades don’t touch HW generations
Run your retrofit economics carefully. Upgrading from Nvidia Tegra (MCU1) to Intel Atom (MCU2) buys you video streaming and Arcade expansion. But AMD Ryzen (MCU3) stays factory-exclusive. Know your ceiling before budgeting. MCU1 vehicles are also the generation most likely to carry Transferable Free Unlimited Supercharging, a perk worth factoring into your total ownership calculation before spending on hardware upgrades.
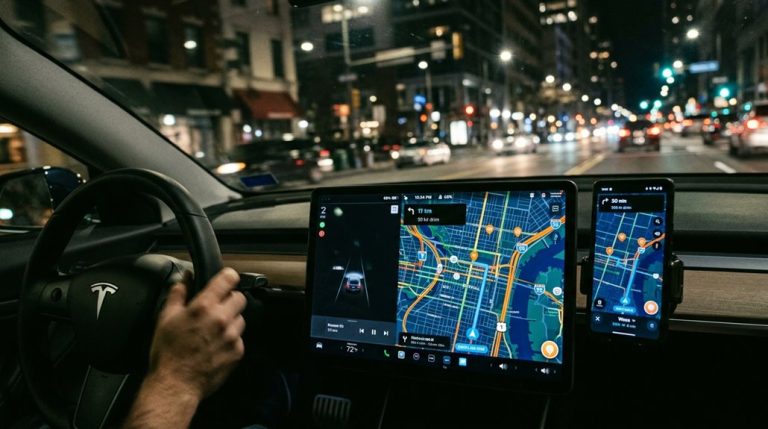
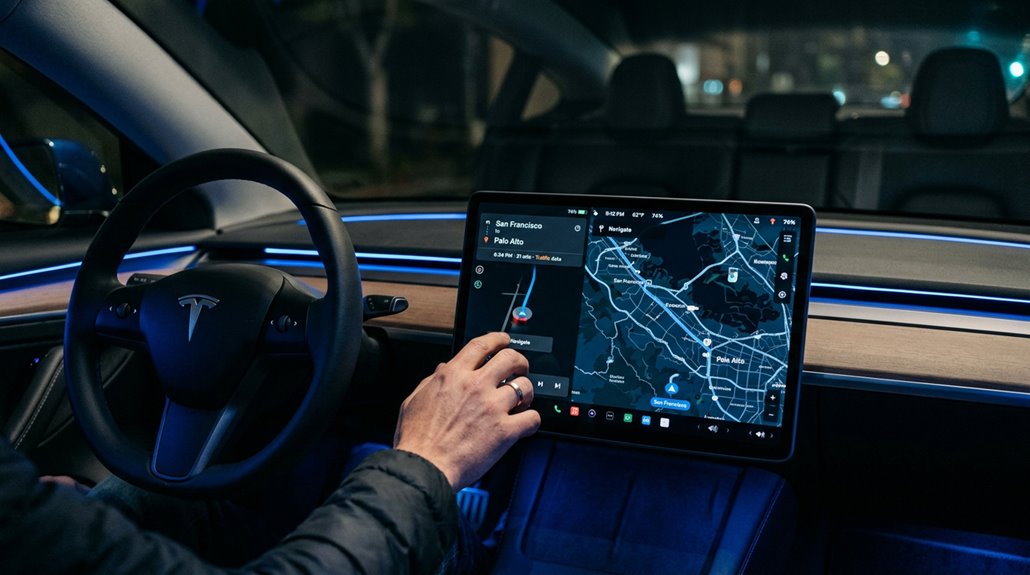
Tesla Navigation: How Google Maps Powers Real-Time Routing

Despite what you’ll read in dozens of forum threads and YouTube thumbnails, Tesla doesn’t run the Google Maps consumer app natively on its center display—what’s actually happening under the hood is more subtle and, frankly, more useful once you grasp the design.
Tesla runs its own proprietary map stack and routing engine. Google Maps functions as a companion tool, not an embedded application. The destination sharing workflow is where the real value lives: plan your route in Google Maps, tap share, and Tesla’s route guidance executes it on-screen with turn-by-turn guidance.
Meanwhile, google traffic integration influences your pre-trip decisions—crowd-sourced congestion data helps you cross-check corridor conditions before departure. Both systems use different routing logic, so comparing them on complex or time-sensitive routes consistently produces better outcomes than trusting either alone. Your saved locations and favorites from Google Maps can also carry over into the Tesla system once your Google account is paired, giving you instant access to personal destinations without re-entering them manually.
How Tesla Plans Routes Around Charging Stops
Tesla’s Trip Planner doesn’t just find the fastest road to your destination — it builds a charging-aware route that accounts for battery state, Supercharger locations, and real-time traffic simultaneously, automatically inserting stops only where energy demand actually requires them.
When you set a destination beyond your current range, the system calculates each leg’s energy draw, estimates your state of charge at every planned Supercharger, and recommends the minimum charging duration needed at each stop to keep total trip time as low as possible (not just stop count, which is a distinction most drivers overlook).
On long-distance runs, this extends to predictive congestion logic — Tesla’s backend can reroute you away from a Supercharger station forecasted to hit peak load before you even arrive, which is the kind of network-level coordination that a static GPS map simply can’t pull off. That forecasting relies on an iterative machine-learning process that continuously tests predictions against real outcomes and recalibrates its models to improve future accuracy.
Charging Stop Route Integration
When you punch in a destination that’s beyond your current range, Tesla’s Trip Planner doesn’t panic — it just quietly solves the problem by inserting Supercharger stops into your route before you’ve even thought to ask. That’s charger choreography working silently in the background.
The system handles waypoint ergonomics with precision:
- It calculates energy remaining at each Supercharger stop
- It recommends exact charging durations per leg
- It displays a red warning when charging stops aren’t configured
- It adjusts stop timing around your arrival charge target
You’re not just getting directions — you’re getting a power budget for every segment. Miss a stop? The system recalculates.
Add a destination reserve? It rebuilds the entire charge sequence accordingly.
Real-Time Traffic-Aware Planning
The routing engine doing the heavy lifting here isn’t just a GPS layer slapped on top of a charge calculator — it’s a live system that fuses traffic conditions, energy consumption, and Supercharger availability into a single decision loop. Predictive routing means the system isn’t reacting; it’s anticipating. Charger forecasting estimates incoming vehicle demand before you arrive, redirecting you toward stations with lower projected load.
| Signal Input | System Response | Driver Output |
|---|---|---|
| Traffic congestion detected | Recalculates ETA and energy draw | Updated arrival time displayed |
| Supercharger predicted busy | Suggests alternate nearby station | Reroute notification appears |
| Energy consumption shifts | Adjusts charging stop duration | Revised charge time recommended |
Toggle Online Routing off and you’re effectively flying blind — don’t.
Long-Distance Trip Management
Plug in a destination over 200 miles out and Trip Planner doesn’t just draw a line — it builds a multi-leg itinerary, threading Supercharger stops into the route based on your current state of charge, expected energy consumption per segment, and the charging speed available at each candidate station.
The planner fine-tunes four variables simultaneously:
- Arrival buffer — reaching each stop with a safe reserve, not fumes
- Detour penalty — favoring stations that don’t pull you miles off-route
- Charge rate matching — selecting higher-power Superchargers when available
- Stop duration — recommending only what’s needed to reach the next leg
Rest stop syncing and midnight charging sessions align naturally here — shorter, frequent stops beat one marathon charge every time, since charging slows considerably above 80%.
How “I’m Feeling Hungry” and “I’m Feeling Lucky” Work
Baked into Tesla’s V10 software update, “I’m Feeling Hungry” and “I’m Feeling Lucky” are route-finding shortcuts that cut through the paralysis of deciding where to stop — one surfaces nearby restaurants, the other pulls up attractions or points of interest, both accessible directly from the touchscreen or via voice command. The randomized routing logic prioritizes proximity first, then factors in Destination Charger availability, making local detection genuinely useful rather than decorative.
| Feature | Target Destination | Trigger Method |
|---|---|---|
| I’m Feeling Hungry | Nearby restaurants | Touchscreen or voice |
| I’m Feeling Lucky | Attractions, POIs | Touchscreen or voice |
| Both | Destination Charger locations preferred | V10+ software required |
You’re fundamentally outsourcing the decision to the car — not a bad trade on mile 200 of an unplanned drive.
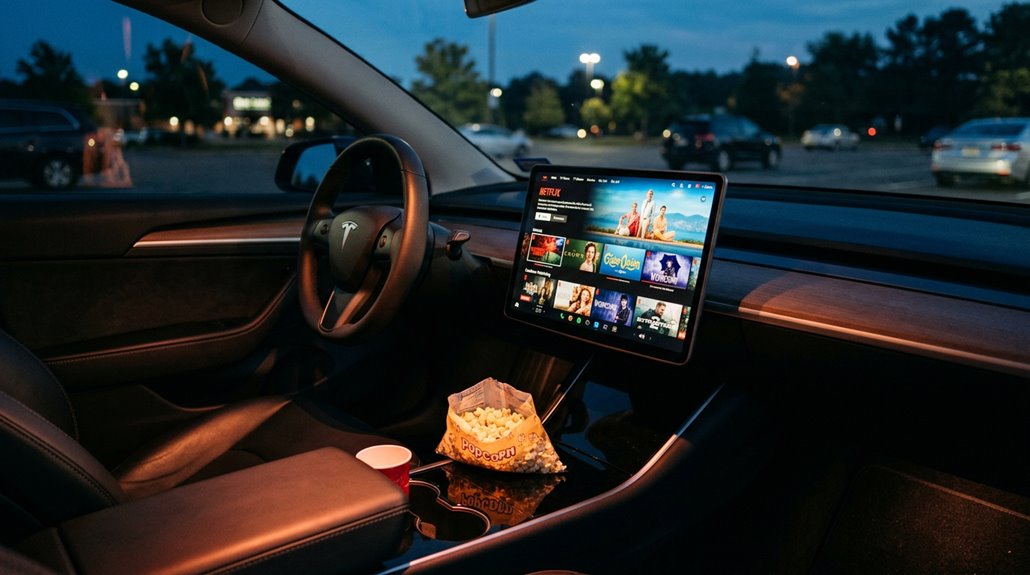
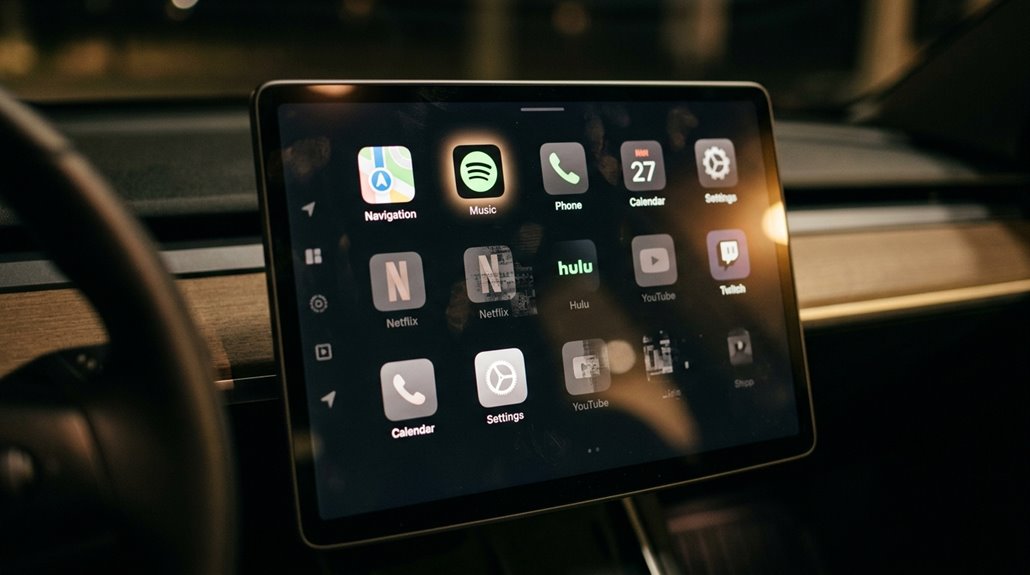
Streaming Services Available on Tesla’s Infotainment System
Tesla’s infotainment system doubled down on entertainment starting with V10, folding Netflix, YouTube, and Hulu directly into Tesla Theater — a native streaming hub accessible from the center display across Model S, Model X, and Model 3.
Playback only becomes available when parked (no offline playback exists natively), and account privacy stays yours — sign-in and sign-out happen entirely through the display interface.
Here’s what you’re actually working with:
- Netflix streams globally (excluding Hong Kong) at a hard cap of 720p
- Hulu supports both on-demand and Live TV account tiers
- YouTube runs natively without workarounds
- Spotify and Apple Music handle audio, syncing to your driver profile
Vertical displays render Netflix horizontally with black bars — functional, not pretty.
How Tesla Theater Turns Your Cabin Into a Viewing Lounge
Theater does more than stream video — it reframes what your parked Tesla actually is. Activate it through the Entertainment menu, connect to Wi-Fi or premium cellular, and the center touchscreen becomes a legitimate cabin cinema display. No projector required, no awkward laptop propped against a headrest. The system launches dedicated streaming apps using your existing account credentials, so setup is minimal.
Park at a charging station, enable Camp Mode to hold cabin temperature, and you’ve converted idle time into a usable rear lounge experience. If you’re in a Model S or Model X with rear screens, playback continues independently even after the front session closes — a genuinely useful design detail. Video pauses when you shift out of Park; audio doesn’t.
How to Watch Netflix, YouTube, and Disney+ While Parked
Netflix, YouTube, and Disney+ all run natively inside Tesla Theater without sideloading anything or cracking open a browser — provided your software version supports them and you’re sitting in Park.
Here’s what the system enforces automatically:
- Park lock — GPS and accelerometer data confirm the vehicle is stationary before playback starts.
- Resolution cap — Streaming tops out at 720p on Tesla’s display, regardless of your account tier.
- Horizontal output only — Vertical-orientation screens still render video panorama, flanked by black bars.
- Browser fallback — HBO Max, Prime Video, and Crunchyroll remain accessible through Tesla’s browser when native apps aren’t listed.
Passenger safety drives every restriction here. Privacy concerns apply too — your login credentials sit inside a connected vehicle system, so treat account security accordingly.
Apple Music, Spotify, and Amazon Music: How to Set Up and Switch
Tesla’s built-in media stack supports Apple Music, Spotify, and Amazon Music as native applications—no phone mirroring, no Bluetooth workarounds, just direct account authentication through the Media player or App Launcher on the center touchscreen.
Setting up Apple Music specifically requires a software version at or beyond the 2022.44.25 holiday update, where a QR code appears on-screen for you to scan with your iPhone camera, triggering Apple ID authentication (and possibly two-factor verification if your account requires it).
Once your accounts are linked, you switch between services through the Media source selector mid-drive without interrupting playback, though lossless audio and Dolby Atmos remain unsupported in Tesla’s Apple Music implementation—a limitation worth knowing before you audition the premium audio system.
Connecting Your Music Account
Plugging your music library into Tesla’s infotainment system is less painful than it sounds, but the process differs depending on which service you’re connecting. Each platform uses a distinct account linking flow.
- Apple Music: Open the Media menu, select Apple Music, and scan the QR code authorization prompt with your phone camera to authenticate your Apple ID.
- Spotify: Select Spotify from the media source list and log in directly through Tesla’s interface.
- Amazon Music: Available in supported regions — find it in the Media Player source list.
- Visibility Control: Hide or show any service through Media Settings.
Two-factor authentication may interrupt Apple Music’s linking sequence, so keep your phone nearby. Spotify skips the QR code entirely, making it the faster setup.
Switching Between Streaming Services
Switching streaming services in Tesla doesn’t require hunting through menus or rebooting anything — the Media Player source dropdown handles all of it from a single screen. Tap the source selector, pick your service, and you’re live. That’s in-car switching done right.
Source prioritization matters here. Services you use most — Spotify, Apple Music, Amazon Music — can be pinned as app launcher icons and rearranged for faster access. Less-used services can be hidden entirely through Media Player’s source settings, which declutters the interface without removing account links.
You never lose your session when switching. Your Spotify queue stays intact while you check Apple Music, then switch back. Tesla treats every service as a persistent media source, not a separate app requiring a cold launch.
Playback Settings And Preferences
Each streaming service in Tesla’s Media Player has its own setup flow, and knowing where the preferences live saves you from delving through menus mid-drive. Each platform exposes different controls once you’re authenticated.
- Explicit content filtering toggles per-service, not globally.
- Audio caching depth varies — Apple Music buffers differently than Spotify under weak LTE.
- Voice personalization settings (where supported) adjust recommendation weighting inside the native app interface.
- Source display preferences live inside the mini player card, not the main settings panel.
Spotify and Amazon Music share the same source-selection pathway through Media Player, but their internal preference screens diverge. Switching sources mid-session doesn’t reset your playback queue — it just pauses it, which is genuinely useful behavior.
Apple Podcasts on Tesla: Synced Playback Between Phone and Car
Tesla rolled out Apple Podcasts as a native in-car app with its 2023 Holiday Update, and it’s available across Model S, 3, X, Y, and Cybertruck via a free OTA push to nearly 50 countries. First launch requires scanning an on-screen QR code with your iPhone, which authenticates your Apple ID and begins library syncing immediately.
Cross-device continuity is where this integration earns its keep. Your playback position syncs bidirectionally, so whatever episode position you reached in the car resumes precisely on your iPhone afterward. Followed shows, saved episodes, and played history all transfer automatically. New episodes from followed podcasts appear without manual reloading.
One playback privacy note: cellular streaming requires Premium Connectivity, while Wi-Fi handles offline-downloaded episodes cleanly without that subscription overhead.
SiriusXM on Tesla: Setup and Channel Navigation
To activate SiriusXM on your Tesla, you’ll first need to confirm your software is running the latest OTA release—without it, the SiriusXM icon simply won’t appear in your Media Sources tray (no icon, no radio, no workarounds).
Once updated, open Media Sources, select the SiriusXM icon, and accept the in-vehicle trial prompt, which gets you one month of access without requiring a credit card. For channel browsing, everything runs through the center touchscreen interface, where you can scan a QR code to set up a full account or tap the Subscription tab to refresh your channel access if playback stalls.
Activating SiriusXM In Tesla
SiriusXM doesn’t just show up in your Tesla the moment you want it—a few conditions have to line up first before the app even appears in Media Sources. Think of it as a handshake protocol between Tesla’s software stack and SiriusXM‘s activation servers.
Here’s what needs to happen in order:
- Connect to active Wi-Fi or enable Premium Connectivity (sold separately).
- Install the latest OTA update—no update, no SiriusXM icon.
- Open Media Sources and tap the SiriusXM app (a blue dot signals it’s newly available).
- Accept the terms to complete trial activation.
For in-car troubleshooting, check your Subscription tab first—it displays remaining trial days and your Radio ID. If channels won’t play, that tab also walks you through a radio refresh.
Browsing SiriusXM Channels
Once your SiriusXM source is active and showing up in Media Sources, the actual channel browsing works more like steering through a streaming app than tuning a traditional radio. You’ll scroll through categorized listings directly on the center display — music sorted by genre, talk and news grouped by subject, sports channels tucked into their own section. Tap a channel name and playback starts immediately.
There’s no offline caching here, so stable Premium Connectivity or Wi-Fi is non-negotiable for clean channel loads, including artwork and metadata rendering. Voice guidance isn’t supported within the SiriusXM interface itself, meaning you’re working the touchscreen manually.
Your available channels mirror your active subscription tier exactly — if a channel won’t load, check your account status through the subscription tab before blaming the software.
Tesla Arcade: Games Available and How to Launch Them
Tesla Arcade ships as a native app baked directly into the infotainment stack, sitting under the main app launcher on your touchscreen—and it’s a surprisingly deep library once you start poking around.
Vehicle must be in Park before any game loads.
To launch and play:
- Open the Arcade app from the main touchscreen launcher
- Select your title from the available library list
- Confirm your input method—steering wheel, touchscreen, or Bluetooth controller
- Check controller compatibility per title, since not every game accepts every input
The library spans Atari classics (Tempest, Asteroids, Centipede) alongside modern titles like Beach Buggy Racing 2, Cuphead, and Stardew Valley.
Updates add and remove titles over-the-air.
Note that parental controls and regional software builds directly affect which games appear on your specific unit.
How Grok Voice Assistant Works in Tesla Vehicles
Grok—built by xAI and embedded directly into Tesla’s infotainment stack—marks a real departure from the “say a command, get a response” model that defined earlier Tesla voice systems. Voice activation works via a long press on the steering wheel’s voice button. Wayfinding integration is where Grok genuinely earns its place: you can request destinations, reroutes, and stops dialogically, no touchscreen required.
| Feature | Grok | Native Tesla Voice |
|---|---|---|
| Activation | Long press | Short press |
| Wayfinding requests | Dialogical | Fixed commands |
| Hardware control | No | Yes |
| Personality options | Yes | No |
| Connectivity required | Yes (Premium) | Partial |
Grok supplements Tesla’s native system rather than replacing it—think co-pilot, not takeover. Offline use isn’t supported, and FSD decisions remain entirely off-limits.
How to Set and Edit Navigation Destinations With Grok
Setting a destination through Grok cuts out the touchscreen entirely—long-press the voice button, state your destination dialogically, and Grok pushes the route directly into Tesla’s guidance stack.
These voice workflows eliminate manual map entry while driving, which is genuinely useful.
Here’s how destination management works:
- Single destination: Say “guide to [place name]” and Grok resolves the location, occasionally asking clarifying questions before confirming.
- Multi-stop routing: Add sequential stops—stores, Superchargers, landmarks—and Grok sequences them into a multi-leg route.
- Mid-route edits: Swap or remove stops conversationally without interrupting active routing.
- Route personalization: Use specific place names (not generic addresses) for cleaner resolution and fewer follow-up prompts.
The confirmed route still appears on your map before guidance begins.
What Natural Language Voice Commands Tesla Actually Understands
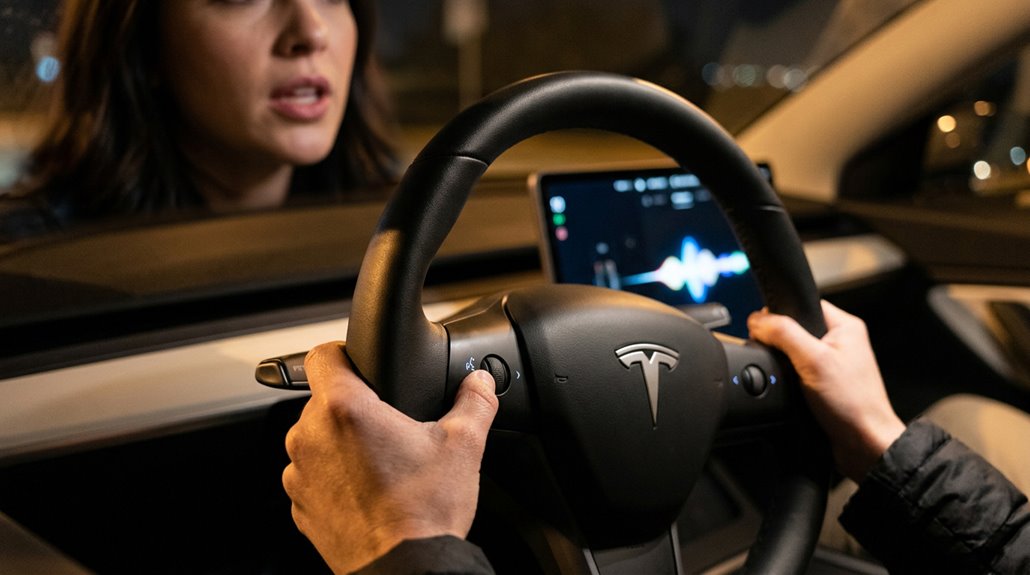
Unlike rigid command systems that reject anything outside a predefined phrase list, Tesla’s voice interface runs on natural language processing—meaning you don’t need to memorize exact syntax to get results. Say “I’m cold” instead of “increase cabin temperature,” and the system still responds correctly. Activate commands via the right scroll wheel (Model 3/Y) or steering wheel button (S/X), wait for the tone, then speak naturally.
Supported commands span vehicle controls (“activate sentry mode,” “fold mirrors”), climate (“turn on dog mode,” “set seat warmer”), route guidance (“show nearby Superchargers”), phone (“call [contact]”), and media (“open Netflix”). Tesla’s official documentation explicitly calls the command list non-exhaustive—it evolves via OTA updates.
Understand the dialog limits, though: complex multi-step requests still trip the system. And yes, privacy implications exist—every spoken command routes through Tesla’s processing infrastructure.
How to Customize Your Tesla’s Split-Screen Display Layout
Tesla’s split-screen customization isn’t a drag-and-drop dashboard editor—it’s a curated set of layout controls that vary markedly by model and software version, so your first step is recalibrating expectations.
Here’s what you can actually control:
- My Apps bar – Touch-hold any shortcut to enter edit mode, then drag replacements from the app tray.
- Overlay presets – Model S/X support richer multi-panel arrangements; Model 3/Y relies on fixed regions.
- Gesture shortcuts – Swipe up to reveal drive-mode strip controls or expand Park view.
- Climate split – Tap the temperature popup’s “Split” control for independent driver/passenger zones.
FSD visualization can silently override whatever layout you’ve built, so treat any arrangement as software-version-dependent, not permanent.
Climate, Media, and Camera Controls From One Screen
Consolidating climate, media, and camera into a single touchscreen sounds like a UX compromise until you actually use it—then it clicks as the only logical arrangement.
Centralized touchscreen control feels like a tradeoff—until muscle memory kicks in and fragmented panels seem absurd by comparison.
Tesla’s interface stacks HVAC controls, media playback, and camera feeds onto one display without requiring you to move away from your current task. Adjust fan direction, skip a track, and check the rear camera feed—all without touching separate panels. Touchless gestures (supported on newer MCU hardware) further simplify these interactions.
Split climate mode lets you set independent driver and passenger temperatures simultaneously while Mini-Player keeps audio visible beneath.
The rear camera integrates into this same ecosystem, accessible through quick-action shortcuts.
Worth noting: centralized control creates privacy implications, since every interaction logs to your vehicle’s activity data.
Tesla’s infotainment setup works best when everything is within a natural line of sight, yet most drivers still end up glancing down at their phone for navigation, calls, or secondary apps. Tesla Screen-Integrated Magnetic Phone Mount keeps the phone positioned right beside the main display, making it easier to follow routes and notifications without breaking focus or cluttering the cabin.
How to Prepare a USB Drive for Tesla’s Sentry Mode and Dashcam
Getting Sentry Mode and Dashcam working properly comes down to one unglamorous prerequisite: a correctly prepared USB drive. Skip a step, and your car records nothing useful.
Follow this sequence:
- Select hardware: Use a drive with at least 64GB capacity and 4 MB/s sustained write speed (USB 3.0 drives must also support USB 2.0).
- Handle USB formatting: Format using exFAT, ext3, or ext4 — NTFS won’t work.
- Build your folder structure: Create a base-level folder named exactly “TeslaCam” (capitalization matters).
- Insert correctly: Use the glovebox port; rear ports are charge-only and record nothing.
Once recognized, Dashcam and Sentry Mode icons appear in Controls, confirming you’re operational.
Sentry Mode: How Camera Monitoring Works While Parked
With your USB drive formatted and seated in the glovebox port, you’ve handled the storage side of the equation — now the more interesting question is what Sentry Mode is actually doing while your car sits unattended.
It operates across three states: Standby (low-power passive monitoring), Alert (triggered by minor contact or proximity), and Alarm (triggered by impacts or towing).
Each escalation pulls camera feeds into active recording, with footage capturing roughly ten minutes of pre-event footage — solid camera retention that gives you context, not just consequences.
Privacy implications are worth noting: Live Camera footage is end-to-end encrypted and inaccessible to Tesla itself.
The system runs until battery hits 20%, then shuts down automatically, notifying you through the app when that threshold triggers.
Dashcam Recording: Telemetry, Footage, and Clip Management
Tesla’s built-in Dashcam records continuously to a USB flash drive (the glovebox port is preferred on equipped vehicles), storing footage in 1-minute segments across multiple camera views and maintaining a rolling buffer that newer software expanded from 1 hour to 24 hours before overwriting.
You control when clips actually get saved through three modes — Manual (touch the icon to capture the last 10 minutes), On Honk (same 10-minute window, triggered by the horn), and Auto (event-driven, though Tesla openly acknowledges detection varies based on power state, sleep mode, and Autopilot engagement).
As of Tesla app version 4.55.6, downloaded clips include a telemetry overlay burned directly into the footage — speed, steering wheel angle, and Self-Driving state — which converts a basic dashcam clip into a timestamped data artifact useful for incident review, FSD behavior verification, or settling the inevitable “but how fast were you going?” argument.
How Dashcam Recording Works
Dashcam recording on a Tesla isn’t a passive black box bolted to your windshield — it’s a tightly integrated software layer pulling live feeds from the car’s existing camera array and writing segmented MP4 clips directly to a USB drive (typically mounted in the glovebox port).
The system processes everything onboard, never routing footage through Tesla’s servers.
Here’s how the pipeline actually works:
- Cameras feed continuous video into a rolling buffer retention window (now 24 hours post-update)
- Events trigger clip saves, locking segments before they’re overwritten
- MP4 files land in a structured Dashcam folder on your USB drive
- Metadata extraction pulls speed, steering angle, gear state, and pedal input embedded directly into saved clips
No external hardware. No cloud dependency. Just local, structured recording.
Telemetry Data and Overlays
What used to leave you with a silent MP4 and zero background now ships with a full telemetry layer baked directly into the clip.
Since the 2025 Holiday Update, Tesla embeds dashboard telemetry directly into footage via SEI metadata, synchronizing speed, steering angle, gear position, accelerator pressure, brake pressure, and Self-Driving state frame-by-frame with the video.
You can toggle the data layer on or off during in-car playback or through the Tesla app viewer.
App version 4.55.6 finally closed the export gap—forensic overlays now survive the download to your camera roll instead of quietly disappearing.
Telemetry scope actually exceeds the visible overlay, with raw latitude/longitude and direction of travel accessible through Tesla’s Dashcam tool.
Note: Sentry Mode recordings carry no SEI telemetry whatsoever.
Managing and Reviewing Clips
Telemetry metadata embedded in your clips is only useful if you can actually find and manage the footage—so here’s how the file system and review workflow actually operate.
Your TeslaCam folder splits into three directories:
- RecentClips — continuous loop footage, roughly 60 minutes before overwrite
- SavedClips — manually or auto-preserved recordings, outside the overwrite cycle
- SentryClips — security-event recordings, subject to automatic deletion under storage pressure
- Timestamped folders — your primary clip organization anchor for fast event lookup
Retention policies aren’t sentimental: accessible footage disappears as new video rolls in.
Review clips in Park via the Dashcam icon, or pull the drive (pause first) and browse timestamped files on your computer.
Four camera angles—front, rear, left, right—save per clip on supported models.
Reversing Camera View: Settings and Display Customization
When you drop the shifter into Reverse, Tesla’s software doesn’t wait for permission — the Camera app launches automatically, pushing the rear feed to your touchscreen within roughly a second. Adaptive guidelines move with steering input, giving you real-time geometry. Camera layouts vary by model and software version, sometimes reshuffling after an OTA update without touching a setting.
| Layout Element | Behavior |
|---|---|
| Rear camera | Centers automatically in Reverse |
| Side cameras | Toggle by swiping up or down |
| Parking guidelines | Move adaptively with steering |
| Front camera | Accessible via manual swipe |
Swipe up or down to reveal or hide side-camera tiles. Privacy concerns are minimal here — feeds stay local, never leaving the vehicle’s internal system.
How Tesla’s High-Fidelity Park Assist Works
Introduced in the 2023 Holiday Update, High-Fidelity Park Assist is Tesla’s leap from a crude 2D obstacle band to a genuine 3D reconstruction of your immediate surroundings. It runs entirely on vision only mapping, meaning no ultrasonic sensors required. Here’s what the neural reconstruction actually does:
- Predicts nearby objects as smooth, continuous distance fields (not rigid pre-loaded meshes)
- Maps painted ground lines and parking markings in 3D space
- Renders the display rotatably, so you inspect any angle
- Activates automatically below roughly 3 mph when you shift into reverse
It’s more informative than most 360-degree camera systems, though it’s not a physical bumper sensor replacement for millimeter-precise distance readings. Curb detection works well, just not always consistently. Expect ongoing improvements.
What Driver-Assistance Looks Like on Your Tesla Screen
When driver-assistance features are active, your Tesla’s touchscreen transforms into a live, camera-fed situational display that renders nearby vehicles, lane edges, and road geometry in real time. The visualization pulls from Tesla’s suite of external cameras and ultrasonic sensors (where applicable), stitching together a bird’s-eye composite that shows your vehicle centered within detected lane markings — blue edges confirm the system’s read on lane borders, while a single blue path line signals FSD (Supervised) engagement.
You’re not just watching a status indicator here; you’re watching the car’s actual sensor interpretation of the road, which makes the display a direct window into how the system is assessing its next move.
Visualizing Nearby Surroundings
Behind the polished surface of Tesla’s touchscreen sits a real-time interpretation engine that’s constantly translating raw camera data into something you can actually use at a glance. That’s sensor fusion working silently—stitching together eight camera feeds into a unified proximity visualization you see as simplified 3D objects surrounding your car icon.
Here’s what that display is actually communicating:
- Surrounding vehicles, pedestrians, and cyclists appear as stylized 3D renders, not raw footage
- Colored outlines around your car icon signal detected objects nearby
- Radiating lines shift from white to red as proximity tightens
- Alert sounds accompany visual warnings when urgency escalates
The system reflects what Tesla’s cameras interpret in that exact moment—clean cameras mean accurate data, dirty ones mean degraded awareness.
Camera-Centric Display Integration
Every camera feed your Tesla processes doesn’t disappear into a black box—it surfaces directly on your center display as a real-time visual language you’re expected to read and act on.
Lane geometry, detected objects, and surrounding vehicles render continuously while Autopilot or FSD (Supervised) is engaged. That’s not decoration—it’s accountability framework.
Your cabin camera (mounted above the rearview mirror) feeds attention analytics directly into this same ecosystem. It’s tracking gaze direction and head position, not your identity. In-cabin privacy is maintained by default, meaning imagery stays onboard unless you’ve explicitly enabled data sharing.
When the system detects inattentiveness, it escalates through visual and audible alerts on that same display. One unified interface handles perception, assistance, monitoring, and warnings simultaneously—no separate hardware required.
What Autopilot Actually Shows You on the Center Screen
Tesla’s center display isn’t just a touchscreen for climate control and music — it’s pulling double duty as your instrument cluster, rendering a real-time visualization of everything the car’s vision system currently detects around you. That driver visualization replaces the traditional gauge cluster entirely on most models.
Here’s what you’re actually seeing:
- Surrounding vehicles — rendered with relative position and movement
- Lane markings — showing detected limits and centering setting
- Pedestrians and animals — flagged when the neural net recognizes them
- Traffic signals and stop signs — displayed when FSD (Supervised) is active
Understand the sensor limitations, though. The display shows what Tesla *detects*, not necessarily everything present. Treat it as a smart supplement to your mirrors, never a replacement.
Why Tesla Treats Its Infotainment Like a Smartphone OS
You’re not driving a car with a screen bolted on—you’re operating a rolling software platform that treats firmware the way your iPhone treats iOS, where each OTA update rewrites the experience from the ground up rather than just patching bugs.
Tesla pushes these updates silently over Wi-Fi or LTE while the car sits in your driveway, rolling out new features (think Autosteer refinements, UI overhauls, or entirely new games) without a dealer visit or a wrench in sight.
That continuous update loop is the engine of Tesla’s competitive edge, letting a 2019 Model 3 run software capabilities that didn’t exist when it rolled off the assembly line.
Continuous Software Evolution
While most automakers treat infotainment as a fixed hardware deliverable — ship it, forget it, move on — Tesla treats its in-car software the same way Apple treats iOS: it’s a living platform that gets materially better after you’ve already paid for it. Continuous deployment means your car’s feature set isn’t frozen at delivery. Feature telemetry lets Tesla monitor real-world usage patterns and push targeted improvements.
Here’s what that actually looks like:
- Spotify, Apple Music, and YouTube Music arrived post-launch
- Native Apple Podcasts integration landed in 2023 with cross-device sync
- Grok added natural-language route editing
- Custom lock sounds shipped via Toybox > Boombox > Lock Sound
Your car’s software stack evolves. Most cars don’t work that way.
OTA Updates Drive Innovation
Every time Tesla pushes an OTA update, your car’s infotainment stack gets closer to what a software team would call a “living release” — not a frozen firmware image baked onto a chip at the factory. Your vehicle checks for packages automatically over Wi-Fi, downloads silently in the background, then surfaces a touchscreen notification letting you install immediately or schedule it later.
That innovation cadence mirrors how your phone receives OS updates — features arrive post-purchase without dealer involvement. Go to Controls > Software and set your preference to ADVANCED to position yourself earlier in the rollout queue.
Tesla’s emerging developer ecosystem benefits from this model too, since each release can layer new apps, routing logic, and UI behavior onto existing hardware without touching a single bolt.
How to Use the Tesla App to Control Infotainment Remotely
The Tesla mobile app gives you real-time reach into your vehicle, but it’s worth being precise about what “remote infotainment control” actually means in practice—because the gap between marketing language and documented functionality is wider than most owners expect.
Here’s what the app actually delivers:
- Climate, charging status, and access controls work reliably over cellular or Wi-Fi
- Bluetooth limitations apply—Bluetooth commands require close physical proximity
- Core vehicle actions (locks, trunk, horn, windows) are fully documented
- Third-party risks emerge when apps claim deeper infotainment access through Tesla’s API
Tesla’s official documentation doesn’t list remote touchscreen route guidance or streaming-app selection as supported features.
Treat anything beyond those four functions as unsupported territory—useful background before granting third-party apps your account credentials.
How to Manage App Permissions and Linked Accounts on Tesla
Managing who and what can access your Tesla account isn’t glamorous work, but getting it wrong hands strangers a live connection to your car’s location, charging data, and service history.
Tesla bundles app permissions into grouped scopes rather than individual toggles, so approving one third-party integration might expose more data than you’d expect. Review every connected app under Settings → Security and Privacy → Third Party Apps. Revoke anything unfamiliar immediately.
Account linking for additional drivers works differently—added drivers get most Tesla app features but can’t touch payment methods, charging history, or insurance data. That’s a deliberate permission ceiling, not a bug.
If driver-addition fails, update both devices to the latest Tesla app version before troubleshooting anything deeper.
Tesla’s central screen is constantly in use, and over time glare from sunlight, fingerprints, and micro-scratches can quietly make navigation and media harder to see than it should be. Anti-Glare Tempered Glass Screen Protector helps maintain a clearer, more readable display in bright conditions while shielding the surface from daily wear that builds up faster than most owners expect.
Why Some Streaming Apps Disappear After a Tesla Software Update
Locking down your app permissions is one headache; watching a perfectly functional streaming app vanish after a routine OTA update is another beast entirely.
Post update troubleshooting usually reveals one of four culprits:
- UI regressions — firmware reshuffles tile layouts, burying apps without actually uninstalling them
- Regional licensing shifts — Tesla quietly adjusts app bundles per market, so an update can legally remove access overnight
- Invalidated sessions — account tokens get refreshed during updates, forcing reauthentication before apps reappear
- Connectivity gaps — weak cellular or Wi-Fi post-reboot prevents streaming services from initializing properly
Before panicking, perform a soft reboot.
If Theatre or media tiles remain missing, switch your display language, then switch it back — that triggers a refresh cycle that’s recovered missing apps repeatedly across community reports.
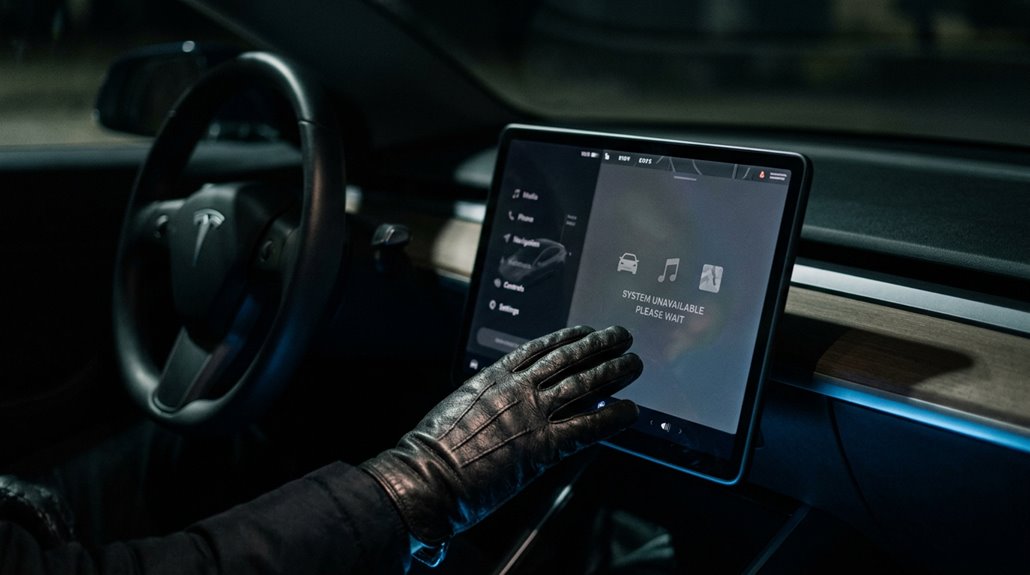
How to Troubleshoot a Frozen or Unresponsive Tesla Touchscreen
A frozen Tesla touchscreen isn’t a catastrophe — it’s a reboot procedure away from full recovery in most cases. Your first user workaround: hold both steering wheel scroll wheels simultaneously while parked. The screen goes black, the Tesla logo reappears, and within 10–30 seconds you’re operational again. That handles most frozen menus, lagging touch response, and wayfinding lockups.
Still unresponsive? Run the deeper diagnostic checklist. Steer to Controls > Safety & Security > Power Off, then leave everything untouched for two full minutes — no brake, no doors, no screen taps. Press the brake afterward to wake it.
Persistent freezes after both procedures suggest software corruption, dashcam USB conflicts, or hardware failure. At that point, you’re beyond DIY territory — schedule service.
Tesla Touchscreen Soft Reboot vs Hard Reboot: Which Fix to Use
Most Tesla owners conflate the two reboot options as interchangeable fixes, but they operate on completely different layers of the vehicle’s software stack.
Here’s how to distinguish them:
- Soft reboot restarts only the touchscreen display layer — hold both scroll wheels until the screen goes black (~30 seconds).
- Hard reboot powers the entire vehicle down via Controls > Safety > Power Off, requiring a 2-minute hands-off wait.
- Use a soft reboot first for frozen displays, audio glitches, or unresponsive UI controls.
- Escalate to a hard reboot when the soft reboot fails — it addresses deeper system states affecting multiple vehicle functions.
Neither procedure replaces actual diagnostics.
If both fail, you’re past self-service territory and into a service appointment.
Why Your Tesla Screen Lags and How to Resolve It
Knowing when to reboot is half the battle — knowing *why* the screen needed one in the first place is the other half. Tesla’s infotainment stack juggles route guidance, cameras, climate, and media simultaneously, so resource contention is constant. Older MCU1-based Model S and Model X units suffer from eMMC memory wear — physical cell degradation that slows read/write cycles and causes boot delays, input lag, and unexpected reboots. Extreme cabin temperatures trigger thermal throttling, reducing processor clock speeds to prevent hardware damage. A weak 12V battery introduces voltage instability that upsets infotainment performance. Software updates occasionally introduce compatibility conflicts that compound existing slowness. Start with a scroll-wheel reboot. If lag persists across sessions, you’re likely dealing with hardware degradation, not a software hiccup.
Tesla Standard vs Premium Connectivity: What Each Tier Unlocks
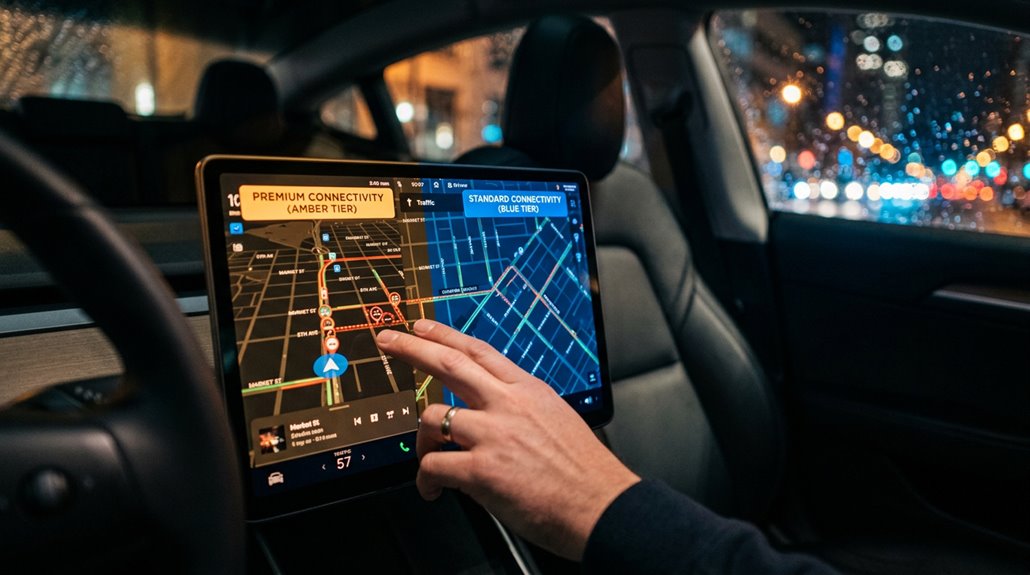
Tesla’s connectivity tiers aren’t marketing fluff — they’re a real structural split in what your car’s cellular radio does and doesn’t serve you.
Standard Connectivity ships free for eight years, covering basic navigation and Bluetooth audio.
Premium runs $9.99 monthly or $99 annually.
Here’s what actually changes between tiers:
- Cellular limitations lift entirely — every feature routes over LTE, not just Wi-Fi
- Live traffic visualization activates, giving your routing engine real data
- Satellite-view maps become available, replacing vector tiles with imagery
- Sentry Mode live view becomes cellular-accessible (privacy implications worth noting — your footage streams externally)
Most Standard users compensate with phone hotspots.
That works, but it’s a workaround, not a solution.
Premium earns its price specifically for frequent highway drivers.