Tesla’s paint is barely thicker than a human hair — and that’s not a flaw, it’s a design choice with serious consequences when things go wrong. A single scratch isn’t just an eyesore; it’s a precision-depth problem where the wrong repair method can permanently destroy the finish you’re trying to save. Before you reach for that touch-up pen or buffer, there’s something most Tesla owners don’t realize about how these layers actually work.
How Tesla’s Layered Paint System Affects Every Scratch Repair Decision
That distinction drives every repair decision you’ll make.
A light swirl mark sitting in the clear coat responds well to gentle polishing—you’re effectively leveling the outer surface. But once damage breaks through to the base color, you’re dealing with paint matching, application control, and blending.
Surface scratches polish out. Break into the base coat, and you’re now matching paint—a different problem entirely.
Go deeper into primer territory, and DIY correction becomes unrealistic. Minor scratches and chips are far more affordable and manageable to address before damage progresses to deeper layers.
Two invisible threats accelerate this damage stack: UV degradation slowly breaks down clear-coat integrity, and film delamination separates layers entirely—turning a manageable scratch into a structural finish failure.
When selecting repair materials, always verify model and year fitment before purchasing touch-up paint or protective film kits, since trim and finish compatibility varies significantly across production years.
Knowing which layer you’ve hit isn’t optional; it’s the starting point.
Does That Tesla Scratch Go All the Way Through the Clear Coat?
Before you reach for a polishing compound or touch-up paint, you need to know exactly how deep that scratch actually goes, because the repair method changes completely depending on whether you’ve broken through the clear coat or just scuffed it.
Start with a clean inspection: wash the area gently with a soft microfiber cloth and mild shampoo, since Tesla’s water-based, particularly soft finish can make surface contamination look like genuine paint damage (a dirty streak that disappears after washing was never a real scratch to begin with).
Once the panel is clean and dry, run a fingernail lightly across the scratch — if your nail glides over it without catching, you’re likely dealing with clear-coat abrasion only, but if it snags, the damage has almost certainly cut past the clear coat and into the base color layer, which means polishing alone won’t fix it. Keep in mind that darker colors like black and midnight silver will make even shallow scratches appear far more severe than they actually are, so color affects perceived depth and should factor into your assessment before you decide on a repair approach.
Tesla’s high-torque launch behavior can contribute to accelerated tire wear that kicks up road debris, increasing the likelihood of paint chips and scratches along lower body panels where damage is easiest to overlook during a quick visual inspection.
Testing Scratch Depth
Knowing whether a scratch has cut through Tesla’s clear coat—or stopped short of it—determines whether you’re polishing or reaching for touch-up paint, so getting this diagnosis right matters before you spend time or money on the wrong fix.
Two tools guide your depth gauge assessment: the fingernail test and light angle inspection. Here’s what each result tells you:
- No nail catch — shallow enough for polishing or compounding
- Slight nail catch — deeper in the clear coat, but still correctable
- Firm nail catch — beyond the clear coat; polishing won’t fix this
- White or gray coloration — primer exposure, meaning touch-up paint is necessary
- Bare metal visible — deepest damage; professional repair likely required
Always clean the scratched area before performing either test, since dirt or debris can mimic deeper scratch depth and lead you toward an unnecessarily aggressive repair approach. Physical testing beats guessing every time. It’s also worth noting that later Model 3 builds introduced higher perceived quality paint finishes, meaning the clear coat characteristics and surface feel can differ meaningfully between early and more recent production vehicles.
Clear Coat Damage Signs
Once your fingernail test confirms a scratch has cut deeper than surface-level marring, the next question worth asking is whether it’s actually broken through Tesla’s clear coat—or just roughed it up.
Look for dullness first—gloss loss under direct sunlight is often your earliest UV indicator that clearcoat adhesives are failing beneath the surface. Run your finger across the scratch; healthy clear coat feels smooth, while compromised clear coat feels grainy or chalky.
White, opaque patches signal the coating has thinned past transparency entirely.
Watch the edges carefully—lifting or flaking at panel lines means separation has already begun, and polishing won’t reverse that. Tesla’s minimalist exterior design, which stems from a rebuilt vehicle architecture, means panel gaps and lines are precision-engineered, making edge separation easier to spot against tightly toleranced bodywork.
If the scratch looks hazy, milky, or surrounded by micro-cracking, you’re likely dealing with structural clear-coat failure rather than simple surface marring. A clay bar treatment applied to the affected area can help confirm this—if the rough, gritty texture remains unchanged after claying, the damage goes beyond surface contamination and into the clear coat itself.
Fingernail Catch Test
The fingernail catch test is probably the fastest low-tech diagnostic you’ll run on a Tesla scratch—no tools, no product, just a clean nail dragged lightly across the damaged area to figure out whether you’re dealing with a clear-coat scuff or something that’s already punched through into the color layer.
Fingernail hygiene matters here—oils or debris distort tactile feedback. Use angle technique: approach from multiple directions since light refracts differently across scratch edges.
- No catch: clear-coat surface damage only; polishing likely works
- Light catch: deeper clear-coat groove; correction possible but uncertain
- Firm catch: through the clear coat; touch-up paint required
- Color visible: paint layer exposed; polishing won’t solve this
- Raised edge: rough texture signals more than superficial marking
Conservative correction beats aggressive over-polishing every time. Keep in mind that bumper cover replacements can run $1,500–$4,000 or more, which puts the case for catching and addressing scratch depth early—before damage compounds—in sharp financial perspective.
Which Tesla Scratch Repair Method Do You Actually Need?
Once you’ve figured out how deep your Tesla’s scratch actually goes — clear coat only, into the base coat, or all the way to primer — you can match the right repair method to the damage instead of guessing and making things worse.
Before you touch any product to the paint, though, clean the area thoroughly with a pH-neutral soap, clay bar the surface to pull bonded contaminants, and let it dry completely, because polishing compounds and touch-up paints both bond poorly to dirty or damp surfaces.
From there, the decision tree is straightforward: light clear coat scuffs get compound and polish, visible paint loss gets a Tesla touch-up kit applied in thin, patient layers, and anything that catches your fingernail hard enough to drag goes straight to a certified body shop. It’s also worth noting that white paint resists UV fading longer than most other color options, making it a practical choice if long-term paint durability factors into your decision.
Assessing Your Scratch Depth
Before reaching for a polish or a touch-up pen, run your fingernail lightly across the scratch — that five-second test tells you more than any visual inspection alone.
Pair that with proper lighting techniques (direct sunlight or a bright LED works best) to catch what shadows hide.
Here’s what your fingernail reveals:
- Smooth, no catch — clear coat only; polishing handles this
- Slight catch — still likely clear coat, but compound work may be needed
- Firm catch — base coat or primer exposure; DIY kits apply here
- White or gray color showing — confirms you’re past the clear layer
- Bare metal visible — immediate paint coverage required to prevent rust
Match your method to the layer. That’s the whole game. If you drive a Tesla, keep in mind that the NACS connector standard unifies the charging plug design across all models, but paint protection needs vary depending on which trim and body style you own.
Surface Prep Comes First
Knowing your scratch depth is half the problem solved — the other half is making sure the surface is actually ready before you touch it with anything.
Start with soapy water to strip loose dirt, then follow with a wax-and-grease remover because residual wax kills adhesion fast. Dry everything completely — high-pressure air helps eliminate trapped moisture in panel gaps.
Your worksite ventilation matters here too; airborne dust settles into wet primer like it’s paid to.
Mask surrounding panels with paper or film, exposing only the repair zone. Glove selection isn’t cosmetic — bare hands deposit oils that contaminate the surface immediately.
Work somewhere warm and dry. A clean, controlled environment isn’t optional prep; it’s what separates a lasting repair from one you’ll redo next season. Just as Tesla’s battery management system negotiates power limits in real time to protect cell integrity, your BMS here is preparation — get it wrong and every step after it costs you.
Matching Method To Damage
The repair method you choose has to match the actual damage — not the damage you’re hoping it is. Misreading a scratch wastes time and money.
Here’s how damage levels break down:
- Surface scuffs and paint transfer → polishing compound only, no colorcoat needed
- Clear-coat scratches → touch-up paint (colorcoat plus clearcoat), color matching and finish swatching required
- Deep gouges without substrate exposure → spot putty, primer, then multiple colorcoats
- Bare metal or plastic showing → primer is non-negotiable before any colorcoat
- Large or complex damage → certified body shop, full stop
Tesla’s multi-coat finishes make color matching particularly unforgiving. Finish swatching against your panel in natural light before committing saves you from a visible patch that looks worse than the original scratch. Unlike mechanical repairs, Tesla’s over-the-air updates can alter vehicle software and settings without any physical intervention, but paint damage remains strictly a hands-on fix with no remote remedy available.
The Surface Prep Steps You Can’t Skip Before Tesla Paint Repair
Skipping surface prep is the fastest way to ruin a Tesla paint repair before it even starts. Tesla’s multi-coat system bonds poorly to contaminated surfaces, so contamination control isn’t optional — it’s foundational. Start with soapy water or a dedicated car cleaner to strip dirt and road film from the entire panel, not just the scratch. Your cleaning equipment matters here: microfiber cloths pull residue away without embedding it deeper into the clear coat.
Once visibly clean, follow up with a wax-and-grease remover. Wax, oil, and detailing product residue create fisheyes and adhesion failures that no amount of skill can fix afterward. Wipe the area down with alcohol as a final pass, then stop touching it — hand oils recontaminate a clean surface faster than you’d expect.
Work in a warm, dry, dust-free space. Fresh coatings attract airborne particles immediately, and the prep environment determines the finish quality. Tesla vehicles rely on onboard neural networks processing visual data in real time, meaning even minor paint irregularities around sensor-adjacent panels like the front bumper or pillars can affect camera clarity and system performance over time.
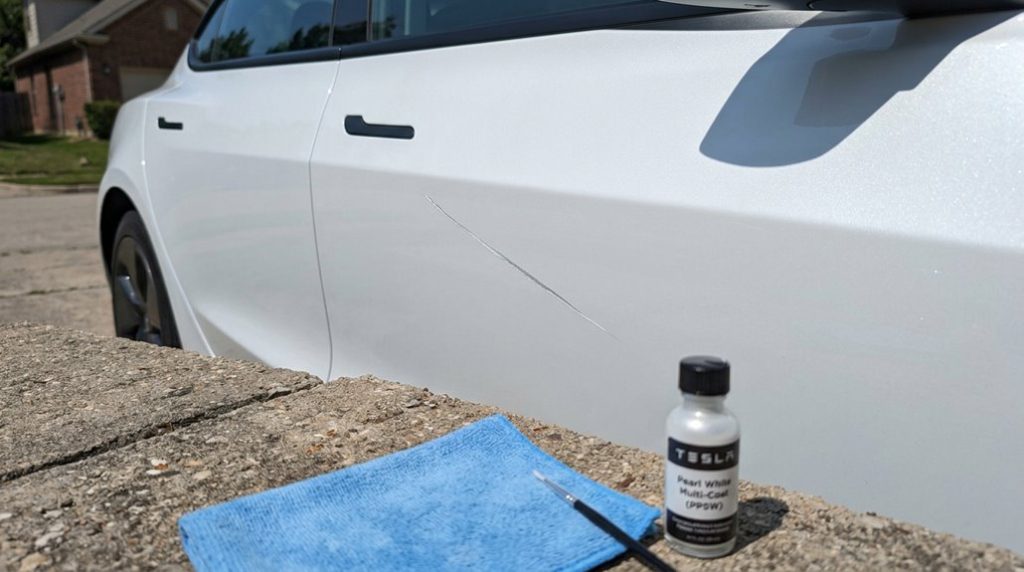
How to Apply Tesla Touch-Up Paint Correctly, Layer by Layer
Once the surface is prepped and clean, the application sequence is what separates a repair that blends in from one that looks like a crayon smudge on your quarter panel. Tesla’s multi-coat system demands precision placement and controlled layer drying — skip either, and you’ll notice.
Here’s how to build your repair correctly:
- Use a fine-tip brush or toothpick to deposit paint directly into the defect, not across surrounding paint
- Apply thin layers only — heavy coats shrink unevenly and create raised edges
- Wait 5–15 minutes between coats (check your specific kit’s timing)
- Build multiple coats gradually until the fill reaches the surrounding paint level
- Let the final color layer cure 30–60 minutes before touching it again
Deep chips may need a second session since each layer shrinks slightly as it dries. Patience here isn’t optional — it’s literally part of the chemistry.
How to Wet Sand a Tesla Scratch Without Damaging Surrounding Paint
Wet sanding is one of those repairs where the margin between fixing a scratch and creating a bigger one is genuinely thin — sometimes measured in microns. Tesla’s multi-coat clear is unforgiving, so your prep matters as much as your technique.
Start with a clean panel and heavily saturated 3000-grit wet-dry paper. Use a foam backing block to distribute pressure evenly — no bare fingers, which concentrate force. Work in short passes (roughly 10 seconds), staying centered on the scratch rather than drifting outward. A micro masking technique — taping off surrounding paint — gives you a physical boundary that prevents accidental overcutting.
Temperature effects matter here. Cold panels cause water to run fast and reduce lubrication; hot surfaces dry your slurry instantly, increasing friction. Aim for moderate ambient conditions. Wipe dry frequently with a microfiber cloth to actually see your progress. Haze means sanding; no scratch means you’re close.
How to Protect Tesla Paint After the Scratch Repair Is Done
After all that careful wet sanding and polishing, the last thing you want is a fresh rock chip undoing your work within the first week. Protecting repaired Tesla paint requires a layered approach, not just a quick wax and a wish.
Rock chips don’t care how long you spent polishing. Protecting repaired paint takes a real strategy, not wishful thinking.
Here’s what actually works:
- Wait 24–48 hours before applying anything so the clearcoat fully cures and bonds properly
- Apply ceramic coating once cured to build chemical resistance, UV protection, and long-term gloss retention
- Install paint protection film (clear bra) on high-impact zones like the hood, bumpers, and fenders where damage repeats most
- Wash using a two-bucket method with pH-balanced shampoo and soft microfiber mitts to avoid introducing swirl marks
- Park smart—shaded spots, away from gravel and branches, dramatically cut re-scratch risk
Ceramic coating handles invisible threats. Paint protection film handles physical ones. Together, they keep your repair intact.
Frequently Asked Questions
Can I Use Any Brand of Touch-Up Paint on My Tesla?
You can use various brands, but brand compatibility and pigment matching matter. Always locate your Tesla paint code first — it guarantees you’re selecting a color-matched product that won’t make the scratch more noticeable.
How Long Does a Complete DIY Tesla Scratch Repair Typically Take?
Like a blacksmith timing a forge, your time estimate ranges from 30 minutes to over a day. Light scratches finish fast, but drying times between coats can stretch deeper repairs into tomorrow.
Will My Tesla Warranty Cover Paint Scratch Repairs I Do Myself?
Your Tesla’s warranty won’t cover paint scratches you cause, and warranty limitations mean self repair risks could complicate future claims if your DIY work creates additional damage requiring professional attention.
Does Tesla’s Paint Color Affect How Visible Repaired Scratches Remain?
Like a spotlight on a stage, color contrast reveals repaired scratches—your darker Tesla exposes fixes more than lighter shades. Metallic flake helps disguise repairs, but bright sunlight can still betray mismatches.
At What Point Should I Stop DIY Repairs and Hire a Professional?
You should consult a professional when repair complexity exceeds shallow clear-coat damage—think fingernail-catch depth, wide panel scratches, paired dents, or when you’re risking a finish that’ll look worse than before.