Lifting your Tesla Model Y sounds simple — until the suspension geometry fights back. Go too aggressive, and you’re bleeding range while your camber angles quietly punish your tires. Get it right, and you gain genuine clearance without compromising the engineering Tesla spent years perfecting. The physics narrow your options faster than you’d expect, and the wrong choice costs more than money. Everything you need to choose and install the right lift kit is laid out ahead.
What a Model Y Lift Kit Does to Your Suspension
Installing a lift kit on your Model Y adds roughly 35 mm (about 1.5 inches) of ground clearance — enough to meaningfully reduce contact with speed bumps, steep driveways, and rough terrain — but it doesn’t achieve that height by replacing your springs or dampers.
Instead, it spaces the body upward relative to the existing suspension components, letting your factory hardware keep doing its job.
The kit spaces the body upward, leaving your factory suspension components completely untouched and fully functional.
Here’s the catch: changing ride height also changes suspension geometry.
Camber angles shift (particularly at the rear), and your wheel alignment moves outside factory spec the moment the kit goes on.
You’ll need a professional four-wheel alignment immediately after installation — no exceptions.
Some kits also recommend rear camber arms to restore proper alignment range.
Skip those, and you’re accelerating bushing wear and compromising tire contact.
The Model Y’s considerable battery pack weight — ranging from 800 to 1,200 pounds — makes proper suspension geometry even more critical, as that load amplifies the stress placed on any component that falls outside alignment spec.
Done correctly, though, your suspension keeps its factory ride quality and normal system function intact. The kit is a fully bolt-on solution, meaning no cutting or permanent modification is required to your vehicle.
Leveling Kit vs. Overland Lift: Which One Fits Your Goals?
Not all lift kits serve the same driver, so matching the kit type to your actual use case saves you from buying more (or less) hardware than you need.
A leveling kit adds around 35 mm (≈1.5 in) of clearance with a bolt-on design that keeps the Model Y behaving close to stock—solid choice if you’re chasing a cleaner stance or want to stop scraping steep driveways without rebuilding the suspension. Because Tesla evaluates warranty claims on a repair-by-repair standard, a properly documented professional installation can strengthen your position if a suspension-related claim arises later.
An overland lift pushes that number to roughly 1.75–1.85 in, adds tire fitment clearance up to 29.5 in overall diameter, and targets mixed-surface utility like snow, rough terrain, and off-pavement routes where that extra quarter-inch of clearance actually earns its keep. The Unplugged Performance leveling kit is priced at $495 and fits every Model Y from 2020 through the 2026 Juniper refresh.
Defining Each Kit Type
Before choosing a lift kit for your Model Y, it helps to grasp that “lift kit” isn’t one-size-fits-all — two distinct categories exist, and they target different problems.
A leveling kit adds roughly 35 mm (≈1.5 in) of clearance using strut and coil spacers, prioritizing aesthetic adjustments and a corrected factory stance. It preserves your OEM suspension framework, so ride comfort stays largely intact — think mild refinement, not metamorphosis.
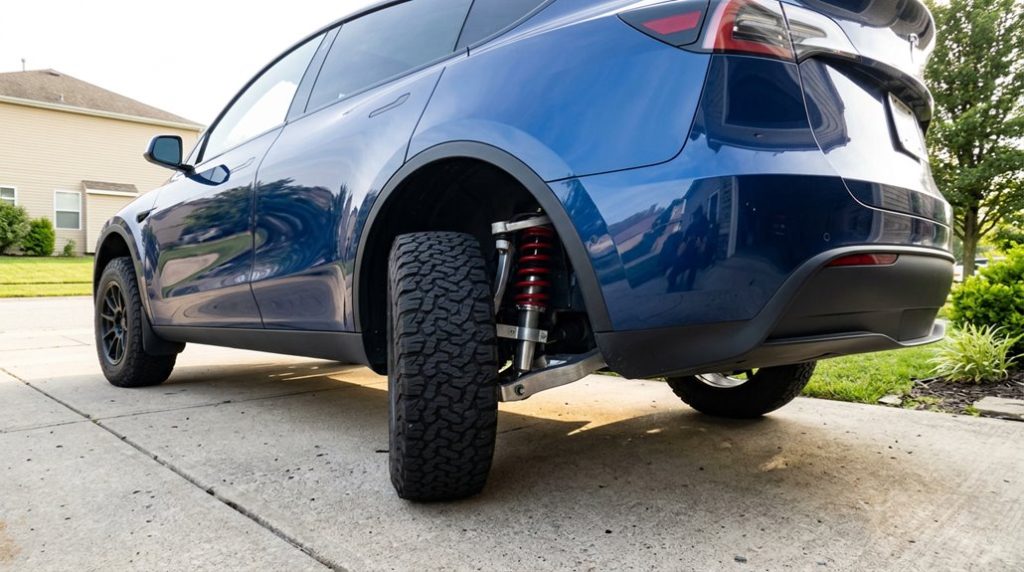
An overland lift targets 1.8 in of added clearance (up to 2.3 in with compatible tires), built specifically for rough terrain, snow, and steep driveways. It uses billet spacers and additional rear hardware, supporting larger tire fitments. Unlike traditional truck platforms that rely on a separate ladder-frame spine, the Model Y uses a structural battery pack that doubles as a load-bearing floor element, meaning lift hardware must account for a lower, more integrated center of gravity.
Same goal, very different scope — your intended use case determines which direction makes sense. The leveling kit is compatible with 2020–2025 and 2026+ Tesla Model Y vehicles, including the refreshed Juniper.
Matching Goals to Kits
Knowing what separates a leveling kit from an overland lift is one thing — knowing which one actually belongs under your Model Y is another. Match the kit to your most common driving environment, not your occasional edge case.
If you’re mostly covering city streets and suburban roads, a leveling kit preserves ride comfort while cleaning up your stance. Simple, low-maintenance, done.
But if your route includes steep driveways, rutted trails, or heavy snowfall, the overland kit’s 1.8-inch clearance gain (2.3 inches with T Sportline 18-inch overland tires) earns its place. Keep warranty implications in mind, too — geometry changes from more aggressive lifts typically require a post-install alignment.
Define your tire goals before choosing, because clearance and suspension geometry don’t operate independently. Larger wheel and tire combinations also carry real efficiency trade-offs — moving from 19-inch to 21-inch wheels can reduce range by 20–30 miles per charge under normal driving conditions. The lift kit is also designed to be compatible with all Model Y versions, meaning you won’t need additional modifications to achieve proper fitment.
Lift Range Considerations
Once you’ve matched your kit to your environment, the actual numbers behind that decision start to matter. A leveling kit corrects stance and delivers modest height changes—useful cosmetically, but limited when clearance testing against real obstacles is the goal.
The overland lift operates differently. With factory tires, you’re gaining 1.8 inches of usable clearance. Swap in T Sportline 18-inch Overland tires, and that figure climbs to 2.3 inches—a meaningful difference when you’re negotiating steep driveways or heavy snow accumulation. Tire diameter drives that gap (literally and figuratively), so selecting the wrong pairing leaves clearance potential unrealized.
Ride comfort shifts slightly with either option, but the overland kit’s terrain-focused geometry justifies the tradeoff. The kit also supports tires up to 29.5 inches overall diameter, expanding your build ceiling considerably.
Front Strut Assembly Removal for Model Y Lift Kits
Before you can install any lift spacer on the Model Y’s front suspension, you’ll need to work through a specific sequence of access steps—starting with pulling the front wheels and removing the upper plastic cowling to expose the strut tower area.
From there, you’ll disconnect the brake line bracket, ABS wire loom, and sway bar end link, then pull the upper control arm pinch bolt and lower control-arm fasteners to free the suspension geometry enough to extract the assembly.
The front strut itself comes out once you’ve removed the three top nuts at the strut tower and separated the lower connection—just don’t attempt any of that without a spring compressor in hand, because the OEM spring carries enough preload to make an uncontrolled release genuinely dangerous. Before beginning any suspension work, verify your vehicle’s hardware generation by navigating to Settings → Software → Additional Vehicle Information, since HW3 and HW4 vehicles feature distinct suspension geometry and subframe configurations that can affect which lift spacer kit is compatible with your specific build.
Accessing The Strut Tower
Getting to the strut tower on a Model Y isn’t a matter of popping the frunk and reaching in—the upper mount nuts sit deep inside the shock tower area, completely blocked by the front tub assembly until you remove it.
Here’s your access sequence:
- Pull the frunk cover and remove the front tub using four 10 mm bolts
- Inspect the exposed shock tower for corrosion protection issues before proceeding
- Carefully relocate any wiring looms routed near the strut tower opening
- Confirm the shock tower cap is removed before attempting hardware access
Only after clearing this hardware do the three upper mount nuts become reachable. Skipping steps here doesn’t save time—it guarantees frustration and potential damage to surrounding components. Tesla’s shared platform architecture means the Model Y uses identical wiring looms across trim levels, so the routing you encounter in this area will be consistent regardless of which variant you’re working on.
Disconnecting Front Suspension Hardware
With the strut tower cleared and the upper mount nuts exposed, you’re now ready to start pulling the front suspension hardware apart—and this is where the sequence matters as much as the tools.
Start by disconnecting the sway bar end link from the shock fork using an 18 mm socket to remove the lock nut (Tesla specifies discarding this nut entirely upon removal).
Next, mind your brake line routing—brake lines must be carefully freed before the assembly moves, or you’ll stress the hydraulic connections.
Remove the three upper mount nuts, then separate the lower shock bolt from the lateral control arm using a 21 mm socket and wrench combo.
The strut assembly drops downward out of the upper control arm mount—you’ll want a second set of hands here. Many Tesla owners choose the Model Y specifically for its hatchback utility and higher roofline, making suspension clearance modifications like this particularly popular among families who also prioritize cargo capacity.
Removing The Strut Assembly
Now that you’ve disconnected the sway bar end link and freed the brake lines, the strut assembly itself is ready to come out—but don’t treat this as a simple yank-and-done. Electrical isolation matters here; keep the ABS lead clear of any binding during extraction. Tesla’s ultrasonic sensors and radar(link) are integrated into the vehicle’s broader sensor array, so any wiring disruption during strut removal can affect collision-detection systems that rely on clean signal paths.
Follow this sequence carefully:
- Support the assembly from below before touching upper mount fasteners—preloaded springs don’t forgive careless hands.
- Remove the three upper nuts securing the tophat using a thin-walled strut socket (Tesla’s specified special tool).
- Extract the lower shock fork bolt from the lateral control arm while keeping the assembly stabilized.
- Slide the assembly outward, routing it past adjacent leads without forcing contact.
Observe proper waste disposal for any residual fluid, and note environmental considerations around brake dust contamination during removal.
Tools and Hardware You Need Before You Start
Before you touch a single fastener on the Model Y’s suspension, you’ll want every tool staged and ready — because mid-job hardware runs kill momentum and, more importantly, create safety gaps. Good shop lighting matters more than most people admit; you’re working near battery pack components and wiring looms where mistakes are expensive.
Staged tools aren’t just convenient — they’re the difference between a safe suspension job and an expensive mistake.
Your lifting arsenal needs a 2.5-ton floor jack, low-profile jack stands, and Tesla-specific jack pad pucks (protecting those designated body contact points). A stable, level surface is non-negotiable before anything goes airborne.
For sockets, gather 10mm, 13mm, 15mm, 18mm, and 21mm sizes, plus a T50 Torx bit. Add a breaker bar for stubborn fasteners, a torque wrench (½-inch drive recommended), pry tools, and a screwdriver. Keep penetrating oil nearby — corroded suspension joints don’t negotiate.
Organize everything in tool storage before starting. Searching for a 13mm mid-installation is exactly as frustrating as it sounds. If you’re also planning to address your charging setup after the lift is complete, note that the Model Y supports Level 2 AC charging at up to 11.5 kW through a Wall Connector, which pairs well with overnight installation recovery when the vehicle is out of commission during the day.
Lifting a Tesla Model Y without the right protection is where most DIY owners go wrong—one slip on the jack points can lead to costly underbody damage that’s completely avoidable. Before you raise the car for any lift kit installation or wheel work, secure it properly with a Tesla jack pad adapter set so every lift stays aligned, stable, and safe from battery or chassis damage.
Rear Spring and Damper Removal on the Model Y
Tackling the rear suspension means working through a specific sequence — skip a step, and you’ll find out why Tesla’s service manual doesn’t leave room for improvisation. Start by pulling the LH rear wheel and rear suspension cover before anything else becomes accessible.
Follow this removal sequence carefully:
- Mount the spring compressor — position the top plate near the upper coils and the bottom plate under the lower control arm
- Compress the spring just enough to unseat it from the body (not fully collapsed)
- Remove the two lower damper bolts after supporting the suspension assembly
- Execute a top-out removal — lift the spring upward once the lower control arm drops far enough to create extraction clearance
Spring isolation matters here. The lower isolator’s locating nubs must seat correctly on the control arm during reassembly, or you’ll introduce noise and misalignment. Hand-tighten the lower damper bolt first before final torque — that’s non-negotiable. Tesla’s onboard battery management system uses real-time negotiation protocols that demand equally precise engineering tolerances throughout the vehicle, reflecting the same zero-compromise philosophy you should apply to every torque spec in this suspension job.
A Model Y lift kit is only as safe as the tools you use with it, and most owners only realize the risk when a standard jack can’t fit properly or slips under the weight of the vehicle. Avoid that situation entirely by using a low-profile hydraulic floor jack designed for EV clearance so you can lift your Tesla without stressing the battery or underbody during maintenance or wheel work.
Torque Sequences and Loaded-Position Fastener Rules
Torque sequencing matters equally when stretch bolts are involved. These require a two-stage process: hit the initial Nm specification first, then rotate to the specified angle.
Multiple stretch bolts demand a consistent sequence across both stages, preventing uneven bushing preload across the joint. Skip the sequence, and clamping force becomes inconsistent — subtle enough to miss on the stand, obvious enough to feel on the road.
Post-Lift Alignment and Camera Recalibration on the Model Y
Once the lift kit’s torqued down and the car’s back on its wheels, the real work starts — because raising ride height doesn’t just change how the Model Y looks, it shifts the entire suspension geometry.
Bolting on a lift kit is the easy part — getting the suspension geometry right afterward is where the real work begins.
Camber, caster, and toe all move when ride height changes, so a toe-only adjustment won’t cut it here.
You’ll need a full four-wheel alignment using an alignment rack with slip/turn plates. Here’s what that process actually covers:
- Ride-height measurement at Tesla-specified points before any adjustments begin
- Caster sweep performed before the steering wheel is set
- Steering-wheel centering verified using a bubble level and holder during alignment
- Camera recalibration and driver assist validation confirmed through Tesla’s Clear Offset function and post-alignment test drive
Adjustable aftermarket arms often bring lifted geometry back into factory spec. If your steering wheel still sits crooked afterward, that’s a toe problem — not a cosmetic fix.
Frequently Asked Questions
Does Lifting a Model Y Void the Factory Battery Warranty or Drive Unit Coverage?
Lifting your Model Y doesn’t automatically void your factory battery warranty or drive unit coverage. Tesla must prove the lift kit directly caused the failure before denying warranty implications or claiming battery degradation affected coverage.
How Does Increased Ride Height Affect the Model Y’s Aerodynamic Drag and Range?
Lifting your Model Y creates an aero penalty by increasing frontal exposure and underbody turbulence. You’ll experience measurable range loss—one test showed a 7.2% drop—with highway driving amplifying the drag penalty most markedly.
Can a Lifted Model Y Still Use Tesla’s Automatic Garage Door Height Memory Feature?
Yes, you can still use Tesla’s trunk height memory after a lift, but you’ll need to reprogram your garage clearance settings and perform sensor recalibration to match your vehicle’s new stance.
Does a Lift Kit Change How the Model Y Handles Emergency Automatic Braking Situations?
A lift kit doesn’t change Tesla’s AEB logic, but it can affect brake feel and suspension behavior. You’ll need sensor calibration post-install to keep your driver-assist systems functioning accurately in emergencies.
Are There Insurance Implications When Installing a Suspension Lift Kit on a Model Y?
Like adding a supercharger and not telling your mechanic, silence costs you. Yes, installing a lift kit carries real insurance implications — you’ll need policy notifications to avoid claim denials tied to undisclosed modifications.