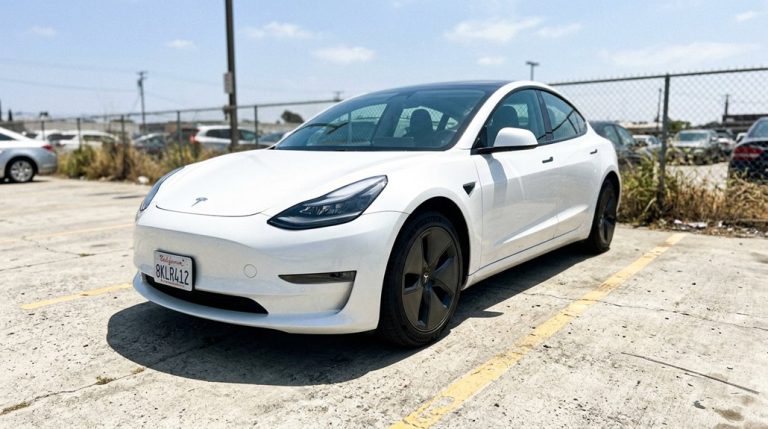
Your $80,000 Tesla just died in a parking lot — not the battery you’re thinking of. While everyone obsesses over range anxiety, a humble 12V accessory battery quietly holds your entire car hostage. No app access, no door handles, no nothing. Tesla’s dual electrical system means jumpstarting works nothing like what you learned with your first beater car, and getting it wrong could cost you far more than a service call. What you do in the next few minutes matters.
Can You Jumpstart a Tesla’s Low-Voltage Battery?
Yes, you can jumpstart a Tesla’s low-voltage battery, and it’s a more straightforward procedure than most people expect from a vehicle that looks like it came from a science fiction film.
Jumpstarting a Tesla’s low-voltage battery is simpler than the futuristic exterior might lead you to believe.
Tesla vehicles rely on a small 12V (or 16V in some Model Y configurations) low-voltage battery to power door locks, control modules, and the touchscreen — not the traction battery that actually moves the car.
When that auxiliary battery dies, you lose emergency access entirely, meaning the doors won’t release and the car won’t become drive-ready.
Here’s what matters: jumpstarting is strictly a low-voltage recovery procedure. You’re providing alternative power to wake the vehicle’s electronics, not boost the main battery pack.
A portable jump starter designed for standard automotive 12V systems handles this job cleanly. Once connected correctly, the touchscreen typically recovers within a few minutes, restoring normal vehicle function. Unlike traditional vehicles, Tesla’s compact drivetrain design eliminates many of the mechanical components that would otherwise complicate an underhood recovery procedure.
For reliable results, a lithium jump starter like the NOCO GB150 — rated at 3000A — is recommended, as it auto-detects battery type and works across both lead-acid and LiPo low-voltage batteries found in Tesla vehicles.
Why Tesla’s 12V Battery Dies Even With a Full Charge
Finding your Tesla stone-dead despite a 100% state of charge on the traction battery isn’t a glitch — it’s a design reality you need to grasp.
The high-voltage pack (which powers the motor and charges through the charge port) and the 12V low-voltage system are electrically separate, connected only through the DC-DC converter inside the Power Conversion System, which steps roughly 400V down to about 14V to keep the 12V battery topped off.
When that converter fails, when the car sleeps too aggressively, when a module refuses to sleep and pulls a parasitic drain, or when the 12V battery itself degrades through sulfation or internal cell failure, you end up with a dead 12V system — and a Tesla that won’t open, won’t boot its control electronics, and won’t let you go anywhere, regardless of what the traction pack says.
Repeated discharge of the 12V battery below approximately 10.5V causes permanent damage, leaving it with a reduced ability to hold charge and making recovery increasingly unreliable with each deep discharge event.
You can confirm your vehicle’s hardware generation and software build — factors that influence how aggressively the car manages 12V charging cycles — by navigating to Settings → Software → Additional Vehicle Information on the touchscreen.
A Tesla that won’t respond doesn’t always mean a major failure—more often, it’s the low-voltage system quietly dropping out when you least expect it. It usually happens at the worst possible moment: a quick errand, a late-night stop, or when you’re already running behind and just need the car to wake up. Keep a portable jump starter and power bank ready so a small 12V issue doesn’t turn into an unnecessary wait for assistance.
Common 12V Failure Causes
Ironically, the most confusing Tesla 12V failure scenario isn’t a dead traction battery — it’s a dead 12V battery sitting right next to a pack that’s sitting at 80% charge. Several culprits drive this failure.
| Failure Cause | Mechanism |
|---|---|
| Parasitic drain | Always-on systems (Sentry Mode, key receivers) continuously pull current |
| DC-DC converter fault | Stops replenishing the 12V battery from the main pack |
| Aging chemistry | Battery sulfation raises internal resistance, killing reserve capacity |
You’ll want parasitic testing performed if your 12V keeps dying unexpectedly. Temperature extremes accelerate every problem listed above. Cold forces systems to work harder; heat degrades chemistry faster. Third-party apps keeping your vehicle awake make everything worse, quietly draining your 12V overnight. Over-the-air updates can sometimes address DC-DC converter behavior, but they cannot reverse battery chemistry degradation that has already progressed from repeated thermal stress. Disabling Sentry Mode when unnecessary can reduce the parasitic load that silently depletes your 12V battery during extended periods of parking.
When a Tesla goes unresponsive, the stress usually isn’t about the car itself—it’s about everything around it: where you are, how long you’ll be waiting, and whether you’re visible enough while stuck roadside. Those moments tend to feel longer than they should, especially when small issues turn into delays you didn’t plan for. Keep a Tesla-compatible emergency safety and access kit ready so a simple stop doesn’t turn into an uncomfortable wait on the roadside.
Traction Battery’s Separate Role
Those failure causes all share a common thread — the 12V battery is doing real work while the traction battery sits largely uninvolved. Your Model 3’s 400-volt pack doesn’t directly power the door locks, computers, or contactors. That job falls entirely on the 12V system, which depends on the DC-to-DC converter to stay topped off. Think of it as traction segregation by design — the two systems only interact through that converter.
When converter diagnostics reveal interrupted output (whether from sleep cycles, calibration drift, or a weak converter itself), the 12V battery depletes without any warning from the main pack. You can have 200 miles of range sitting dormant while your car refuses to wake up. Separate voltage layouts mean separate failure points — full stop. Tesla’s onboard neural networks continuously process real-time sensor data to support vehicle systems, meaning even brief 12V interruptions can disrupt the computing infrastructure those networks depend on to remain operational.
Tesla’s transition to a 12V Li-Ion battery in newer vehicles introduced an additional complication — these units can fail within 20 minutes when the main battery drops below 10% state of charge, particularly in vehicles where the LFP pack hasn’t been properly calibrated after delivery. Jump-starting with a conventional lead-acid battery has proven ineffective in many of these cases, since the Li-Ion unit operates at voltages a lead-acid source simply cannot match.
How to Jumpstart a Tesla Step by Step
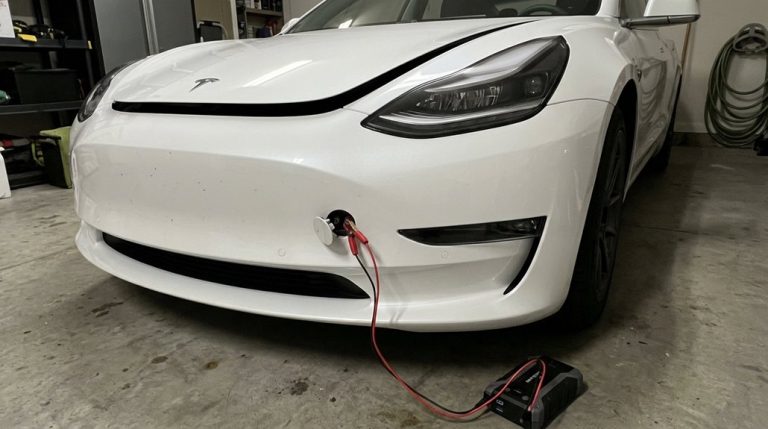
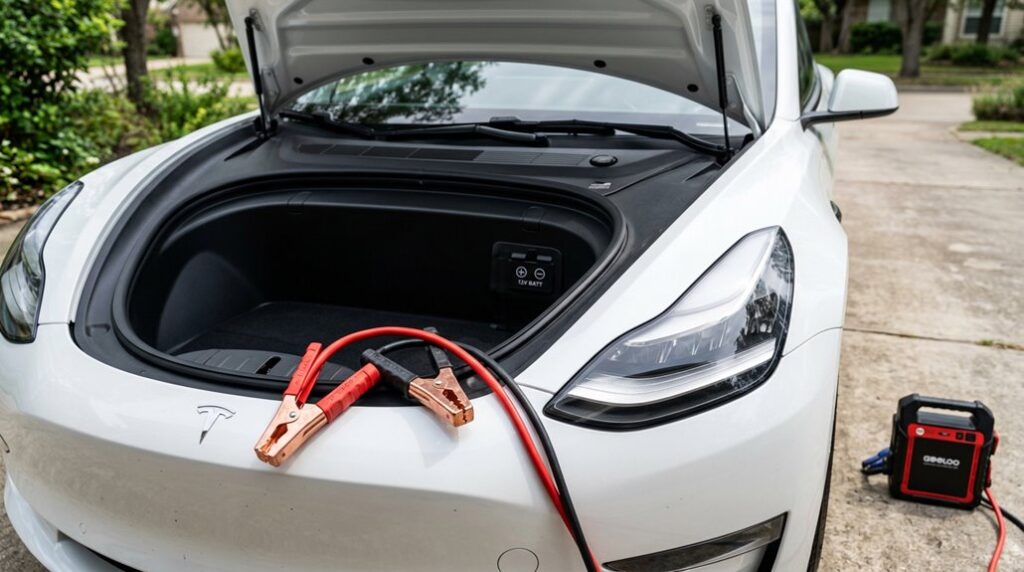
You’ll need to access the frunk using Tesla’s no-power release method if the car is fully unresponsive, then remove the maintenance panel to expose the positive jump post and the designated negative ground point beneath the black plastic trim.
Once you’ve got both cables connected correctly to an automotive-grade jump starter, the touchscreen should wake within a few minutes — at which point you’ve restored low-voltage power and handed control back to the car. Keep in mind that once the vehicle is responsive, you can locate the nearest charging station through the in-vehicle route guidance system to replenish the high-voltage battery if needed.
Locating the Jump Posts
Once you’ve popped the hood and pulled the maintenance panel upward to release its trim clips, the jump posts come into view — and this is where Tesla’s approach plunges sharply from anything you’d find on a conventional ICE vehicle.
In the front compartment, you’ll spot the positive jump post hiding under a red cover. Remove that cover before attaching anything.
On the Model 3, the negative connection is a bolt positioned beside the brake fluid reservoir — not a traditional battery terminal. Model S vehicles follow similar front compartment logic, though build date matters; pre-January 2023 models have a slightly different layout.
Always confirm your specific build against Tesla’s documentation before touching anything. Getting the polarity wrong isn’t a minor inconvenience — it’s an expensive mistake. Check twice, connect once. Unlike conventional vehicles, many Tesla electrical issues and minor faults are resolved remotely through over-the-air updates, meaning a dead 12V accessory battery is one of the few problems that genuinely requires hands-on intervention at the jump posts.
Connecting the Cables Correctly
With the jump posts now exposed and identified, it’s time to run the cables — and the sequence here isn’t optional.
Start with the red positive cable. Match your clamp alignment carefully to Tesla’s designated red positive jump post, remove the cover (Model S owners release it; Model Y owners lift it off entirely), and attach the clamp securely. Keep that cable away from surrounding metal — cable material conducting an accidental short here causes real damage.
Next, connect the black negative cable to the grounded bolt Tesla specifies (the HEPA filter bolt on Model Y, for example).
Both clamps seated? Now activate your external power supply per its manufacturer instructions. The touchscreen may take several minutes to wake up — that’s normal, not a problem. If you later notice any electrical irregularities after the jump, keep in mind that wiring harness alterations or improper connections can create legitimate warranty audit triggers that Tesla evaluates on a repair-by-repair basis.
Waking the Vehicle Up
Cables connected and power supply active, the waiting game begins — and patience here isn’t weakness, it’s procedure.
Open your Tesla app and initiate a remote wake command directly from the controls menu. The car won’t respond instantly; expect anywhere from 10 to 30 seconds while the 12V system stabilizes and re-establishes cellular connectivity.
If the app spins indefinitely, that’s your sleep diagnostics cue — the vehicle isn’t online yet. Lock or release requests (counterintuitively) often trigger faster wake responses than simply refreshing the status screen.
Bluetooth proximity helps too, so stay near the vehicle with your paired phone key active. Once the app confirms the car is online, your systems are live and you’re cleared to proceed. Keep in mind that features like remote live camera access require an active Premium Connectivity subscription and won’t function even after a successful wake if that subscription has lapsed.
What Happens If You Connect the Cables Wrong
Connecting jumper cables to the wrong terminals isn’t just an embarrassing mistake — it’s a physics problem that resolves itself immediately and violently. Reverse polarity creates a direct short circuit the moment that second clamp touches metal. Current floods through the cables in the wrong direction, and clamp overheating follows almost instantly — sometimes fast enough to melt insulation before you can react.
Here’s what typically happens next: a fuse or fusible link blows, your cables get dangerously hot, and you’ll likely hear a sharp spark or sizzle at the connection point. That sound is your wiring absorbing punishment.
The components most at risk are your alternator diodes, electronic control modules, and battery circuits — none of which enjoy reverse current. If the donor vehicle was running during the mistake, the fault current is markedly higher, and the damage potential scales accordingly. Duration matters enormously here — seconds count. Tesla’s high-voltage architecture, which operates across 400V to 1,000V ranges, demands strict polarity and safety protocols that make reverse-connection errors far more consequential than in conventional 12V systems.
Can a Tesla Jumpstart Another Car?
| Factor | Why It Matters |
|---|---|
| Small 12V auxiliary battery | Not sized for cranking another engine |
| DC/DC converter limitations | Can’t replenish current fast enough |
| High starter-motor draw | Exceeds low-voltage circuit capacity |
The core problem isn’t voltage — it’s current. A deeply discharged ICE battery demands surge amperage that overwhelms Tesla’s low-voltage designer. Your emergency protocols should account for this. Ignoring manufacturer guidance also raises legal liability concerns if damage occurs. Keep a dedicated jump pack in your trunk instead — it’s the right tool for the job. Tesla vehicles rely on a small 12-volt auxiliary battery for low-voltage systems, and a 12-volt battery replacement typically costs only $150–$400 out of warranty — a reminder of just how limited this component is compared to what jumping another car demands.
How to Keep Your Tesla’s 12V Battery From Dying Again
Once you’ve dealt with a dead 12V battery — scrambling for a jump pack, rebooting systems, and waiting for the car to wake back up — you’ll want to make sure it never happens again.
Prevention is straightforward once you grasp what’s actually killing the battery.
Three habits make the biggest difference:
- Minimize unnecessary wake events by disabling Sentry Mode when parked somewhere safe and avoiding obsessive app-checking (every tap wakes the car).
- Stay plugged in whenever possible, since the main battery directly supports 12V system health — letting it drop critically low is a double failure waiting to happen.
- Mind your parking habits and temperature control — covered parking reduces heat exposure, which genuinely accelerates low-voltage battery aging.
Software updates also quietly improve power management, so don’t ignore them.
And if warning cascades appear after a fresh replacement, get it inspected immediately rather than rebooting your way into a false sense of security.
Frequently Asked Questions
Does Tesla Roadside Assistance Cover a Dead Low-Voltage Battery?
Over 90% of Tesla stranding events trace back to low-voltage failure. Yes, your roadside coverage includes a jump attempt. If unsuccessful, you’ll receive an emergency tow, though battery replacement and concierge service depend on your warranty status.
Will a Dead 12V Battery Void My Tesla Warranty?
A dead 12V battery won’t void your Tesla warranty. The warranty implications depend on the failure’s cause. Keep your service documentation handy, as Tesla determines coverage after testing whether it’s a defect or normal wear.
Can Extreme Cold Permanently Damage Tesla’s Low-Voltage Battery?
Don’t sweat the cold storage question—extreme cold won’t permanently damage your Tesla’s low-voltage battery. It can stress it and worsen battery chemistry degradation if it stays undercharged, but the effects are typically temporary.
How Long Does a Tesla Low-Voltage Battery Typically Last?
Your Tesla’s low-voltage battery has a typical lifespan of 2–4 years for lead-acid units, while newer lithium-ion versions last markedly longer. Factor in replacement cost when budgeting, as conditions like heat and cold affect longevity.
Does Tesla Notify You Before the Low-Voltage Battery Completely Dies?
Yes, Tesla does warn you, but don’t count on generous lead time. Alert timing varies by model, temperature, and battery age, so adjusting your notification settings and acting fast on any low-voltage warning is critical.