Your Tesla Wall Connector installation might be simpler — or far more dangerous — than you think. Most homeowners already have a panel that supports a 60-amp circuit, yet still hire an electrician for work they could handle themselves. But breaker sizing, conduit routing, torque-spec wiring, and app registration leave zero room for error — one misstep turns your home charger into a fire hazard. Here’s exactly what you need to know before touching a single wire.
Gather Tools, Materials, and Electrical Requirements First
Before you touch a single wire or drill a single hole, you’ll need 12 specific items (tools, materials, and electrical components) staged and ready to go — because nothing stalls a DIY installation faster than a mid-project hardware run.
Before touching a single wire, have all 12 required items staged — because mid-project hardware runs kill momentum fast.
Start with your tool kit: a drill, Phillips and flathead screwdrivers, T10 and T20 security drivers (Tesla-specific, non-negotiable), a level, measuring tape, wire stripper, and voltage tester. That’s eight.
Add fish tape, PVC primer and cement, a deburring tool, and conduit cutters to round out the physical supplies.
Your safety checklist and site assessment run parallel to this prep work. Confirm your wall surface — stud, concrete, or plywood backer — can handle long-term load. If rigid straight conduit proves too difficult to work with due to wire bending, opt for aluminum conduit instead.
Measure the distance from your panel to your parking spot; longer runs mean larger conductor sizing, typically 6 AWG copper minimum for higher-amperage Wall Connector setups. Verify local code requirements before ordering anything. Always shut off power completely and verify dead circuits with a voltage tester before making any electrical connections to prevent shock or short-circuit hazards.
Home charging is where most Tesla owners either gain real convenience or quietly lose time every day. A standard outlet can work, but it often means longer charging windows and less flexibility when your schedule changes. Installing a Tesla Wall Connector gives you a dedicated Level 2 setup that delivers faster, more consistent charging at home, making it easier to keep your vehicle ready without planning your day around charging time.
Plan Your Wall Connector Circuit: Breaker, Wire Gauge, and Conduit
With your tools staged and your wall surface confirmed, the next move is locking in your circuit spec — because every downstream decision (conduit size, wire gauge, panel space) flows directly from the breaker size you choose.
For maximum output, Tesla specifies a 60 A double-pole breaker supplying 48 A continuous charging at 240 V. Can’t support 60 A? Tesla accommodates 50 A, 40 A, 30 A, 20 A, and 15 A configurations — each with proportionally reduced output.
Wire gauge follows breaker sizing directly. A 60 A circuit requires minimum 4 AWG, 90°C THWN-2 copper conductors (with a 60°C-rated breaker) or 6 AWG with a 75°C-rated breaker. Don’t improvise here — undersized conductors create heat, and heat creates problems.
Conduit selection depends on wire gauge, conductor count, and local fill requirements. Minimize bends, keep runs tight, and use weather-resistant fittings for any outdoor segments. Straightforward physics: shorter runs equal lower voltage drop. Because EV chargers are expected to run continuously for several hours at a time, the continuous load rating rule applies — requiring your breaker to be sized at 125% of the actual draw. Most Teslas support an 11.5 kW onboard charger ceiling for Level 2 charging, meaning even a correctly sized circuit will be governed by what the vehicle itself can accept.
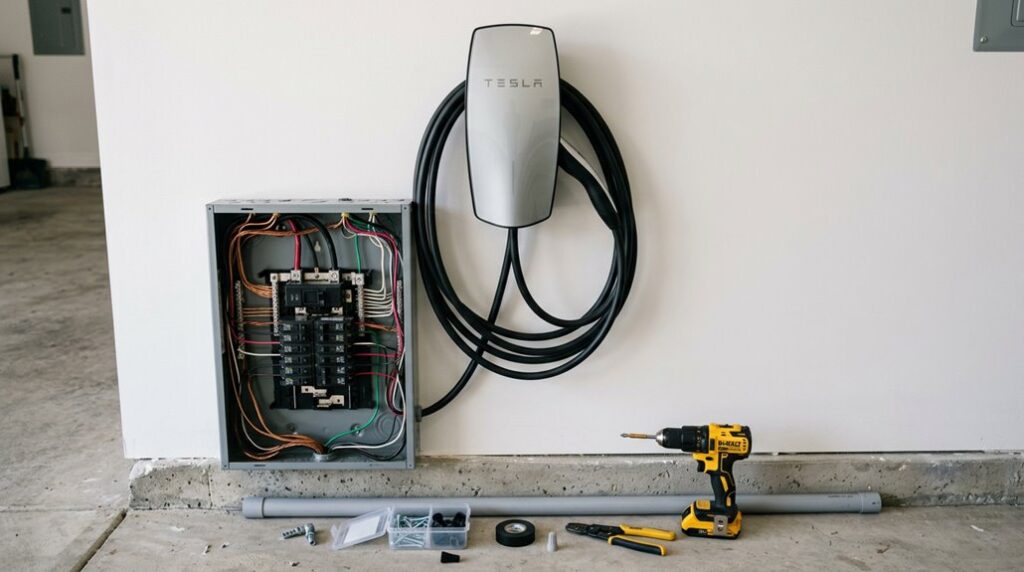
Mount the Wall Connector Bracket the Right Way
Mounting the Wall Connector bracket correctly sets the physical foundation for every step that follows, so get this part right before a single wire goes in. Bracket levelness isn’t optional—a tilted bracket means a tilted charger, and that’s a problem no amount of optimism fixes.
Getting the bracket level isn’t a suggestion—a crooked mount means a crooked charger, and that’s not fixable later.
Follow this sequence precisely:
- Hold the bracket against the wall and use it as your drilling template, spacing the two holes exactly 8 7/16 in. (214 mm) apart.
- Drill two 3/8 in. (7.1 mm) holes, using lag screws on wood or masonry anchors on brick and concrete.
- Confirm conduit alignment before committing—run your 1 in. conduit into the back or left side of the enclosure, keeping it left of the wall stud.
- Tighten all hardware until zero rocking or flexing exists, then hang the charger body.
Position the connector no higher than 48 in. from the floor. Tesla includes a cardboard template in the kit to help you mark this height accurately before drilling anything. Unlike a Supercharger, which uses offboard AC-to-DC rectification to bypass the vehicle’s onboard charger entirely, the Wall Connector delivers AC power that your Tesla’s onboard charger converts, making a secure and stable installation critical to consistent charging performance.
Even with a proper home charging setup, many Tesla owners overlook what happens when the car needs to be lifted for tire rotations or basic maintenance. A Tesla jack pad adapter set ensures the vehicle is lifted safely at the reinforced points, helping prevent costly mistakes during servicing and protecting the battery pack and chassis from avoidable stress.
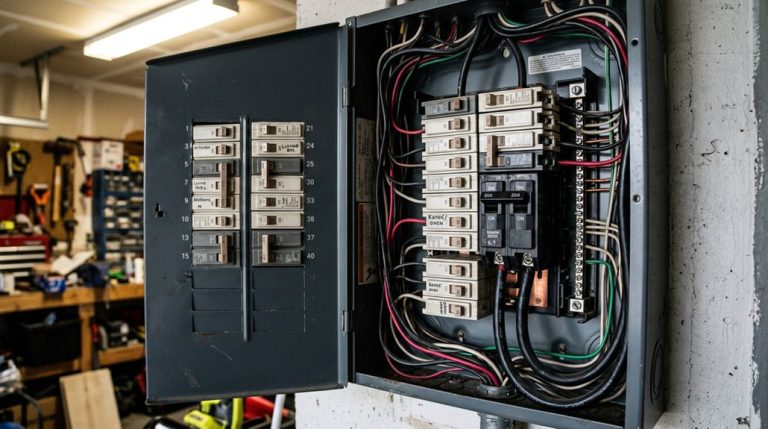
Wire Your Wall Connector’s L1, L2, and Ground Terminals Correctly
Once the bracket is secured and your conduit is run, the wiring phase is where voltage actually meets hardware—and where most DIY mistakes happen. Forget wire color myths—black and red are conventionally hot, but code doesn’t prohibit other colors on a 240 V circuit. What matters is function: L1 and L2 each carry 120 V to neutral, and together they deliver 240 V to your Wall Connector. The Tesla Gen 3 Wall Connector requires minimum 6 AWG, 90°C rated conductors, as specified in the manual.
| Terminal | Conductor | Role |
|---|---|---|
| L1 | Hot (black) | 120 V phase leg |
| L2 | Hot (red) | 120 V phase leg |
| Ground | Bare/green | Fault protection |
Neutral never lands here. The ground wire runs back to your panel’s grounding bar—not a random ground rod placement near the unit. Torque every terminal to spec. Loose connections cause arcing, heat buildup, and eventually, an expensive lesson about resistance. Using a non-certified charger during installation can create targeted warranty denial risk, meaning Tesla may refuse to cover damage to charging-related components if an unapproved unit is identified as the cause.
Set Up and Register Your Wall Connector in the Tesla App
Your Wall Connector is wired, torqued, and pulling power from the panel—now the hardware needs to shake hands with the software. Registration takes roughly five minutes, so keep the Tesla app open throughout.
Follow these four steps to complete setup:
- Account setup – Log into your existing Tesla credentials or create a new account directly in the app.
- Add Product – Tap the top-right menu, select *Add Product*, then hit *Begin Registration*.
- QR scanning – Scan the QR code printed on your Quickstart Guide (guard that document like it owes you money).
- Wi-Fi connection – Connect the Wall Connector to your home network; the app may temporarily join the device’s own Wi-Fi during app pairing before switching back.
Once registered, you’ll enable scheduled charging, real-time status, charging history, and automatic software updates—all managed directly from the app. Keep in mind that features like remote live camera access require a Premium Connectivity subscription and cannot be recovered through a Wi-Fi workaround alone.
Confirm Your Wall Connector Is Working Before Your First Charge
Hardware in place, app registered—now you need to verify the Wall Connector actually works before you hand it charging duties for a $50,000+ vehicle.
Start with the startup indicators. After powering up, watch for a green LED line lasting roughly 10 seconds—that’s your confirmation power’s arriving cleanly. No lights? Check your breaker immediately.
Once your Tesla connects, the vehicle handshake determines what happens next. The Wall Connector reads the car’s charge request before supplying any power. Keep in mind that hardware limitations on older vehicles can restrict available software features, including charging-related controls accessible through the Tesla app.
| LED Status | Meaning |
|---|---|
| Solid green | Ready to charge |
| Solid blue | Vehicle connected, no charge requested |
| Pulsing blue | Establishing vehicle handshake |
| Two blue blinks | Connected, but Wall Connector isn’t ready |
| Solid red | Internal fault detected |
A persistent red light means escalate—don’t ignore it. Scheduled charging settings can also block your first session, so verify those inside the Tesla app before assuming hardware failure.
Frequently Asked Questions
Can Multiple Tesla Wall Connectors Share One Circuit in a Home Garage?
Just as two appliances can share an outlet safely, multiple Tesla Wall Connectors can share one circuit — you’ll need proper circuit sharing with built-in load management to keep everything balanced and code-compliant.
Does a Tesla Wall Connector Work With Non-Tesla Electric Vehicles?
It depends on adapter compatibility and charging standards. The standard Wall Connector works with non-Tesla EVs using a NACS-to-J1772 adaptor, while the Universal Wall Connector supports both natively without extra accessories.
Will a Power Outage Damage a Mid-Charge Tesla Wall Connector Session?
When the lights take an unexpected vacation, don’t panic—your Wall Connector’s built-in safeguards handle the charging interruption gracefully. You won’t face battery preservation issues, as charging resumes automatically once stable power returns.
Can a Tesla Wall Connector Be Installed Outdoors or in an Exposed Location?
Yes, you can absolutely mount your Tesla Wall Connector outdoors. It’s built for outdoor installation with strong weatherproofing considerations—sealed housing protects against rain and snow, though avoiding excessive direct exposure is always a smart move.
Does Installing a Wall Connector Void Any Existing Tesla Vehicle Warranty?
Installing a Tesla Wall Connector doesn’t void your vehicle’s warranty scope. Think of it like Jake’s case — his DIY install was fine until faulty wiring damaged the charger. Dealer approval isn’t required, but proper installation protects your charging equipment coverage.