Most Tesla owners assume swapping rims is as simple as any other wheel change. It isn’t. One misplaced jack point destroys your battery skid plate — a $3,000 mistake. The wrong wheel offset rewrites your handling geometry. Incorrect TPMS programming floods your dash with phantom warnings. Mismatched load ratings silently void your warranty. These aren’t rare edge cases; they happen to careful, well-intentioned owners every day. Before you touch a single lug nut, there’s critical information you need to know.
What to Check Before You Swap Tesla Rims?
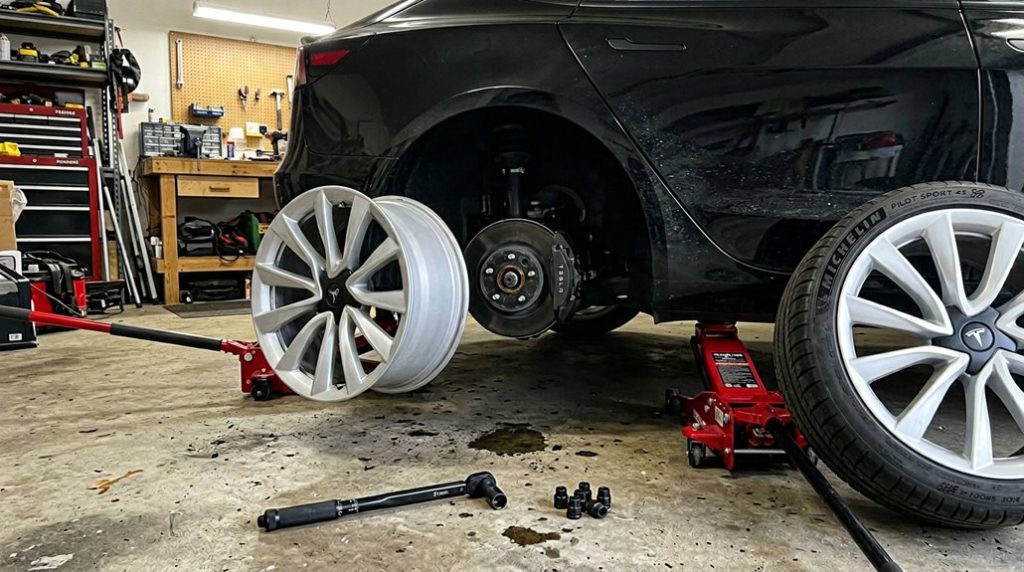
Before you touch a single lug nut, confirm that your jack, jack stand, and lifting interface are all rated for Tesla’s curb weight and positioned correctly at the manufacturer-designated lifting point — skipping this step on a 4,500-plus-pound vehicle isn’t just inconvenient, it’s structurally destructive. Tesla requires a dedicated puck or adapter to keep the jack centered; improvising here crushes battery enclosures.
Next, verify wheel compatibility. Tesla explicitly warns against non-approved wheels, so confirm your replacement set matches the vehicle’s required mounting style and hardware before anything else touches the hub. Keep in mind that unsupported tire sizes can create legitimate warranty audit triggers, meaning a rim swap with incompatible sizing may invite scrutiny on unrelated future claims.
Don’t overlook tire age, either. Tesla recommends replacement every six years regardless of remaining tread depth — a tire can look fine and still be compromised internally. Check sidewalls for cuts, bulges, or cord exposure at multiple points, including the inner shoulder, where uneven wear quietly signals alignment or suspension problems you’d rather catch now than on the highway. Use a tread depth gauge to check at three tread positions across each tire, since a single reading at the center can miss edge wear that indicates a deeper mechanical issue worth addressing before the swap.
Tesla Wheel Specs That Actually Matter
Once you’ve confirmed your lift points and verified basic compatibility, the next step is getting specific — because “fits a Tesla” isn’t a spec, it’s a guess.
Tesla’s Model Y runs four distinct wheel sizes: 18×8.5J, 19×9.5J, 20×9.5J, and a staggered 21-inch setup (9.5J front, 10.5J rear). Each size pairs with an exact tire — 235/55R18 through 275/35R21 rear — and a minimum load and speed index like 104 XL H or 98 XL W.
Offset isn’t optional, either. Factory offsets range from 35.5mm on 18-inch wheels to 52mm on the 21-inch rear. Get that wrong, and you’re rubbing fenders or binding suspension.
The bolt pattern is 5×114.3mm, and hub-centric fit keeps everything centered without stressing lug nuts.
Once the wheel’s mounted, apply correct wheel torque and don’t forget proper center caps — they’re not decorative, they seal hub exposure. Stepping up from 19-inch to 21-inch wheels on a Model Y also carries a real efficiency penalty, with range reduced by roughly 20–30 miles per charge depending on driving conditions. For the Model 3 specifically, staggered fitment options like 235/40R19 paired with 275/35R19 are available across multiple trim levels, so confirming your exact configuration before purchasing replacement tires prevents costly sizing mismatches.
Changing Tesla rims without proper lift protection is where expensive mistakes happen fast—one wrong jack point and you’re risking the underbody and battery shield. Avoid that stress by using a Tesla jack pad set so every wheel change is stable, safe, and damage-free from the start.
How to Jack a Tesla Without Damaging the Battery
Proper jack pad placement is non-negotiable. A rubber pad centers the load correctly on the lift point and protects surrounding components from a misaligned saddle. Use a low-profile floor jack with a minimum 2.5-ton capacity to safely lift the vehicle without risking structural compromise.
Also disconnect the charging cable — that’s standard prep, not optional. Before bringing the jack into position, slide three fingers into the holes under the vehicle skirt to locate and mark the center of the jack point.
How Wheel Size Affects Tesla Range, Ride Quality, and Speedometer Accuracy
Wheel size quietly shapes three things you’ll notice every day: how far your Tesla goes, how it rides, and whether your speedometer’s lying to you.
Jumping from 18-inch to 20-inch wheels typically costs you 10–15% urban range. Aero impact from open-spoke designs worsens that loss at highway speeds. Shorter sidewalls also kill noise levels and winter performance — less rubber means less cushioning and reduced cold-weather grip. Cold weather already strains range independently, and pairing it with larger wheels can compound the efficiency hit well beyond what either factor causes alone, making battery preconditioning especially valuable before winter drives.
| Wheel Size Change | Range Impact | Ride/Accuracy Effect |
|---|---|---|
| 18″ → 19″ (Model 3 RWD) | ~3–5% loss | Minor speedometer drift |
| 18″ → 20″ (Model 3 Performance) | ~7% loss | Harsher ride, stiffer response |
| 2+ inch jump (any trim) | 10–15% loss | Noticeable odometer inaccuracy |
Keeping your overall tire diameter close to stock minimizes speedometer error. Change the diameter markedly, and your displayed speed reads lower than reality — a detail worth knowing before your next highway drive. Stability control and driver-assist systems also depend on accurate wheel diameter data, so a significant size deviation can compromise their calibration and intended behavior.
How to Transfer or Reset Your Tesla TPMS Sensors
Your Tesla’s TPMS sensors don’t automatically know they’ve moved to a different set of rims, so grasping whether you’ve got BLE (Bluetooth Low Energy, standard on 2021+ Model 3/Y) or older RF sensors is the first thing you need to sort out before touching a single lug nut.
Transferring sensors between wheel sets requires full tire disassembly, a clean mounting hole, a fresh rubber seal seated flush against the wheel base, and a retaining nut torqued to exactly 8 Nm for Continental sensors (5 Nm for Baolong) using an 11 mm deep socket — overtighten it and you’re cracking seals, undertighten it and you’re chasing slow leaks.
Once the new wheels are mounted, drive above 20 mph (32 km/h) for roughly one minute to trigger the ID learn cycle, or go to Controls > Settings > Service & Reset > Tire Pressure Monitor on the touchscreen to manually reset if the display is still showing dashes.
You can also confirm your current tyre pressure readings directly from the touchscreen’s Controls menu, which serves as the central hub for lighting, mirrors, charging, and driver-assist settings alongside tyre monitoring.
Understanding TPMS Sensor Basics
Most Tesla owners swapping aftermarket wheels quickly find that the Tyre Pressure Monitoring System (TPMS) doesn’t simply transfer its settings with the new rims — you’ll need to either reset or relearn the sensors before the system reads accurately again. Grasping TPMS basics saves you time and avoids false warnings.
| Factor | Detail | Impact |
|---|---|---|
| Sensor lifespan | 5–10 years typical | Replacement may coincide with rim swap |
| Reset method | Touchscreen-based | No tools required |
| Auto-learning speed | Activates above 40 km/h | Requires stable driving conditions |
Each sensor transmits individual wheel pressure data. Mismatched wheel sizes confuse the system entirely, triggering persistent warnings that won’t clear until you’ve selected the correct specification during reset. Keep in mind that your wheel choice also carries real performance consequences, as upgrading to larger wheels increases rolling resistance and aerodynamic drag, reducing your real-world range by roughly 5–10%.
Transferring Sensors Between Wheels
Sensor swapping also demands hardware compatibility. Baolong and Continental sensors aren’t interchangeable, and each has a distinct retaining-nut torque target — 5 Nm and 8 Nm, respectively.
Seal preservation matters here too; wipe the mounting area with IPA before installation and confirm the TPMS seal seats fully against the base.
Once remounted and balanced, drive above 20 mph for roughly one minute to complete the ID learn procedure. Tesla’s NACS connector standard unifies Supercharger, Destination, and home charging under one plug design, meaning any wheel swap that maintains sensor function ensures your vehicle remains ready to charge seamlessly across the network.
Resetting TPMS After Installation
Once the new wheels are on and torqued down, the TPMS system needs to catch up — and Tesla makes that process straightforward, though it does demand a specific sequence.
First, inflate all tires to the cold pressure listed on your door placard. Then steer to Controls > Settings > Service & Reset > Tire Pressure Monitor > Reset Sensors. Select the correct wheel size — wrong selection triggers false warnings, which wastes everyone’s time.
Recalibration timing matters here: the vehicle must sit stationary for 20 minutes before your road test begins. Once you exceed 25 mph, auto-learning activates and typically completes within 20 minutes.
Regarding sensor privacy, Tesla’s direct TPMS relearns sensor IDs automatically — no manual programming required. All four pressure values should populate once learning finishes successfully. This seamless reprogramming is made possible by Tesla’s ability to push over-the-air software updates that refine sensor learning behavior and system logic without requiring a dealership visit.
Torque Specs and How to Update Your Tesla Wheel Profile
Getting the torque right isn’t optional—it’s the difference between a wheel that stays put and one that doesn’t. For Model 3, Model Y, and Model X, the spec is 175 Nm (129 lb-ft). Hit that number with a calibrated torque wrench, not an impact gun—impact tools overshoot easily and damage the fastener interface without warning.
Tighten in a star pattern, not a circle. Snug every lug lightly first, then complete a full-torque pass in the same sequence. That two-pass method guarantees even seating across the wheel (think of it as torque calibration spread across the contact surface rather than concentrated at one point).
After a few miles, retorque everything—lug nuts settle under load. Also update your Tesla’s wheel profile if you’ve changed sizes; mismatched settings affect displayed range and speed accuracy. Proper wheel balancing matters too—skip it, and you’ll feel every mile afterward. If you’re fitting wheels to a Model S Plaid, keep in mind that unlocking the car’s full top speed requires compatibility with 21″ Arachnid wheels and carbon-ceramic brakes, so wheel choice on that trim carries more consequence than on any other variant.
New Tesla rims stand out the moment they’re installed, which also makes them a target when you’re parked in the wrong place at the wrong time. Don’t wait until something goes missing—secure your wheels with a Tesla wheel lock nut set so your upgrade stays exactly where it belongs.
Frequently Asked Questions
Can Curb-Rashed Tesla Wheels Be Safely Repaired Instead of Replaced?
You can often save a curb-rashed Tesla wheel through cosmetic refinishing and wheel restoration if there’s no cracking, bending, or bead-seat damage — only surface-level scuffs that don’t compromise structural integrity.
Which Socket Type Should Never Be Used on Tesla Lug Nuts?
You should never use 12-point sockets on Tesla lug nuts. They don’t grip hex flats securely, increasing rounding risks. Always choose 6-point impact sockets instead—they’re safer, more reliable, and protect your lug nuts during removal.
Should Lug Nuts Be Loosened Before or After Jacking the Vehicle?
Like cracking a jar before unscrewing the lid, you should loosen lug nuts prejack. This torque sequence keeps your wheel grounded, resisting spin so you’ll apply breakaway force safely and effectively.
What Protective Gear Is Recommended When Removing and Installing Tesla Wheels?
When removing and installing Tesla wheels, you’ll want to wear protective gloves to improve grip and prevent cuts, and eye protection to shield against debris or accidental tool slips.
How Should Tesla Lug Nuts Be Tightened to Ensure Even Clamping Force?
Tighten your Tesla’s lug nuts in a star pattern, bringing each one down gradually in stages. You’ll then apply proper torque using a torque wrench set to 175 Nm until it clicks at every nut.