Most Tesla Model X owners have no idea their car can perform a full choreographed light show — synchronized doors, sound, and all. But activating it isn’t as simple as pressing a button. Between specific USB configurations, precise file formats, and clearance requirements for those dramatic Falcon Wing doors, most people get it wrong on the first attempt. Get it right, though, and your Model X transforms into something that stops foot traffic cold. Here’s exactly what you need to know.
What the Tesla Model X Light Show Actually Does
When Tesla rolled out its Light Show feature with the V11 software update, it wasn’t just a software gimmick — it turned the Model X into a choreographed performance machine. Every exterior light — headlights, taillights, fog lights, turn signals — fires in precise sequence, synchronized to music running through the speakers.
That’s vehicle choreography in its most literal form. You’re not watching random flashing; you’re watching a timed, programmed routine where each light channel operates independently, switching fully on or off (most lights don’t dim) or ramping through preset shifts at 500 ms, 1000 ms, or 2000 ms intervals.
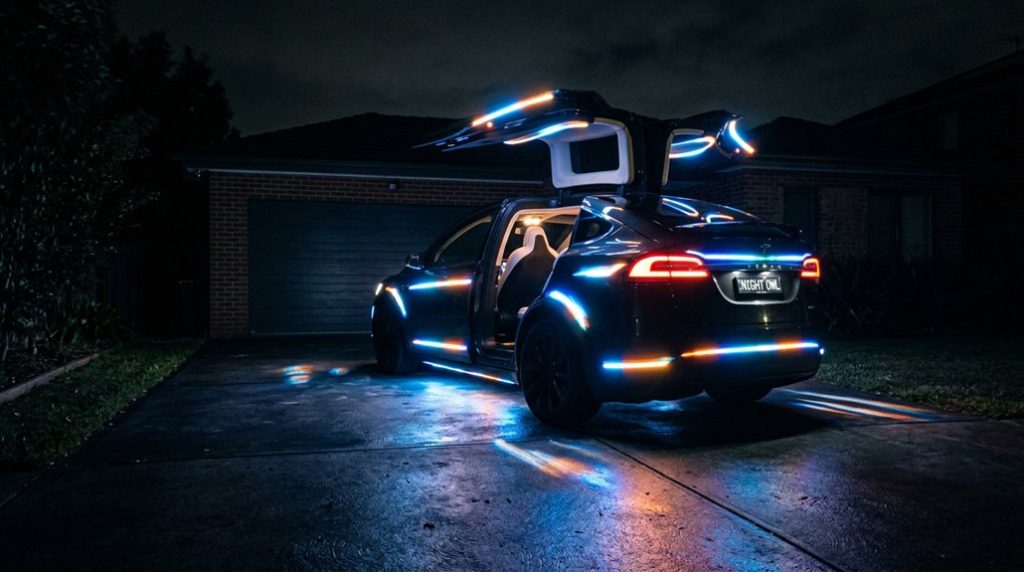
The sensory appeal is obvious when you see it running outdoors at night. Tesla preloaded at least one built-in show, but users can build entirely custom sequences using xLights software, then transfer the .fseq file and audio track via USB. The car executes the whole thing automatically once triggered. Custom shows support a maximum duration of 4 hours for a single programmed routine. The Model X’s distinctive falcon-wing rear doors and panoramic windshield give the Light Show a uniquely dramatic physical presence that flat-roofed vehicles simply can’t replicate.
The Tesla Model X “dance” feature looks impressive on its own, but the moment the audio feels underpowered or limited to the cabin, the whole experience loses impact. Push the moment further by connecting a high-quality portable Bluetooth party speaker so the sound matches the movement and your Tesla becomes the center of attention instead of just a visual trick.
Clear Space Around Your Model X Before Starting
Before the light show can do its thing, the Model X itself needs room to operate. Park on a stable, level surface outdoors—uneven ground affects door alignment, and the Falcon Wing doors require both lateral and vertical clearance because of their articulated opening path. Unlike conventional doors, they sweep upward and outward, so tight side spacing risks incomplete closure, which delays the start sequence entirely.
Run a quick safety checklist before activation: confirm the front hatch area is unobstructed, verify rear clearance for visual effects, and check that no walls, pillars, or parked vehicles sit within the door swing radius. The show only begins after you’ve exited and sealed every door, so incomplete latching stops everything cold. For the best visual impact, choose a dark, open location away from streetlights so the full range of exterior lights and LED strips registers clearly against the surroundings.
Spectator positioning matters too. Place your audience far enough back to see the full light pattern without walking through the performance zone or accidentally triggering proximity sensors during the sequence. Tesla’s remote software updates can occasionally modify vehicle behavior overnight, so it’s worth confirming your vehicle’s software is current before running the light show to ensure the full feature set performs as expected.
The Tesla Model X “dance” feature already turns heads on its own, but once the cabin lighting feels flat or uneven, the whole experience loses that premium, show-ready effect you expect from a vehicle like this. Bring the interior to life by installing a Tesla interior ambient LED light kit so every movement, beat, and light sequence feels more immersive and visually striking inside the cabin.
How to Start the Light Show From Toybox
Once your selections are locked in, tap Confirm. The show launches automatically after confirmation, provided the vehicle is parked and you’re outside with the doors locked (or the countdown expires). Tesla designed this feature for stationary use, so don’t expect it to run while driving.
Simple, deliberate, and surprisingly theatrical for a touchscreen menu. The light show is delivered through Tesla’s over-the-air updates system, meaning new sequences and improvements can be added to your vehicle without any hardware changes. You can also uncheck Dance Moves to disable the window, trunk, and mirror motion if you prefer a lights-only experience.
How to Load a Custom Light Show via USB
You can confirm your vehicle’s current software build number by navigating to the car icon → Controls → Software on the touchscreen, which helps ensure compatibility with the latest light show feature set.
USB Drive Formatting Requirements
Getting the USB drive formatted correctly is the first real hurdle — skip this step carelessly and the Model X won’t recognize your custom show at all. Your file system choices matter here. Tesla supports exFAT, MS-DOS FAT, ext3, and ext4; NTFS simply won’t work.
| Format | Compatibility | Recommended Use |
|---|---|---|
| exFAT | ✅ Supported | Best cross-platform option |
| MS-DOS FAT | ✅ Supported | Mac users |
| ext3/ext4 | ✅ Supported | Linux environments |
| NTFS | ❌ Not Supported | Avoid entirely |
| FAT32 | ✅ Supported | Troubleshooting fallback |
Drive partitioning strategies also help — keeping a dedicated FAT32 partition strictly for your LightShow folder prevents conflicts with other Tesla USB functions, ensuring clean file recognition every time. The same Model X that runs your light show can also access Tesla’s 17,800+ Superchargers via a NACS connector, reflecting how deeply Tesla standardizes hardware and software compatibility across its entire ecosystem.
Placing Required Show Files
Once files are copied, safely eject the drive before removing it.
Skipping that step risks corrupted files — a frustratingly avoidable problem. To further protect your setup, keep documentation of your USB configuration and any custom files, as professional installation records and receipts can support your position if a warranty claim is ever disputed.
Control the Model X Light Show Remotely With the Tesla App
The Tesla app lets you kick off the Model X Light Show without ever touching the car—useful when you want the show running before you walk up, or when you’d rather not sit through a full production from the driver’s seat. Remote scheduling requires mobile access enabled in settings and an active Tesla account login (app permissions gate everything). Bluetooth must be on, and cellular or Wi-Fi connectivity needs to be solid.
From the schedule flow, select your song or custom file, adjust volume, then confirm. A countdown begins immediately.
| App Step | What It Does |
|---|---|
| Enable mobile access | Permits remote commands |
| Select Light Show | Chooses song or custom file |
| Adjust volume | Sets external speaker level |
| Confirm schedule | Starts countdown timer |
| Stop command | Ends show after activation |
The app also grants access to the car beforehand—required for dance-move mode, which moves windows and the trunk. Keep in mind that the Model X is no longer in active production, meaning Model X availability is now limited exclusively to the used market if you’re considering ownership alongside the Light Show experience.
Light Show Won’t Start? Fix These Model X Errors First
When your Model X refuses to kick off its light show, don’t assume hardware failure—most causes are software-level and fixable in minutes. Start with a soft reboot: hold both steering wheel scroll wheels until the center display goes black and the Tesla logo reappears. That single step clears most logic faults.
Next, check your USB setup. Rename your files exactly lightshow.fseq and lightshow.mp3—custom names get ignored. Reconnect the drive only after the car fully restarts. A corrupted stick causes silent failures, so swapping in Tesla’s branded USB often resolves read errors.
Location matters too. Cramped spaces trigger the Falcon Wing door safety logic, aborting the show early. Move to open ground, or disable Dance Moves to bypass door-motion checks entirely.
If failures persist post-update, treat the firmware as the likely culprit (software rollback may apply). Tesla’s over-the-air software updates can modify or restore feature behavior without a service visit, making firmware the first suspect when a previously working show suddenly stops. Tesla’s network diagnostics can confirm whether a service appointment is genuinely necessary.
Frequently Asked Questions
Can the Model X Light Show Run in Cold or Freezing Weather Conditions?
Yes, you can run it in cold weather, but expect a cold start to slow battery and system readiness. You’ll also face higher battery drain, so precondition your Model X beforehand.
Does Running the Light Show Frequently Cause Any Long-Term Battery Degradation?
Image your battery aging like fine wood grain—slow and steady. Frequent light shows won’t meaningfully harm your battery health; the real culprits are poor charging habits, high cycle counts, and excessive power draw from fast charging.
How Long Does the Built-In Model X Light Show Performance Typically Last?
You’ll find the typical duration of the built-in Model X light show’s performance length runs about one minute. It stops automatically when the sequence finishes, or you can manually end it anytime via the touchscreen.
Can Multiple Tesla Vehicles Synchronize Their Light Shows Simultaneously?
Ironically, your cars don’t actually “talk” to each other — yet you can still achieve stunning fleet choreography! You can sync up to eight Teslas using synchronized beaming via matching scheduled start times through the Tesla app.
Is the Light Show Available on Older Model X Vehicles With Earlier Software?
Your older Model X may run the stock Light Show, but software compatibility affects custom show access. Hardware limitations aren’t the barrier—earlier firmware often restricts features, so check Toybox for “Start The Show” to confirm availability.