Everyone assumes the massive high-voltage battery is what kills a Tesla — they’re wrong. The culprit behind most no-start nightmares is a humble 12V auxiliary battery, the same concept powering decades-old gas cars. Before you spiral into expensive diagnostics or dealer appointments, there’s a straightforward process that gets most Teslas back online fast. The fix is far simpler than the panic it causes.
Why Your Tesla Won’t Start and Where to Look First
When a Tesla refuses to start, the 12V auxiliary battery is statistically the most likely culprit—not the high-voltage traction pack most owners immediately suspect. The 12V system powers the onboard computers, access modules, and control logic that must boot before the drivetrain engages. Kill that circuit, and the car’s dead regardless of what the main pack shows. The Tesla drivetrain contains roughly 20 moving parts, a dramatic reduction from the approximately 2,000 found in comparable internal combustion engines, meaning fewer mechanical failure points contribute to no-start conditions.
Your first diagnostic pass should cover four areas: 12V battery health, key fob status, high-voltage state of charge, and software faults. Cabin temperature matters here—extreme cold accelerates 12V degradation, which can turn a borderline battery into a no-start overnight. Battery diagnostics get complicated fast when multiple systems fail simultaneously, so isolate variables early.
Common symptoms map cleanly to root causes. An unresponsive touchscreen or “No Key Detected” warning typically points to 12V failure. A key fob with a dead CR2032 produces nearly identical symptoms. Check both before assuming anything catastrophic. A software glitch can also freeze onboard systems and prevent the vehicle from waking up entirely.
Nothing ruins your day faster than walking up to your Tesla and finding it completely unresponsive. Keep a backup plan in the trunk and avoid being stranded with the NOCO GB40 Boost Plus 1000A Jump Starter trusted for unexpected battery emergencies before a simple 12V issue leaves you stuck waiting for help.
Tesla Black Screen or No Power? Try This Reset First
A black screen on entry can stop you cold—no display, no backup camera feed, no access to vehicle controls—but before you schedule a service appointment, there’s a simple reset that resolves the majority of software-triggered display failures.
Shift into Park first. Then hold both steering wheel scroll buttons simultaneously until the touchscreen goes black. Wait roughly 30 seconds while the touchscreen firmware reloads and the display cycles back.
Shift into Park, hold both scroll buttons, wait 30 seconds—your touchscreen reloads itself.
That’s it. Tesla Service confirms this restart targets the touchscreen exclusively—it doesn’t power down other vehicle components or interrupt drivetrain operation.
Think of it as a targeted screen diagnostics refresh rather than a full reboot.
If the screen returns, you were dealing with a temporary software glitch.
If it stays black after repeated attempts, you’re likely facing a display unit failure or a deeper fault that requires scheduling service. No menu workaround survives a completely dead screen. If the soft reboot fails to resolve the issue, a full power cycle through Controls, Safety, and Power Off resets the entire vehicle computer system and clears more persistent software glitches. You can also verify your current software build number by navigating to Controls → Software once the screen recovers, which helps confirm whether an outdated version may be contributing to recurring display faults.
How to Jump-Start Your Tesla’s 12V Battery
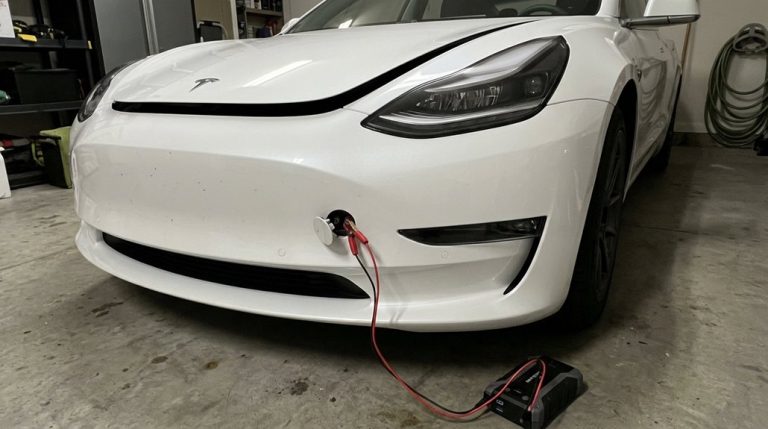
Dead 12V battery is one of the more frustrating Tesla failure modes—the high-voltage pack can sit at 90% state of charge while the car refuses to open, respond to the app, or power the touchscreen, all because the low-voltage system that bootstraps everything else has given out.
To jump-start it, grab a portable jump starter rated for 12V systems.
On Model 3, open the hood, remove the maintenance panel, and locate the red positive jump post—terminal identification here is non-negotiable, since touching that positive cable to adjacent metal creates a very bad day.
Connect red positive first, then black negative to a designated grounding point (near the brake fluid reservoir on some builds).
Jump start safety means powering on the external supply only after both cables are fully seated.
Touch the screen to wake the car, then disconnect black negative first, red second. After a successful jump start, drive the vehicle for at least 30 minutes to allow the high-voltage system to recharge the 12V battery and prevent an immediate repeat failure.
Tesla’s thermal management system actively monitors battery health and can be checked through the internal display without requiring any external diagnostic tools, making it easier to identify whether a recurring 12V issue points to a deeper electrical fault.
Fix Key Errors, Brake Faults, and Sensor Blocks Stopping Your Tesla
Sorting out a dead 12V is straightforward once you know where to look, but a Tesla that won’t start after the 12V checks out fine is pointing you toward a different class of problem—key recognition failures, brake authorization faults, and sensor interference that quietly block the start sequence before it even gets going.
Start with key card positioning: place the card directly on the center console reader and hold it there for five full seconds.
Pull it from any wallet or case first—RFID-blocking material kills detection reliably.
If placement isn’t the issue, check fob batteries (CR2032, cheap, swappable in seconds), since a dying cell mimics pairing failures convincingly.
Still nothing? Run pairing procedures through Controls > Locks, holding the fob near the center console with the brake pedal pressed.
That brake input is required—Tesla’s authorization sequence demands both signals simultaneously.
Finally, eliminate interference sources: phones, laptops, and other electronics near the card can corrupt the handshake entirely. Keep in mind that hardware limitations on older vehicles can also restrict available features, meaning some troubleshooting steps may behave differently depending on your car’s generation. If the issue continues after removing interference sources, contact Tesla Support with your VIN and key card details ready for faster resolution.
Most Tesla owners never think about roadside emergencies until they’re standing beside an unresponsive car with no quick solution in sight. Stay prepared for the unexpected with a portable roadside emergency kit packed with essentials every driver hopes they never need before a minor issue turns into a major headache.
Frequently Asked Questions
Can a Tesla Fail to Start After a Recent Over-The-Air Software Update?
Yes, your Tesla can fail to start after an OTA update. If it’s stuck, request update verification through Tesla support or pursue a software rollback to restore normal drive-ready operation.
Does Extreme Cold Weather Permanently Damage the Main Traction Battery Pack?
Cold stress won’t permanently “retire” your battery chemistry under normal use. You’ll see temporary range loss, but it bounces back once the pack warms up. Aggressive fast-charging a cold battery is where real damage hides.
Will Tesla’s Warranty Cover a No-Start Caused by 12V Battery Failure?
If your Tesla’s within the 4-year/50,000-mile Basic Vehicle Limited Warranty, you’re likely covered. Initiate the claim process through the app. Manufacturing defects qualify; warranty exceptions apply for abuse or neglect-related failures.
Can Signal Interference From Nearby Electronics Prevent Keyless Entry Detection?
Yes, signal interference can block keyless entry detection. Nearby electronics generate radio frequency noise that overwhelms your key fob’s communication. Poor antenna placement compounds the issue, so move away from wireless devices and retest detection immediately.
How Long Does a Deeply Depleted Traction Battery Need to Charge Before Starting?
There’s no fixed battery charging duration—it varies by charger speed, pack temperature, and BMS protection state. You’ll need to plug in and wait until the system clears its thresholds before drive-ready status returns.