Your Tesla left the factory looking perfect—except it probably didn’t. Factory paint can run as thin as 80 microns, and even the most careful owners watch their gloss slowly die under swirl marks, orange peel texture, and micro-scratches invisible until the light hits just right. Before spending anything on paint correction, you need to know if your car actually needs it—or if you’re being sold a solution to a problem you don’t have. The answer starts with a few specific tests most Tesla owners have never heard of.
Why Tesla Paint Needs Correction More Than You’d Think
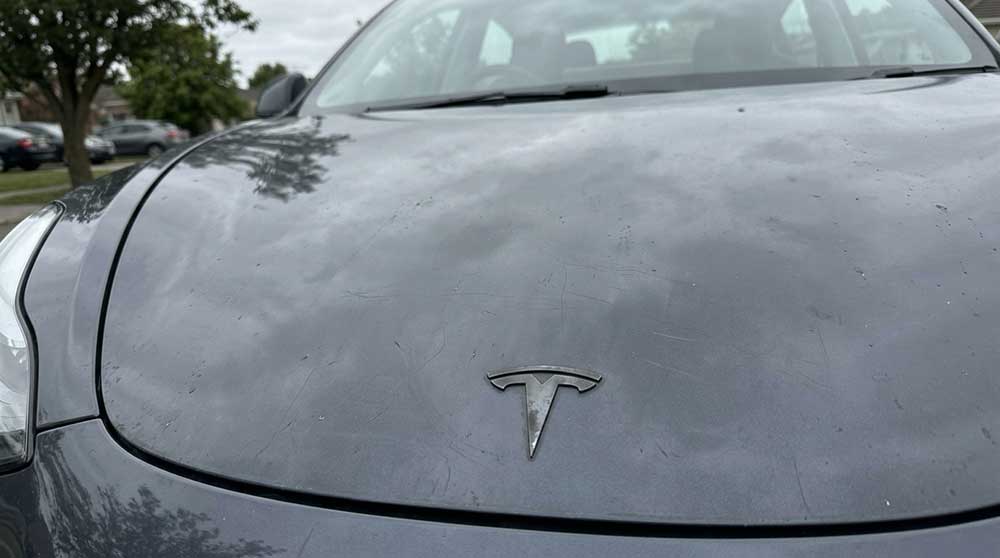
Tesla’s factory paint finish sounds like it should be perfect straight off the line, but the reality is that most Teslas arrive with measurable surface imperfections baked in — orange peel texture, minor scratches, and uneven paint distribution that no amount of wishing away will fix. That’s factory variability at work, and it’s not a defect unique to one bad batch. It’s systemic.
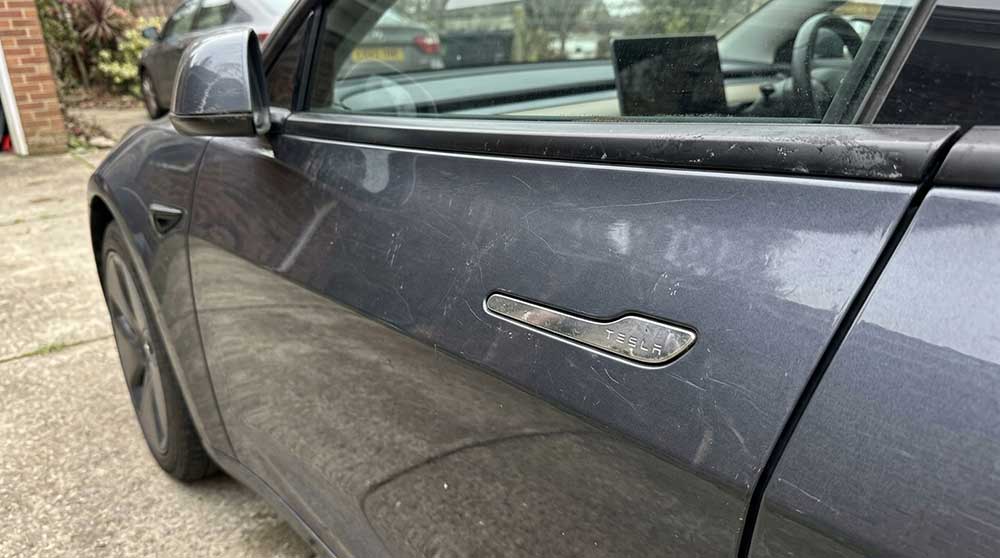
Tesla’s soft finish compounds the problem markedly. Unlike harder OEM paints found on many European vehicles, Tesla’s paint deforms more easily under light abrasion — meaning a single improper wash can introduce swirl marks and micro-scratches that dull the entire panel. Those defects scatter light instead of reflecting it cleanly, which is exactly why a freshly washed Tesla can still look hazy in direct sunlight.
Correction isn’t about chasing perfection. It’s about leveling a surface that arrived imperfect so everything applied afterward — coating, film, or nothing — actually performs as intended. Tesla vehicles are engineered with a focus on weight and efficiency, which means fewer clear coat layers are applied at the factory, leaving the paint more vulnerable to wear from the start. The Highland refresh introduced revised suspension geometry and acoustic rear-window glass, signaling that Tesla’s ongoing refinements extend beyond performance and into overall build quality — yet paint thickness standards have not followed that same upward trajectory.
Tesla paint shows everything—swirls, micro-scratches, and wash marks that build up faster than most owners expect. A dual-action polisher gives you controlled correction without the risk of burning through clear coat, restoring clarity and depth before imperfections become permanent.
Signs Your Tesla Actually Needs Paint Correction
Most Tesla owners don’t realize their paint is already compromised — not because something went catastrophically wrong, but because surface defects accumulate quietly and progressively until the finish stops looking the way it should.
Swirl detection starts with a simple test: angle a flashlight across any panel in low light. Circular scratches become immediately obvious. Hologram spotting works similarly — rainbow-like streaks appearing under direct sunlight usually indicate improper machine polishing, not dirt.
| Defect Type | Visual Indicator | Primary Cause |
|---|---|---|
| Swirl Marks | Spider-web scratches | Improper wash technique |
| Holograms | Rainbow light distortion | Inexperienced machine polishing |
| Oxidation | Chalky, faded surface | UV exposure and environmental damage |
Etched water spots and bird dropping damage go deeper — regular washing won’t touch them. If your Tesla’s finish lacks gloss, clarity, or that sharp reflective “pop,” your clear coat is telling you something worth hearing. Paint correction refines the surface to enhance natural color and reflection, making it especially valuable before applying a ceramic coating or preparing the vehicle for resale. Addressing paint defects before they worsen also protects the underlying clear coat, which connects directly to Tesla’s Body and Rust warranty covering corrosion damage for 12 years and unlimited mileage.
Even after a proper paint correction, Tesla paint can pick up fine swirls again surprisingly fast—especially after a few automated washes. A hybrid scratch remover with ceramic protection helps smooth light defects while leaving a protective layer that keeps the finish looking freshly detailed longer.
The Right Time to Schedule Tesla Paint Correction
Timing paint correction isn’t just about convenience — it’s about sequencing the work so every dollar you spend actually holds.
The two highest-leverage windows are post delivery and before applying PPF or ceramic coating.
New Tesla paint leaves the factory carrying orange peel, minor scratches, and uneven finish. Correcting those defects early, before protective layers lock them in permanently, is the logical move.
Seasonal timing matters too.
Spring and fall offer moderate temperatures (ideally 60°F–75°F) and controlled humidity (45%–55%), conditions professional shops actively target for correction and curing work.
Scheduling before winter prepares your paint for road salt. Before summer, it reduces vulnerability to heat and debris.
Planning a long road trip? Book correction at least 10 days out — coating and film need cure time before highway exposure.
After correction, allow a minimum of 48 hours for panel off-gassing before any protective film is applied.
Tesla’s over-the-air software updates can be scheduled overnight, making it practical to drop your vehicle off for paint correction without disrupting your morning charging routine.
Front-load the work, and the protection actually performs.
What the Tesla Paint Correction Process Actually Involves
When someone says “paint correction,” they don’t mean a quick wipe-down or a coat of wax — they mean a structured, multi-stage process that removes actual clear coat material to eliminate defects rather than bury them.
It starts with full decontamination: wash, iron remover, and an alcohol-based panel wipe to strip bonded contamination that would otherwise sabotage the polish.
Then comes the test spot — a small section corrected first to confirm the pad-and-compound combination is cutting effectively without burning through thin clear coat. Tesla’s soft factory paint demands that caution.
From there, correction moves through deliberate panel sequencing, addressing one panel at a time to control heat buildup and maintain finish consistency. Edges and body lines get lighter treatment since clear coat runs thinner there.
Finally, a wipe-down strips polishing oils to reveal the true result. What’s left should look genuinely swirl-free — not just shiny.
For isolated paint chips discovered during this process, Tesla offers a model-specific touch-up kit that includes a paint bottle, blending solution, and rubber squeegee — and the four-letter paint code on the kit must match the vehicle’s paint code exactly before use. Keeping a documented record of paint correction work can also support resale value, much like how service history records for maintenance tasks attach to the vehicle and signal diligent ownership to prospective buyers.
How to Protect Tesla Paint After Correction
After spending time and money on paint correction, the last thing you want is to watch fresh swirls creep back in two months later — so what you do next matters just as much as the correction itself. Your two best defenses are ceramic maintenance and proper washing technique.
| Protection Option | Primary Benefit | Best Used For |
|---|---|---|
| Ceramic Coating | Chemical resistance, water beading | Surface maintenance, gloss retention |
| Paint Protection Film | Physical impact defense | High-impact zones, long-term wear |
| PPF + Ceramic Combo | Layered protection | Maximum defense on corrected paint |
Always apply ceramic coating or PPF to a fully decontaminated surface — bonding fails on contaminated paint. For washing technique, use the two-bucket method with a pre-wash foam and a microfiber mitt, working top to bottom. Skip brush-style automatic washes entirely; they’ll undo your correction faster than you’d think. It’s also worth noting that Tesla’s over-the-air software updates can adjust driver-assist camera calibration, so maintaining clean, corrected paint around sensor zones helps ensure those systems read the road accurately after any firmware push.
Frequently Asked Questions
Can Paint Correction Void My Tesla’s Factory Paint Warranty?
Paint correction won’t void your Tesla’s factory warranty on its own. However, if the work causes additional damage, you’ll lose coverage. Document everything before visiting authorized service or hiring a detailer.
How Much Does Professional Tesla Paint Correction Typically Cost?
Professional Tesla paint correction’s average pricing runs $500–$2,500, depending on correction stages and your paint’s condition. Expect regional variation to shift your quote noticeably, so always get multiple estimates from reputable local detailers.
Does Paint Correction Work Differently on Tesla’s Matte Finish Options?
Funny enough, just as you’re considering correction, your matte finish demands a completely different approach. You’ll prioritize matte maintenance and texture preservation over polishing, since standard compounding creates uneven sheen patches that permanently alter your finish’s character.
Can I Perform Paint Correction on My Tesla at Home?
Yes, you can perform paint correction on your Tesla at home using DIY techniques like a dual-action polisher and clay bar. Always wear safety equipment and work in small sections for best results.
How Long Does Paint Correction Results Last Before Needing to Redo It?
Paint correction won’t last forever—environmental factors and improper washing reintroduce defects fast. You’ll extend results markedly by adding paint protection like ceramic coating or PPF after correction.