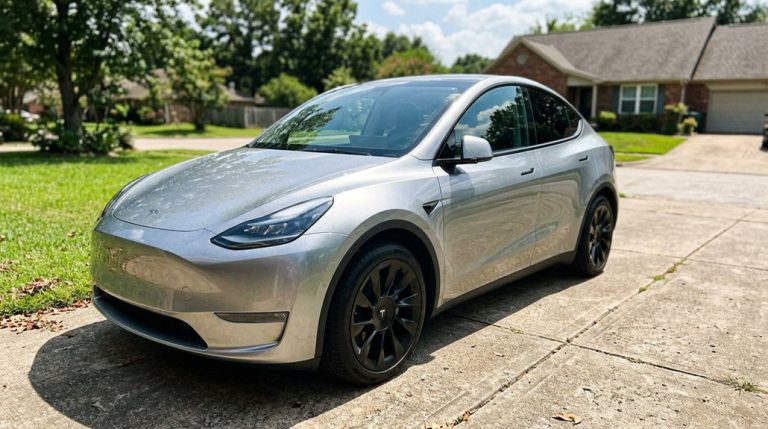
Tesla lets you customize almost everything—until it doesn’t. One wrong modification and your warranty disappears faster than a Plaid launch. But here’s what most owners never realize: federal law may protect you far more than Tesla wants you to believe. Before you touch a single bolt, swap a wheel, or wire anything into your car’s ecosystem, you need to know exactly where the lines are drawn.
How to Read Your Tesla Warranty Before Buying Any Accessory
Before you bolt on a single aftermarket part or peel the backing off a vinyl wrap, you need to grasp exactly what Tesla’s warranty actually protects — and what it doesn’t.
Before you spend a single dollar on mods, understand exactly what Tesla’s warranty covers — and what voids it.
Tesla’s New Vehicle Limited Warranty covers defects in materials or workmanship for 4 years or 50,000 miles, whichever arrives first. That’s factory-installed components only — not wear items like brake pads or wiper blades.
Comprehending warranty terminology matters because accessory exclusions can blindside you fast. A third-party suspension kit installed incorrectly? That’s external damage territory, not a covered defect.
Tesla-branded accessories purchased directly from Tesla fall under the Parts, Body & Paint Repair Limited Warranty (12 months or 12,500 miles). Read the fine print before you spend a dollar. If you’re ever blocked from accessing a third-party retailer’s site while researching accessories, a security service trigger like submitting certain words or malformed data may be the cause.
Which Tesla Modifications Void Your Warranty Immediately?
Slap an aftermarket coilover kit under your Model 3 without thinking it through, and you might be looking at a denied suspension claim faster than you’d expect — but here’s the subtlety most owners miss: Tesla can’t legally void your *entire* warranty over a single modification. Magnuson-Moss principles prevent blanket exclusions.
The real warranty triggers are component-specific — meaning a lowering kit denies suspension coverage, not powertrain protection. Instant exclusions typically apply to the altered system and anything downstream.
High-voltage tampering, wiring splicing, and structural drilling carry the heaviest consequences because damage spreads fast across connected modules. Cutting into a vehicle harness will void the warranty specifically on that harness component, but leaves unrelated systems untouched.
Screen pivots, non-certified chargers, and unsupported tire sizes each create their own targeted denial risk. Know exactly which system you’re touching before you touch it.
Which Upgrades Does Tesla’s Warranty Still Cover After Installation?
You’ve already learned which mods kill your coverage, so now let’s flip the script and map out exactly what Tesla’s warranty still protects after you’ve started bolting things on. The Magnuson-Moss Warranty Act does real heavy lifting here — it legally bars Tesla from voiding your entire New Vehicle Limited Warranty just because you’ve installed aftermarket parts, meaning your drivetrain, battery, and suspension claims stay eligible unless Tesla proves a direct causal link between your mod and the specific failure.
Stick to low-risk upgrades (floor mats, window shades, non-invasive mounts, and aftermarket wheels), and you’re operating in territory where warranty disputes rarely materialize — leaving your factory coverage largely intact where it counts most. When disputes over causation do arise, resolving responsibility may ultimately require court intervention, which can become costly and burdensome for both parties involved.
Tesla’s Warranty Coverage Basics
Modifying your Tesla doesn’t automatically torch your warranty coverage — and that’s not just optimistic thinking, it’s federal law. The Magnuson-Moss Warranty Act prevents manufacturers from issuing blanket warranty exclusions simply because you’ve installed aftermarket parts.
Tesla evaluates claims issue-by-issue, meaning each repair request requires actual claim evidence connecting your modification to the specific failure. Tesla can’t deny your Battery and Drive Unit coverage because you wrapped your bumper.
Coverage layers — Basic Vehicle, Supplemental Restraint System, Battery and Drive Unit, Body and Rust (12 years, unlimited mileage), and ZEV components — remain independently intact for unrelated systems.
The burden falls on Tesla to prove causation, not on you to prove innocence. That’s a repair-by-repair standard, not a full-vehicle cancellation. The FTC enforces the Magnuson-Moss Warranty Act, meaning manufacturers who attempt to void coverage without proven causation are in violation of federal consumer protection law.
Safe Approved Modifications List
Knowing Tesla can’t blanket-void your warranty is useful — knowing exactly which modifications carry zero realistic risk of touching it’s better.
Track safe mods by concentrating on what sits outside Tesla’s core electrical and mechanical framework.
Warranty friendly parts typically share one trait: they don’t touch anything Tesla’s engineers designed to fail-safe.
Your lowest-risk upgrade categories include:
- Paint Protection Film (PPF) — Tesla’s own Clear Protection Film carries a 10-year warranty; third-party PPF leaves body and rust coverage fully intact.
- Aftermarket wheels — Properly sized fitments (matching OEM load ratings) create no automatic warranty exposure on unrelated systems like infotainment or charging.
- Interior accessories — Floor mats, seat covers, and cargo organizers don’t interact with vehicle systems at all.
Simple geography: stay external, stay safe. Tesla’s policy only denies warranty coverage when a problem is directly traced to a specific modification, meaning unrelated systems remain protected regardless of what you’ve changed.
Avoiding Warranty Void Risks
Where things get complicated: wiring harness alterations, nonstandard 12V battery swaps, and unsupported tire sizes create legitimate warranty audit triggers because they touch original electrical architecture.
Simple bolt-ons rarely do.
Going into dealer negotiation armed with this knowledge shifts the dynamic considerably. Document every installation professionally, keep receipts, and understand that causation — not mere presence — is what Tesla must establish before denying your claim.
If Tesla does deny a claim and your factory coverage has lapsed, unauthorized modifications can also disqualify you from purchasing a Tesla Extended Service Agreement to fill that gap.
How to Choose Tesla Accessories by Model: S, 3, Y, and X
Every Tesla shares a platform philosophy, but the Model S, 3, Y, and X each impose different packaging constraints that make one model’s best accessory another model’s useless clutter. Cabin tailoring starts with format recognition.
Every Tesla shares a philosophy, but each model’s best accessory can be another’s useless clutter.
- Model S rewards comfort and storage upgrades given its larger sedan proportions
- Model 3 prioritizes interior fitment accessories due to its compact, minimalist cabin layout
- Model Y suits utility-focused cargo organizers and exterior protection for family hauling
The X, being a full SUV, requires passenger convenience and cargo-capacity accessories first. Across all four, charging ergonomics matter universally—wireless pads, wall connectors, and adapters improve daily usability regardless of trim level. Always verify whether a product lists your specific model or ships as a shared-fit guess. For touchscreen protection, a screen protector costs under $50 compared to a service center screen replacement that can run approximately $1,500. Tesla owners can also access real-time vehicle data directly from the cabin, such as using the tyre pressure display on the Model 3 to monitor inflation without a separate gauge.
Model Year Fitment: Why 2021 and 2024 Tesla Parts Are Not Interchangeable
Choosing the right accessory by model gets you halfway there—the other half is nailing the build year. Tesla revised the Model Y markedly between 2021 and 2024, and those changes create real trim compatibility problems.
The 2021 trim used ultrasonic parking sensors; 2024 dropped them entirely, so bumper kits designed around those sensor cutouts simply won’t fit newer builds.
Suspension geometry shifted too, meaning lowering springs validated for 2021 can cause rubbing or misalignment on 2024 chassis.
Wiring differences add another layer—HW4 camera modules, AMD Ryzen infotainment, and a 16V low-voltage battery all changed what plugs into what. Don’t shop by model name alone. Verify your VIN and build date before ordering anything.
Exterior details shifted across the production run as well, with headlights and taillights updated between model years in ways that affect replacement and aftermarket lighting fitment.
OEM vs. Aftermarket Tesla Accessories: What the Difference Actually Costs
When you’re choosing between OEM and aftermarket Tesla accessories, the sticker price is only half the story—fit and build quality quietly determine whether you actually save money or end up spending more to fix a bad install.
OEM parts are engineered to factory spec, meaning zero guesswork on tolerances, wiring compatibility, or panel alignment, while aftermarket options can run 30%–70% cheaper but carry wider quality variation that makes brand reputation critical.
A $40 aftermarket spoiler sounds like a win until you’re paying a body shop two hours of labor to correct a fitment gap that the OEM version never would’ve had. For electronics like MCU and ECU modules, used OEM is often the stronger call because original design specifications ensure seamless integration that aftermarket alternatives frequently can’t replicate.
Tesla interiors stay clean longer than most cars, but rain, dust, and daily entry and exit quickly start showing on the carpets, especially in high-use vehicles. All-Weather Floor Mats for Tesla help maintain that original cabin condition by containing moisture and debris before it spreads into the fabric.
Quality vs. Price
The gap between OEM and aftermarket Tesla accessories isn’t just about price—it’s about what you’re actually paying for. OEM parts carry factory-spec materials and engineering precision, which directly shapes your longevity expectations.
Aftermarket alternatives can run 30–70% cheaper, but material tradeoffs are real.
Here’s how quality actually breaks down:
- High-tier aftermarket brands often match OEM finish and durability, sometimes exceeding it in specific categories
- Mid-tier options deliver acceptable performance but may show wear faster under real driving conditions
- Budget-tier parts frequently cut corners on materials, creating reliability problems within months
You’re not just buying a part—you’re betting on how it holds up. Know your supplier, check material specs, and match the component’s criticality to your budget accordingly. For safety-critical systems like brakes and headlights, OEM preserves Tesla warranty while aftermarket alternatives risk voiding your coverage entirely.
Fit and Compatibility
Fitment separates a clean upgrade from a rattling annoyance you’ll regret three weeks after install. OEM parts match factory specifications exactly because Tesla engineered them that way. Aftermarket quality varies wildly depending on the brand’s tooling precision and trim compatibility with your specific generation.
Here’s the critical detail most buyers ignore: Model 3 Highland and Model Y Juniper redesigns broke compatibility for roughly 80% of existing interior accessories (BASENOR’s own data confirms this). Redesigned center consoles and altered connector standards mean a product listed as “Fits Model 3” could mean almost anything.
Always verify by model, year, and VIN before ordering. Windshield sunshades and cabin air filters are practically universal. Everything else deserves skepticism until confirmed through fitment testing or direct seller verification. For safety-critical components specifically, OEM parts are the stronger choice because poor fitment risks from aftermarket alternatives can compromise the systems Tesla engineered those parts to protect.
How to Buy Aftermarket Tesla Accessories Without Getting Counterfeits
Counterfeit Tesla accessories have flooded every major marketplace platform, and sorting the legitimate stuff from the garbage takes more than a quick price check. You need to verify authenticity before money changes hands.
Counterfeit Tesla accessories are everywhere. Spotting the fakes takes more than checking the price tag.
Start by demanding seller transparency:
- Confirm a real business name, physical address, and working customer support contact
- Cross-reference the seller’s reputation on Tesla forums and independent review platforms
- Check that part numbers, fitment specifications, and model-year compatibility are explicitly stated
Tesla’s official store remains the safest baseline for comparison pricing. If a listing runs suspiciously cheap against known aftermarket benchmarks, that’s your first red flag. Pay with a credit card (dispute protection matters), document everything, and request serial numbers on high-value components before finalizing any purchase. Legitimate aftermarket sellers often provide installation services for regional customers, such as those in Southern California, which is a verifiable credibility signal worth checking for.
How to Protect Tesla Sensors and Cameras During Any Modification
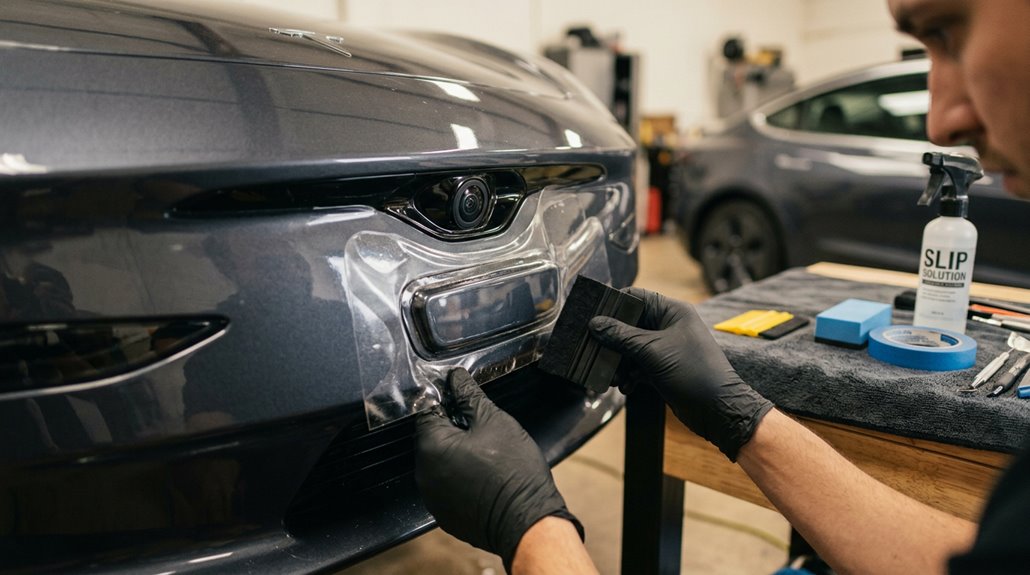
Before you touch a single panel, map every camera cluster and sensor on your Tesla — front bumper, B-pillar, side repeaters, and rear housing — because even a misaligned PPF edge crossing an optical center by a few millimeters can introduce glare, distortion, or condensation trapping that degrades Autopilot’s vision inputs.
Sensor clearance isn’t optional fine print; it’s the difference between a clean install and a $300 recalibration appointment you didn’t plan for.
Once you’ve marked your no-coverage zones with masking tape and dry-fitted every aftermarket part (trim pieces and bumper inserts included), you’ll verify camera image quality across daylight, shade, night mode, and wet conditions before calling anything done. When applying PPF to any camera lens, use thumb in circular motions to adhere the film from the center outward to prevent air bubbles and ensure full optical coverage.
Sensor Clearance Basics
Slapping a body kit, wrap, or bumper splitter onto your Tesla without accounting for sensor clearance is how a $200 mod turns into a $2,000 calibration nightmare.
Tesla packs ultrasonic parking sensors, radar modules, and cameras into fascia zones with almost no margin for error.
Alter the material thickness, mounting depth, or bumper alignment around those zones, and your ADAS starts missing obstacles it previously caught.
Three clearance principles every modifier needs to respect:
- Preserve original sensor spacing — any shift in mounting position degrades detection geometry
- Never block sensor apertures with wraps, inserts, or splitters
- Account for how added material thickness affects ultrasonic signal propagation
Physical clearance and software calibration are linked.
One affects the other every single time. Systems like the occupant classification sensor and steering angle sensor may also require recalibration after any removal, replacement, or battery disconnect event.
Camera-Safe Installation Tips
Sensor clearance keeps your ADAS geometry intact, but it’s only half the equation — the cameras feeding that system are just as vulnerable, and they don’t tolerate careless installation work. Camera protection starts before you touch a single fastener. Power down affected systems, clean lenses with microfiber only, and inspect for chips or clouding first.
| Action | Tool/Method | Why It Matters |
|---|---|---|
| Lens cleaning | Soft microfiber + approved cleaner | Prevents coating damage |
| Edge masking | Low-tack painter’s tape | Blocks adhesive/spray drift |
| Alignment checks | Visual + touchscreen verification | Confirms unobstructed field of view |
Optical maintenance isn’t optional post-install. Confirm no wraps, trim edges, or residue overlap lens openings — even partial occlusion triggers lens calibration errors and disables driver-assist features immediately.
For vehicles equipped with FSD hardware, purpose-made protective film applied directly to the camera lens surface eliminates condensation issues that dome-style covers introduce while maintaining optically clear imaging across all installed cameras.
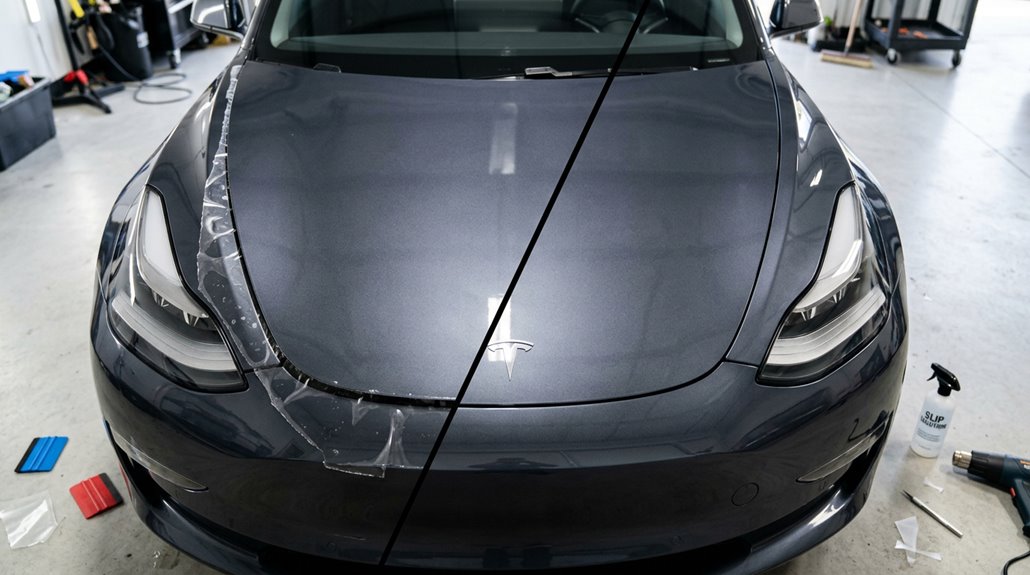
Paint Protection Film for Tesla: Full-Body vs. Partial Coverage
Paint protection film (PPF) splits into three practical tiers — partial front, full front, and full body — and choosing the wrong one is less about wasting money than it’s about leaving the panels you actually care about exposed.
Partial front runs around $995 and shields your bumper, headlights, mirrors, and the leading 12–24 inches of hood.
Full front (~$1,995) eliminates the awkward edge blending shift line by covering complete horizontal panels.
- Partial front: Essential chip defense, lowest cost, visible film edge on some colors
- Full front: Cleaner finished look, stronger hood and fender protection, 2–3 day install
- Full body: Complete panel uniformity, supports matte conversion via satin PPF, highest investment
Street parkers and harsh-climate drivers almost always justify full body. PPF is a clear thermoplastic urethane film that bonds directly to painted surfaces, acting as a barrier against road debris, minor scratches, and environmental contaminants.
Tesla’s center screen takes every fingerprint, glare, and accidental swipe in daily driving, and once scratches appear, they don’t disappear with cleaning. Spigen Tempered Glass Screen Protector for Tesla sits over the display to take the wear instead, keeping the interface clear, responsive, and far less exposed to permanent marks over time.
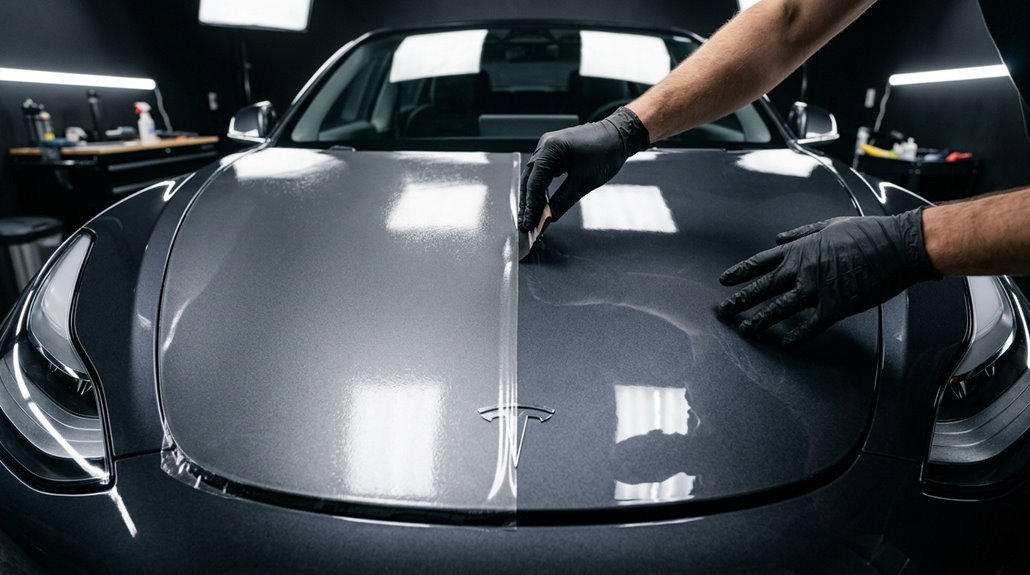
Pre-Cut vs. Custom-Cut PPF Kits for Tesla Hoods and Bumpers
When you’re shopping for PPF for your Tesla’s hood or bumper, the first decision you’ll face is whether to go with a pre-cut kit (computer-plotted templates sized to your exact model) or a custom-cut install (bulk film trimmed by hand directly on the vehicle).
Pre-cut kits cut installation time by up to 30% and cost less upfront, but they typically stop about 0.22 cm short of panel edges to reduce lift risk, which can leave visible seam lines on curved hood fronts and complex bumper corners.
Custom-cut PPF demands more technician skill and budget, but it wraps farther around edges, conforms cleanly to bumper vents and sensors, and delivers the seamless finish that matters most on a car you’ve already invested serious money in. With bulk film, a technician can apply intentional tension across the hood front to redistribute excess material, eliminating the fingers across the front that pre-cut templates commonly produce and cannot easily correct.
Pre-Cut Kit Basics
If you’ve ever watched a professional PPF installer work a raw film roll across a Model Y hood with a squeegee and a razor blade, you already comprehend why pre-cut kits exist.
They arrive digitally templated to your exact Tesla trim and model year, eliminating most on-site blade work near painted surfaces.
Pre-cut kits typically cover:
- Hoods, bumpers, and fenders (highest stone-chip exposure zones)
- Door edges, mirrors, and rocker panels (secondary impact targets)
- Partial-front, full-front, or individual-panel configurations (budget-matched coverage)
Surface prep determines everything here.
Clean panel edges thoroughly before edge tucking begins, because contamination kills adhesion permanently.
Installation tips consistently emphasize wet-application methods, proper edge sealing, and patience—particularly on complex bumper curves where film wants to fight you. These kits are made in Austria, with production carried out at maximum efficiency to minimize material waste throughout the manufacturing process.
Custom-Cut PPF Benefits
Pre-cut kits handle the majority of Tesla builds cleanly, but custom-cut PPF is where installers earn their reputation on complicated front ends. When your hood has aftermarket aero or your bumper’s been repaired, templates simply won’t conform correctly. Custom work allows on-site trimming that follows every contour precisely.
Proper edge sealing becomes achievable because the installer shapes film during application rather than forcing pre-cut perimeters around tight curves. The result? An invisible finish that hides seams along prominent panel lines.
Certified installer expertise is the foundation of any successful PPF application, whether pre-cut or custom, as even the best materials depend on the skill and training of the person applying them.
| Factor | Pre-Cut Kit | Custom-Cut |
|---|---|---|
| Edge Sealing | Template-limited | Installer-controlled |
| Finish Quality | Consistent | Seamless |
| Cost | Lower | Higher |
You’re paying for precision—and on high-wear Tesla front ends, that investment genuinely holds.
Fitment and Coverage Differences
- Edge concealment: Custom-cut film extends closer to panel edges, eliminating the visible ~1/8-inch seam pre-cut kits routinely leave behind
- Installer technique: Hand-trimming lets skilled applicators steer Tesla’s sharp hood contours and bumper sensor cutouts with material precision no template matches
- Coverage scope: Bulk film reaches vents, tow-hook regions, and headlight junctions that pre-cut bumper kits deliberately avoid
Speed favors pre-cut. Completeness favors custom. You’re simply choosing which compromise you can live with. Pre-cut PPF kits are computer-cut to exact vehicle measurements and designed to stop just short of panel edges, which is precisely what creates that telltale gap along Tesla hood lines and front bumpers.
How to Install PPF on a Tesla Without Trapping Bubbles or Lifting Edges
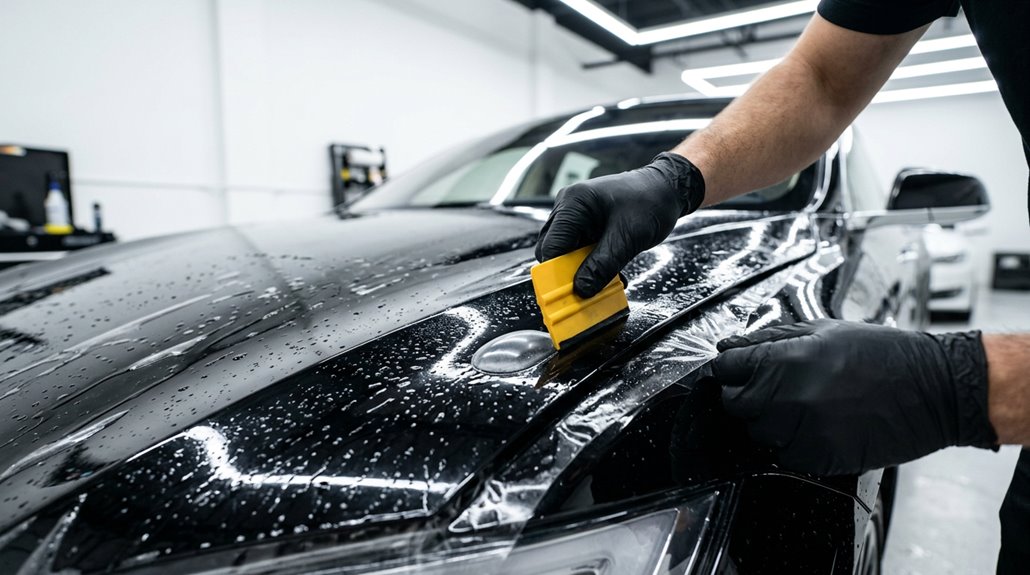
Getting PPF to lay flat on a Tesla isn’t just about patience—it’s about controlling every variable before the film even touches the paint. Start with a thorough wash and clay-bar prep, then inspect each panel under strong lighting. Work in a clean garage and spray water on the floor to settle airborne dust.
Apply slip solution generously to both the paint and film’s adhesive side, then position while fully wet. Squeegee from center outward using firm, overlapping strokes angled downward. Body lines trap bubbles—give them extra passes.
For edge sealing, push out excess slip solution completely before committing. Use drying techniques like a heat gun to help edges conform. Large stubborn bubbles need re-lifting; small ones often self-resolve during curing. When working around the tow hook, spray tack solution around the edge and anchor with gentle initial squeegee strokes to ensure a solid seal.
Self-Healing PPF vs. Standard Film: Which Holds Up on Highways?
When you’re logging serious highway miles in your Tesla, the film protecting your front end faces an unrelenting barrage of high-velocity rock chips, road grit, and pebble strikes that standard polyurethane film can absorb but not recover from. Self-healing PPF uses a heat-activated elastomeric topcoat (typically a TPU-based polymer layer) that literally flows back into light scratches and swirl marks when warmed by sunlight, while standard film takes every hit permanently and shows it.
The durability gap compounds over time — premium self-healing films carry 7–10 year warranties versus the roughly 5–7 year practical lifespan of standard film — which means your cost-per-mile calculation actually favors the pricier option if you’re covering heavy highway distance regularly. For highway commuters, pairing self-healing PPF with a ceramic coating elsewhere creates an ultimate armor package that delivers both impact resistance on high-risk zones and a hydrophobic, easy-clean finish across the rest of the vehicle.
Highway Impact Performance
Highway driving is where PPF earns its keep or quietly fails you, and the difference between self-healing and standard film becomes measurably clear once you’re logging consistent miles at 70+ mph.
Gravel, sand, tar, and road salt hit your Tesla’s front surfaces repeatedly, and your film’s urethane layer absorbs those strikes before paint does.
Here’s where highway resilience separates the two options:
- Self-healing PPF uses TPU chemistry to maintain elasticity under repeated impact, dispersing energy more effectively
- Standard film blocks debris but accumulates visible surface damage without any thermal recovery mechanism
- UV exposure at highway speeds accelerates yellowing in lower-grade films, degrading optical clarity faster
Depth matters here—deeper strikes exceed both films’ repair limits, so thickness and elasticity become your actual protection metrics. Traditional standard films are particularly vulnerable over time, with rapid yellowing and discoloration typically becoming visible within 18 to 24 months of consistent highway exposure.
Film Durability Compared
Durability separates these two film types faster than most owners expect, and the chemistry driving that gap isn’t subtle. Standard PVC or basic TPH film typically degrades visibly within 2–3 years under heavy use, while self-healing TPU constructions routinely reach 7–10 years with proper care. That’s not marketing—it’s polymer elasticity doing real work.
UV resistance tells the clearer story. Standard film yellows under prolonged sun exposure; self-healing film retains optical clarity markedly longer because TPU’s molecular structure resists UV-induced breakdown more effectively.
For highway durability specifically, you’re dealing with constant fine abrasion, road grime, and repeated wash cycles. Self-healing film recovers minor surface scratches using ambient heat (sunlight works). Standard film just accumulates them. Longevity math favors the upgrade. Traditional PPF is also more prone to cracking and peeling with temperature changes, making it a weaker long-term choice for vehicles regularly exposed to varying climates.
Ceramic Coating vs. PPF for Tesla: When to Use One, Both, or Neither
Choosing between ceramic coating and PPF isn’t really a brand preference debate—it’s a physics problem.
PPF creates a physical barrier against front impact damage—rock chips, road debris, door dings. Ceramic coating bonds a liquid polymer to your paint, providing hydrophobic repellency and gloss that simplifies long term maintenance. Neither does the other’s job.
PPF blocks physical damage. Ceramic repels water and boosts gloss. They solve different problems—neither substitutes for the other.
Here’s when each makes sense:
- PPF only: Daily highway driving, gravel roads, high-debris commutes
- Ceramic only: Garage-kept Teslas, low-mileage vehicles, full-vehicle gloss coverage
- Both: High-impact zones get PPF; everything else gets ceramic
Some installers ceramic-coat the PPF itself, improving washability across the entire surface. If you’re short-term leasing or customizing paint frequently, skip both entirely. Tesla’s paint is particularly soft and highly susceptible to scratches, making some form of protection a practical necessity rather than a luxury.
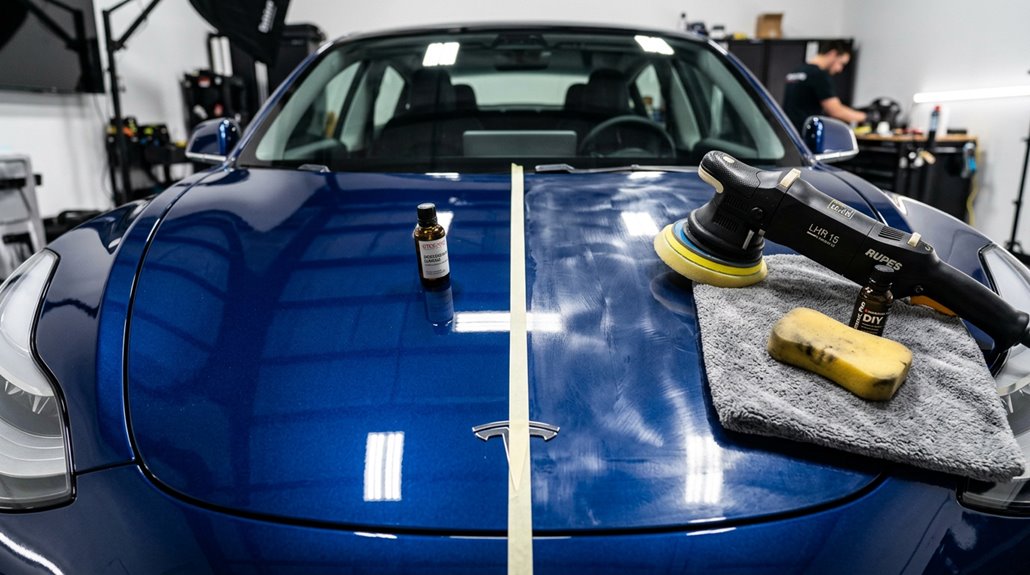
How to Apply Ceramic Coating to a Tesla Model 3 at Home
Before you crack open that coating bottle, know this: the prep work determines whether your ceramic coating bonds properly or peels off in six months looking like regret.
Start with a thorough two-bucket hand wash or foam cannon wash (top-down, always), then hit the paint with a clay bar using a dedicated lubricant to lift bonded contamination without marring the clear coat.
Once you’ve polished out any swirls or oxidation and wiped every panel with an IPA-based prep solution like Gyeon Prep, you’re finally ready to apply the coating itself in controlled 2×2-foot sections using a cross-hatch pattern—horizontal passes first, vertical second—with just a few drops on the applicator block to avoid wasting product or creating high spots. Keep in mind that ceramic coating is only a few microns thick, making it closer to a longer-lasting wax than a hard barrier against rock chips or serious paint damage.
Surface Prep Steps
Surface prep is where ceramic coating jobs actually succeed or fail—skip a step here and you’re effectively laminating your mistakes into the clear coat for the next two to five years. New Teslas aren’t exempt; rail dust and transport contamination sit invisibly in the paint, waiting to wreck your bond.
Work through this sequence without shortcuts:
- Wash thoroughly using a two-bucket method, hitting door jambs, rockers, and wheel surrounds first
- Iron removal dissolves embedded ferrous particles chemical washing simply can’t reach
- Clay bar treatment (with proper clay lubricant) pulls bonded contaminants off, leaving paint glass-smooth
Finish with an IPA wipe-down. That final degreasing step eliminates polishing oils and soap film—the invisible enemies of proper ceramic adhesion. A surface prep spray applied after polishing removes any remaining chemical residue, leaving the surface surgically clean and ready for optimal coating bonding.
Coating Application Process
With your paint properly prepped, you’re ready to apply the coating—and the process is more methodical than most people expect. Work panel by panel using sectional technique, covering roughly 2×2-foot areas in a cross-hatch pattern (left to right, then up and down).
| Step | Action | Detail |
|---|---|---|
| 1 | Load applicator | 3–4 drops per block |
| 2 | Apply coating | Cross-hatch strokes |
| 3 | Check coverage | Uniform wet film |
| 4 | Wait (flash) | ~45-minute window |
| 5 | Buff residue | Light microfiber passes |
Application timing matters enormously—wait too long before buffing and high spots harden into stubborn patches. Keep lighting strong overhead. Thin, consistent coverage beats heavy saturation every time. The coating works by chemically bonding to your factory clear coat during the curing process, which is why surface cleanliness and proper prep directly determine how well the final layer performs and holds up over time.
Professional Ceramic Coating vs. DIY Kits: Real Cost Breakdown
Ceramic coating costs break down fast once you pit professional installation against DIY kits side by side. A full DIY kit runs roughly $225 total, while professional jobs range from $500 to $3,500+ depending on prep depth and coating tier.
DIY ceramic kits cost around $225. Professional installs? Anywhere from $500 to $3,500 depending on prep and coating tier.
Here’s where the durability comparison gets honest:
- Professional mid-tier packages ($1,000–$2,000) include multi-stage decontamination, paint correction, and 3–5 year warranties
- Premium boutique installs targeting Tesla-specific paint hit $1,500–$2,500+ for full exterior plus wheels
- DIY kits skip correction entirely, leaving prep quality—and longevity—completely on you
That cost breakdown reveals the real gap: professionals sell preparation, not just product. Skipping correction before coating basically locks imperfections underneath a protective layer permanently. Tesla-specific professional packages such as the Gyeon Q² Infinite system apply two full layers of ceramic coating over properly corrected paint, a standard no consumer kit can replicate.
How Long Ceramic Coatings Actually Last on Tesla Paint
Knowing what you’re actually paying for matters before you commit to any coating package, and the cost breakdown only tells half the story—durability tells the rest. Consumer-grade ceramic coatings typically last 2 to 5 years on Tesla paint; premium formulations push that to 7 to 8 years under ideal conditions. Real world longevity, however, rarely matches the label. Road salt, harsh UV exposure, and high annual mileage accelerate degradation faster than most installers admit.
Your maintenance routines determine whether you hit the low or high end of that range. Two-bucket washing, coating-safe soaps, and periodic ceramic topper sprays preserve hydrophobic performance noticeably longer. Watch for reduced water beading—that’s your earliest warning that reapplication is approaching.
Professional application typically ranges from one thousand to six thousand dollars depending on vehicle size and the extent of paint correction required beforehand.
Exterior Wraps for Tesla: Full Color Change Without Touching Factory Paint
Vinyl wrap lets you pull off a complete exterior color change without a single drop of paint touching your Tesla’s factory finish. Automotive-grade adhesive film bonds to painted panels, shields against stone chips, road debris, and UV degradation, then removes cleanly later. Matte preservation is a real advantage here — matte finishes (impossible to achieve through factory ordering on most trims) stay protected underneath the film layer.
Key installation details worth knowing:
- Installation timelines typically run two to three days for a full vehicle
- Door jambs and trunk jambs cost extra unless specified upfront
- Pre-cut model-specific templates keep edges precise and clean
Color-shift, carbon fiber, satin, gloss — your options are genuinely wide.
Chrome Delete Kits: How to Wrap or Replace Factory Tesla Trim
Once you’ve committed to a color-change wrap, the next logical target is the chrome — those bright trim strips framing your windows, door handles, mirror caps, and camera housings that catch light like a signal and undercut any stealthy exterior you’re building. Pre-cut kits handle trim restoration without permanent commitment. Matte finishes dominate this space because they kill reflectivity entirely.
| Option | Cost | Skill Required |
|---|---|---|
| Uncut vinyl roll | Under $100 | High |
| Pre-cut DIY kit | $100–$200 | Moderate |
| Professional install | $500–$1,000+ | None (yours) |
Clean every surface obsessively before applying — dust trapped beneath vinyl telegraphs through the film immediately. Heat softens the material around curves. Patience isn’t optional on door handles.
Splitters, Diffusers, and Lip Spoilers for Tesla: What They Actually Do
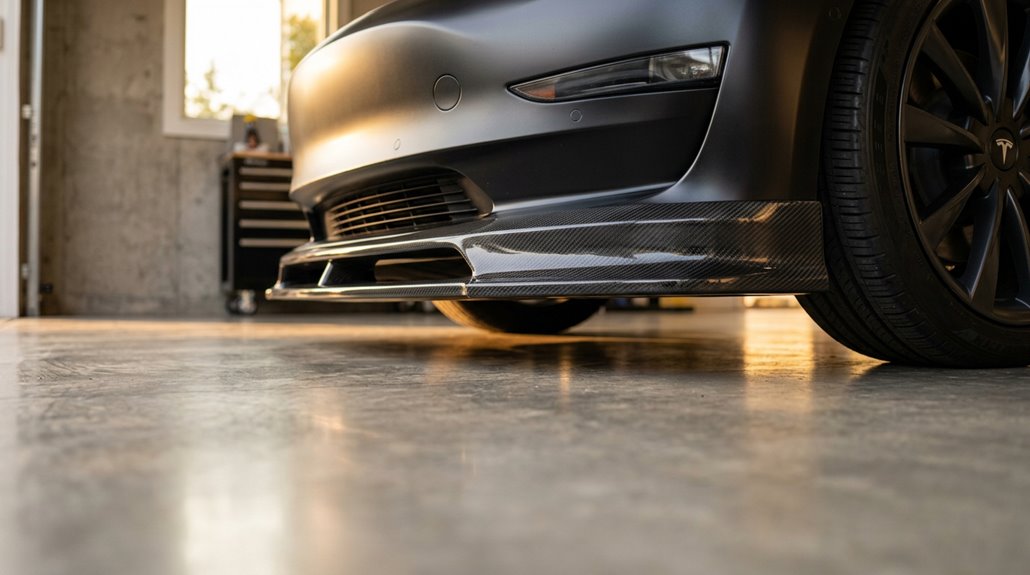
Most of what’s marketed as aerodynamic improvement for Teslas delivers somewhere between meaningful physics and expensive decoration — and knowing which side your splitter, diffuser, or spoiler lands on depends entirely on grasping what these parts actually do to airflow.
Each component targets a different aerodynamic problem:
- Front downforce increases when a splitter extends the lower nose edge, pressurizing airflow above while starving it below
- Diffuser tuning organizes exiting underbody air, reducing turbulent wake that drags against forward momentum
- Spoiler balance disturbs clean trailing-edge airflow, cutting rear lift without aggressively increasing drag
Splitter aesthetics matter too — fitment varies by trim year, so verify compatibility before purchasing.
Effects intensify above 60 mph; below that, you’re mostly buying appearance.
Do Aero Kits Actually Reduce Drag on a Tesla Model Y?
The short answer is yes — but the gains are smaller than most marketing copy implies, and how much you actually recover depends on which parts you buy, how they’re combined, and whether the manufacturer bothered to validate the design with real simulation data.
ADRO’s full four-piece kit (front lip, side skirts, rear diffuser, spoiler) posted a 2.7% drag reduction in CFD testing, while their premium carbon fiber package claimed 4.4%.
Unplugged Performance’s diffuser-spoiler pairing showed roughly 2.4% drag reduction — about 40 fewer newtons of resistance.
Aero effectiveness compounds across components, meaning full kits consistently outperform single parts.
Real world testing remains rare, though; nearly every manufacturer number comes from simulation, not a dynamometer or coastal highway run.
How to Mount a Rear Spoiler on a Tesla Without Drilling Into Bodywork
Buying the spoiler is the easy part — getting it to stay put without turning your trunk lid into a pin cushion is where most installs succeed or fail. Adhesive longevity starts with surface prep, not pressure.
Spoilers are easy to buy. Getting them to stay put without ruining your trunk lid — that’s the real install.
- Wipe the bond area with isopropyl alcohol to strip wax, oil, and residue completely
- Dry-fit first, using masking tape guides to confirm centering before backing removal
- Apply 20-plus pounds of pressure per section for 10 seconds, focusing on edges
Temperature matters for aero testing durability: install between 15–43°C for proper tape wet-out. Peel only 1–2 inches of backing initially, attach ends first, then work inward. No drill required — just discipline.
Carbon Fiber Trim and Aero Parts: Weight Savings vs. Real-World Cost
Carbon fiber upgrades split cleanly into two camps: structural or rotating mass reductions (wheels, hoods) that actually move the performance needle, and interior trim pieces that look sharp but contribute almost nothing measurable to weight or efficiency.
A carbon fiber hood can shed roughly 10–15 kg, and a set of carbon fiber wheels can cut 8–12 kg per corner—meaningful reductions that tighten braking response and reduce rotational inertia—while a carbon fiber dash panel saves you maybe a few hundred grams and a lot of cash.
You’re paying for material quality, mold precision, and vehicle-specific fitment, so prioritize parts with verifiable performance returns and treat interior trim for what it actually is: an aesthetic upgrade dressed in technical clothing.
Carbon Fiber Weight Benefits
Swapping OEM panels and trim for carbon fiber sounds like an engineer’s dream until you run the actual numbers—and the reality is more subtle than the marketing copy suggests.
Decorative trim pieces save grams, not kilograms. Larger components deliver real weight recovery strategies worth calculating:
- A carbon fiber hood removes roughly 10–15 kg of sprung mass
- Carbon fiber wheels cut approximately 8–12 kg per wheel dramatically reducing rotational inertia
- Full aero packages (hood, trunk lid, spoiler) can shed 20–40 kg combined
Those reductions translate to a credible 1–4% range improvement. Carbon fiber aesthetics obviously drive most purchase decisions, but replacing structurally heavy panels makes the performance math actually work in your favor.
Aero Parts Performance Impact
When you bolt a carbon fiber rear spoiler onto your Model 3 and expect range gains to follow, the physics don’t quite cooperate the way the product listing implies. Spoilers manage airflow at higher speeds, improving highway stability rather than enhancing efficiency at every throttle input. Below 55 mph, you’ll barely notice the difference. Above that threshold, reduced lift becomes genuinely useful—but modest.
Interior visual trim (dashboard overlays, door panel accents) delivers zero aerodynamic benefit because it never touches the airstream. Front splitters and rear diffusers do more measurable work than decorative pieces, since they directly redirect underbody airflow. Poorly designed aero parts can actually increase drag, which is the opposite of the goal. Fitment and shape matter far more than material alone.
Cost Versus Real-World Value
Real carbon fiber interior trim sits at the intersection of luxury aesthetics and diminishing returns—and grasping that tension before you spend $800 decides whether the purchase makes sense.
Interior panels weigh almost nothing, so material longevity and aesthetic payoff carry the entire argument.
Here’s where your money actually lands:
- Vinyl overlays ($30–$80): Cheapest entry, worst installation complexity outcomes, and they peel
- Hydro-dipped caps ($150–$250): Better finish, still covers original trim rather than replacing it
- Real carbon fiber kits ($300–$1,200): Fusion Motorsports lists a Model 3/Y set at $779.99
Long term resale impact stays unpredictable—buyers either love it or consider it a liability.
Buy real carbon fiber for the look, not phantom performance gains.
Wheel Size and Tire Width: What Actually Affects Efficiency on a Tesla
Most Tesla owners chasing range treat wheel upgrades like a free lunch—bigger looks better, and surely modern rubber offsets the math. It doesn’t.
Upgrading from 18-inch to 20-inch wheels typically raises rolling resistance 8–15%, cutting EPA highway range by roughly 5–10%. Wheel aerodynamics compound the problem further; open-face designs add another 3–5% drag penalty.
Tire compounds hit equally hard—summer performance tires alone sacrifice 10–15% range versus OEM all-seasons, and combining both upgrades can push total losses toward 25%. Wider tires increase drag through a larger contact patch, though compound choice sometimes matters more than width. Your most efficient setup remains narrow tires, 18-inch wheels, and low-rolling-resistance compounds—unglamorous, but the physics don’t negotiate.
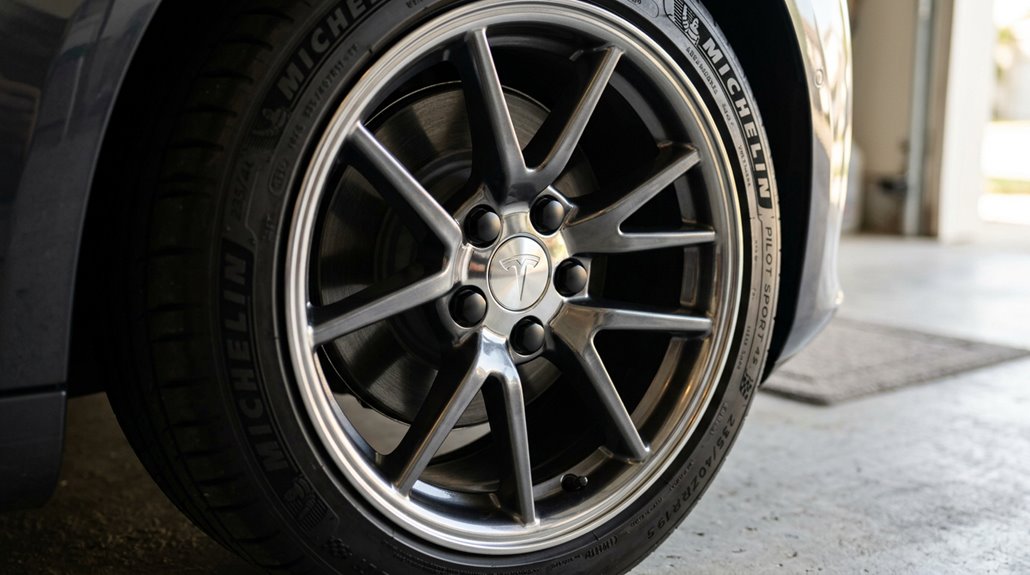
Forged Wheels for Tesla: Why They Outperform Cast Aluminum
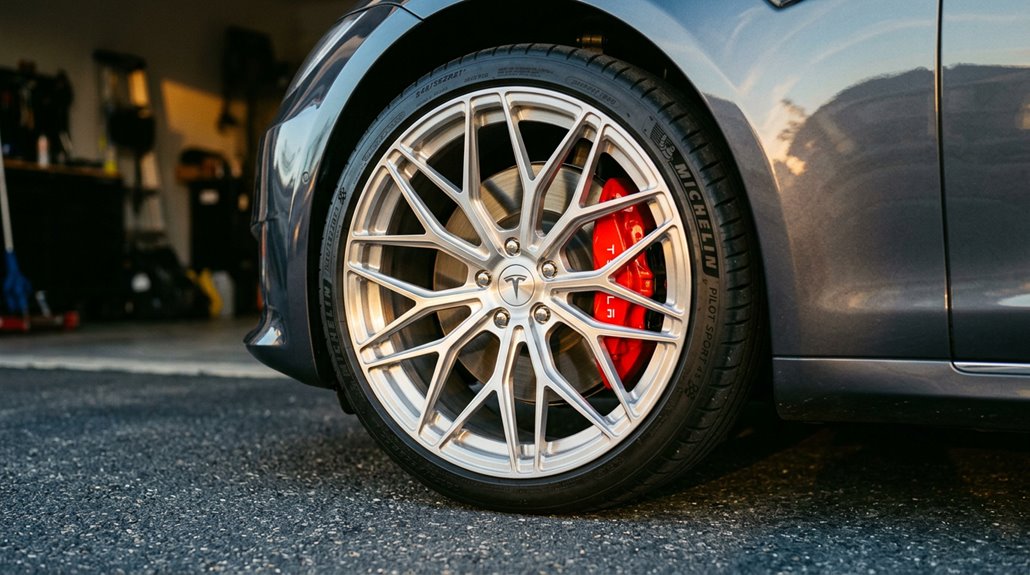
Chasing efficiency means you’ll probably land on the smallest, lightest wheel setup possible—but once you’ve accepted the range tradeoff and decided to upgrade, the material and construction method of the wheel itself becomes the next real variable. Forged wheels are compressed under high pressure, aligning the grain structure of the aluminum and producing a stronger, lighter result than cast alternatives.
The forged benefits stack up clearly:
- Strength-to-weight ratio reduces unsprung mass, improving suspension response and braking efficiency
- Impact resistance handles potholes and curb strikes better, directly supporting wheel longevity
- Rotational mass reduction complements Tesla’s instant torque delivery
Some aftermarket forged options bolt directly onto Tesla hubs—no spacers required.
How Lighter Forged Wheels Change Tesla Range and Handling Response
Swapping to fully forged wheels cuts unsprung rotational mass, which directly lowers the energy your Tesla needs to accelerate, climb grades, and sustain highway speeds — real-world testing on matched trips showed roughly a 4% efficiency gain, translating to about 12 additional miles on a 79,000 Wh pack (based on consumption dropping from 256.7 Wh/mi to 246.5 Wh/mi).
That weight reduction also reshapes how your car handles: less rotational mass means steering inputs feel more immediate, suspension can track uneven pavement more precisely, and brakes decelerate less mass per stop, so transient behavior — turn-in, lane changes, repeated launches — tightens up noticeably.
One real example puts this viewpoint: ditching 38-lb stock 21-inch Uberturbine wheels for a 20-inch Martian forged setup drops roughly 13 lb per corner, or 52 lb total, which is the kind of unsprung-weight reduction that changes how the car feels, not just how it measures on a spec sheet.
Weight Reduction Range Impact
When you bolt a set of fully forged wheels onto your Tesla, you’re attacking range loss from a physics angle most owners overlook: rotational inertia. Every time you accelerate from a stop, heavier wheels demand more energy to spin up to speed. Lighter forged wheels reduce that tax on every cycle.
Real-world testing backs this up:
- A YouTube test reported roughly 4% efficiency gains switching from 21-inch Uberturbines to lighter forged alternatives
- Controlled trip comparisons showed nearly 6% improvement under consistent conditions
- One Model 3 owner claimed 10% better range downsizing from 19-inch to 18-inch forged wheels
Lower unsprung weight also reduces suspension energy demands over rough pavement. Modest gains individually, but measurable ones that compound over thousands of miles.
Handling Response Improvements
Range gains get the headlines, but the handling story is where lighter forged wheels actually earn their price premium. Reducing unsprung mass lets your dampers control wheel motion more precisely, which tightens cornering consistency and reduces wheel hop over rough pavement.
Your suspension reacts faster to road texture because there’s simply less inertia fighting against it.
Rotational inertia compounds the benefit. Mass concentrated at the rim requires disproportionately more energy to accelerate and decelerate, so lighter forged wheels deliver noticeably quicker throttle response during stop-and-go driving.
Turn-in feels more immediate because directional changes overcome less wheel inertia.
On a heavy EV already carrying substantial battery mass, these physics-driven improvements aren’t marginal—they’re meaningful upgrades that sharpen how your Tesla actually communicates with the road.
Rim Protectors, Center Caps, and Lug Nut Covers That Last
Your wheels take a beating every single day—curbs, potholes, parking lot debris—and the factory finish on Tesla rims offers zero protection against that reality.
Tesla’s factory rim finish won’t save you from daily curbs, potholes, and parking lot chaos.
Rim protector longevity depends heavily on material selection; aluminum alloy and AlloyGator-style systems outperform cheap plastic alternatives by absorbing impact rather than cracking under it.
Smart wheel protection covers three layers:
- Rim protectors — adhesive or clip-mounted guards rated for Model 3, Y, S, and X fitments
- Center cap customization — ABS or coated alloy caps matched precisely to hub dimensions (loose caps rattle, fall off, collect grime)
- Lug nut covers — corrosion shields that coordinate your entire wheel aesthetic
Install these correctly once, and you’ll stop wincing every time you parallel park.
Mud Flaps for Tesla: Which Models Need Them Most and Why
Protecting your wheels stops at the rim edge—everything below that is still exposed to whatever the road throws at it. Wheel splash reaches your rocker protection zones constantly, depositing salt, grit, and slush against painted lower panels. Model Y sits at the top of the priority list given its exposed wheel arches. Model 3 follows closely, particularly in winter climates.
| Model | Priority Level | Primary Threat |
|---|---|---|
| Model Y | High | Wheel arch spray, road salt |
| Model 3 | Medium-High | Slush, gravel impact |
| Performance trims | Medium | Debris contact, low clearance |
Choose flexible, no-drill kits with rust-resistant hardware. Rigid designs crack on steep driveways—you’ll learn that lesson once.
Aftermarket Brake Pads and Rotors for Tesla: Regen Braking Changes Everything
Most Tesla owners assume regenerative braking eliminates brake wear entirely—it doesn’t, but it does change the equation dramatically. Your friction brakes still engage during hard stops, low-speed crawls, and emergency situations. Neglect them long enough and you’re replacing pads, rotors, and calipers simultaneously.
Here’s what actually degrades faster on a Tesla:
- Rotors: Infrequent use invites surface rust; rotor coatings like Geomet resist corrosion meaningfully
- Calipers: Low exercise frequency causes sticking and binding
- Pad compounds: Uneven contact from seized hardware creates lopsided wear patterns
Upgrading to ceramic pad compounds reduces wheel dust noticeably. Aftermarket rotors with curved cooling vanes lower operating temperatures during hard stops—relevant especially if you’re driving a heavier Performance trim.
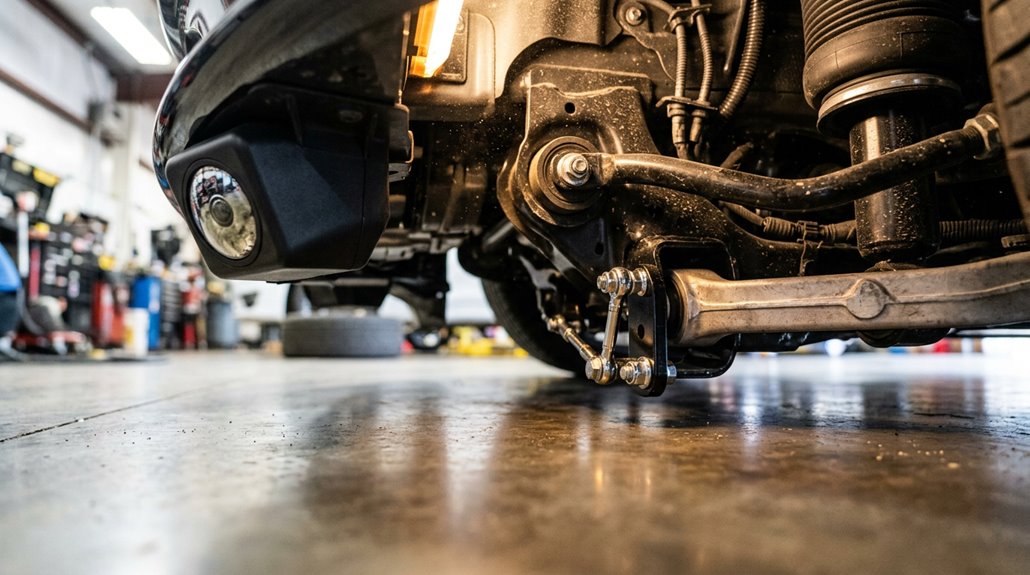
Coilovers and Lowering Springs for Tesla: What Works With Air Suspension
Swapping brake pads and rotors keeps your stopping hardware honest, but it doesn’t change how your Tesla sits or handles through a corner—that’s where suspension mods come in.
Your options split cleanly by platform. Coil-spring Teslas (Model 3 AWD, Model Y) accept coilovers like Air Lift Performance’s dedicated kit, which delivers a static lowered stance with manual height adjustment. Air-suspension Teslas (most Model S and Model X trims) are a different animal entirely—height sensors are integrated into the system, so you can’t simply bolt on lowering springs without upsetting ride-height calibration. Those platforms typically need air suspension upgrade modules or lowering links instead.
Some coilover kits even advertise a future air conversion upgrade path, which gives you flexibility without committing permanently to a fixed setup.
How Lowering a Tesla Affects Ride Height Sensors and Autopilot Cameras
Lowering a Tesla isn’t purely a cosmetic decision—it rewires the relationship between your suspension geometry and every sensor system that depends on knowing exactly where the car sits. Shift the sensor geometry even slightly, and the suspension computer misreads its own position, triggering automatic corrections that fight your lowered setup.
Three consequences hit immediately:
- False height readings cause the air suspension to raise itself back toward stock calibration
- Geofenced location data overrides your lowered stance at saved GPS points like driveways
- Camera recalibration becomes necessary because altered ride height changes every exterior camera’s angle relative to the road
Alignment follows suspension work automatically—non-negotiable. Skipping it compounds both tire wear and camera perception errors simultaneously. Address the sensors first; everything else cascades from there.
Ambient Lighting Kits for Tesla Interiors: Installation and Wiring
Ambient lighting kits for Tesla interiors have come a long way from the sketchy LED strips you’d zip-tie under a dashboard a decade ago—modern plug-and-play kits for the Model 3 and Model Y now ship with pre-terminated wiring looms, control boxes, and adhesive-backed strips sized for specific interior zones like footwells, door panels, center consoles, and seat backs.
Before committing to LED placement, confirm fitment by model year and trim level. For wiring safety, USB-powered setups beat fuse-box hardwiring unless you’re comfortable with automotive electrical work. Trim removal requires plastic pry tools
Console Organizers and Center Stack Inserts Worth the Money
Tesla’s factory center console is a single deep bin—functional in theory, chaotic in practice once you’ve lost a key card under a charging cable for the third time.
A dual-deck insert converts that vertical dead space into two distinct storage layers, putting your wallet, pens, and thumb drives on the upper tray while larger, less-used items stay buried below (lift-out access to the lower compartment typically takes under five seconds).
Before you buy, verify fitment by production year—console geometry changed significantly with the Model 3 Highland and Model Y Juniper refreshes, and a tray designed for a 2021+ console won’t sit flush in an older unit.
Why Organizers Matter
The Tesla center console is, almost invariably, a black hole — deep, open, and completely indifferent to the chaos you drop into it. Keys sink. Cards disappear. Charging cables tangle underneath everything else. Everyday convenience takes a hit every single time you’re digging blind.
A proper insert fixes this by converting one large cavity into defined zones:
- Reduced rattle — loose items stop sliding during hard acceleration or cornering
- Faster retrieval — emergency access to critical items (a key card, parking pass) becomes immediate
- Preserved premium feel — compartmentalized storage eliminates the catch-all look
You’re not buying luxury here. You’re buying function — the kind that compounds quietly across thousands of daily drives without ever requiring a torque wrench.
Top Insert Features
Not every console insert deserves your money — and the difference between a $15 tray that rattles on the freeway and a $60 precision-fit organizer that disappears into the cabin comes down to a handful of specific features. Look for generation-specific fitment first (2024 Model 3 owners, Spigen explicitly excludes you).
Hidden compartments that use sliding or trap-door designs let you layer storage without losing access to lower bins. Noise reduction matters more than most buyers expect — rubberized linings and contoured walls prevent items from shifting during acceleration and cornering.
Matte black ABS or microfiber-lined surfaces match Tesla’s minimalist aesthetic while protecting stored items. Port access is non-negotiable; your insert shouldn’t orphan your USB-C or 12V AUX outlet. Prioritize these features, and you’ll actually use the thing daily.
Best Value Picks
Narrowing down the best value picks comes down to fitment precision, material durability, and how much console real estate each kit actually covers — because buying three separate inserts to do what one 4-piece set handles is just burning money twice.
For refreshed 2021+ interiors, the strongest console inserts bundle cupholder, tray, and armrest zones into one purchase.
- Basenor 4PCS TPU set — dual-layer construction, 0.3mm precision fit, rated 4.9★
- Basenor under-screen shelf — screw-lock mount utilizing dead space behind the touchscreen for hidden compartments, rated 4.88★
- RPM Tesla kits — lifetime warranty with DIY install videos, cutting long-term ownership friction
Pair the 4-piece console set with the under-screen shelf and you’ve covered maximum organization without premium-brand pricing.
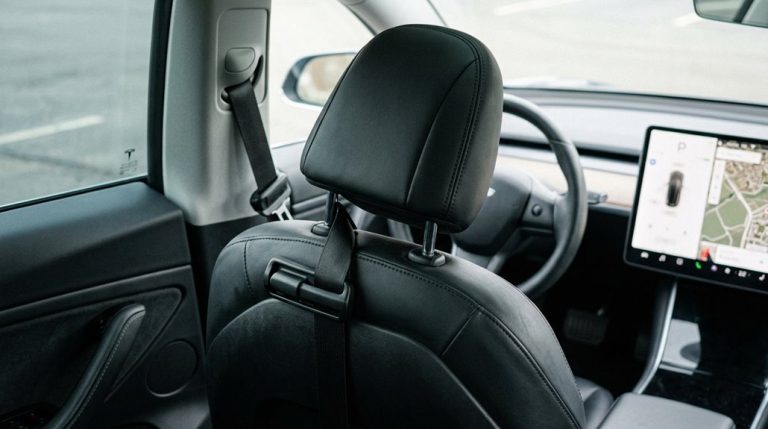
Seat Covers That Fit Tesla Vegan Leather Without Blocking Airbags
Fitting seat covers over Tesla’s vegan leather sounds straightforward until you realize the side airbags release directly from the seat cushion, not the door panel—meaning a poorly designed cover can become a ballistic obstacle during a crash. Seam integrity matters enormously here. Covers using standard stitching won’t tear cleanly under airbag pressure. Sensor interference is equally critical—Tesla’s occupant detection system sits beneath the seat fabric, and thick synthetic layers can confuse it entirely.
| Brand | Airbag-Safe Seams | Sensor Compatible |
|---|---|---|
| EVAAM | Yes | Confirmed |
| Yeslak | Yes | Confirmed |
| EVBASE | Yes | Partial |
| TAPTES | Yes | Confirmed |
| Generic | Unverified | Unknown |
Stick exclusively to brands confirming both features.
Rear-Seat Entertainment Screens: Mounting Options for Model S and Y
In terms of rear-seat entertainment in a Model S or Y, you’ve got two fundamental paths: headrest-mounted screens or integrated center-console-style displays, and each one comes with its own set of trade-offs worth grasping before you pull out your trim tools.
Headrest mounts (typically universal brackets clamping onto existing posts) keep the screen in each passenger’s direct sightline but add bulk, restrict headrest adjustment, and require longer power runs to each unit.
Integrated options like Hansshow’s H86 Android screen for the Model 3/Y centralize everything into one bracket-mounted display positioned between the front seats, drawing power through a routed cable that feeds through the lower trim channel — cleaner install, but one screen splits the attention of two rear passengers.
Headrest Mount Solutions
Rear-seat entertainment in a Tesla doesn’t require a factory screen or a permanent wiring job—a headrest tablet mount handles the job cleanly and reversibly. These mounts clip directly onto headrest posts or seat structure, preserving rear seat ergonomics without drilling or splicing anything.
Installation walkthroughs typically show multi-piece brackets locking into position using directional orientation marks, taking under ten minutes total.
Key specs worth knowing before buying:
- Compatibility: BASENOR supports Model 3 (2017–2023) and Model Y (2020–2024), but excludes the Juniper refresh
- Rotation: Ball-joint systems allow full 360-degree swivel between portrait and landscape orientations
- Size limits: Most mounts cap out before 12.9-inch iPad Pro dimensions
Match your mount to your specific generation—fit gaps are real.
Integrated Screen Options
Upgrading your Tesla’s rear cabin with a dedicated screen splits into two very different realities depending on which model you own.
On Model 3/Y, you’re working with genuinely clean OEM style integration — kits like the Hansshow H86 deliver an 8.66-inch Android 12 display through console mounting that taps the rear OBD harness without permanent modifications. You’ll route a wiring harness through the left-side trim channel, reconnect trim pieces, and finish in roughly ten minutes. The rear seat passengers gain actual Tesla-system access: HVAC control, seat heating, even glovebox functions.
Model S is a different story.
Tablet integration there remains largely standalone — think aftermarket Android unit rather than native Tesla extension — with compatibility varying sharply by model year and requiring custom modification over direct bolt-on solutions.
How to Install an Aftermarket Steering Screen on a Tesla
Adding a dedicated driver display to your Tesla’s steering column area is one of the cleaner instrument cluster workarounds available for Model 3 and Model Y owners who miss having speed, route guidance, and battery data directly in their sightline. Good steering ergonomics depend on correct positioning, so lower your steering wheel through the Tesla menu before pulling any trim.
Start methodically:
- Remove dashboard end caps and lower trim using soft-edged tools to protect factory clips
- Route the wiring lead through dash channels, tucking slack carefully to prevent pinching
- Snap the display into its bracket, connect the cable first, then reboot the vehicle
Minimize display latency issues by ensuring connectors seat fully before reassembly.
Third-Party Heads-Up Displays That Work With Tesla
Tesla’s minimalist cockpit (no instrument cluster, one screen, no traditional gauge pod) makes a heads-up display one of the few genuinely useful retrofits you can add without looking like you raided a JDM parts bin. Your main compatibility categories break down into three distinct types: windshield projection units, low-profile dashboard or vent-mounted displays, and phone-linked external screens that pull data through the Tesla API or a CAN-bus transmitter module.
Model 3 and Model Y owners get the widest product support across brands like Hansshow, TAPTES, HUDWAY Drive, TMA, and the Kickstarter-backed NeuroHUD, though fitment specifics — particularly vent socket availability on post-February 2023 Model Y builds — require a hardware check before you commit to any install.
Compatible HUD Options
Why settle for craning your neck toward Tesla’s center screen every time you want a quick speed check? Aftermarket HUD solutions solve this without touching your factory setup.
Your main compatibility categories break down cleanly:
- Smartphone HUDs (like HUDWAY Drive) mount dash-top and pull route guidance data via Bluetooth from apps like Waze or Google Maps
- Hidden clusters sit low on the dash, displaying speed, battery status, and even preconditioning controls without obstructing your main screen
- Instrument-cluster displays present full vehicle data directly in your sightline
Model 3 (2017–2023) and Model Y (2019–2024) dominate aftermarket support, though year cutoffs vary by vendor. Always verify compatibility against your factory build date, not just the model name, since post-refresh variants occasionally break fitment claims.
Installation And Fitment
Once you’ve picked a unit, the actual install breaks into two decisions: how it gets power and how it physically mounts.
Most units draw power from the cigarette-lighter socket, though some tap into dedicated dashboard adapters for a cleaner result.
Physically, you’re choosing between a low-profile dashboard mount or a vent-integrated design. Dashboard alignment matters here—even minor misplacement creates glare angles that defeat the whole point. Vent-mounted units should sit flush against the opening to prevent vent interference with airflow.
Model Y builds after February 2023 sometimes require a rear-vent socket for hidden installations (absent on some trims, frustratingly).
Cable routing runs through trim gaps using adhesive clips, keeping everything non-destructive. No drilling, no permanent modifications—just precise placement and patience.
Wireless Charging Pads and Phone Mounts That Fit Tesla Cabins
Dropping your phone into a wireless charging pad sounds simple until you realize Tesla’s cabin layouts vary enough across model years to make “universal fit” a marketing fantasy. EVANNEX’s dual Qi pad fits pre-November 2020 Model 3 consoles specifically, measuring 7.6 in wide by 6.85 in high with a 0.5 in bottom bumper. Verify your build date before ordering anything.
Key fitment factors worth confirming:
- Console generation — refreshed interiors often reject older pad dimensions entirely
- USB-C routing — some pads require threading power leads into specific console ports
- Magnetic mounts — standing designs improve screen visibility while charging
Portable chargers like Tesla’s 5000 mAh Alcantara-finished unit sidestep fitment headaches altogether, though you’re trading installation elegance for raw convenience.
How to Add a Subwoofer to a Tesla Without Cutting Factory Wires
Getting your phone to charge cleanly inside the cabin is satisfying, but it doesn’t fix the part of Tesla’s factory audio that most owners quietly tolerate: the low-end bass response, which ranges from thin to borderline absent depending on your trim level. Fortunately, factory integration doesn’t require cutting a single wire.
Vehicle-specific adapters plug directly into OEM connectors near the rear seat, tapping the factory subwoofer output line cleanly. A compact mono amplifier (Alpine KTA-200M fits well) handles power delivery. Harness options vary by trim, so verify compatibility before ordering.
| Component | Placement | Notes |
|---|---|---|
| Amplifier | Rear cargo area | Keep wiring short |
| Enclosure fitment | Trunk well | Sealed, 10-inch preferred |
| Harness connection | Under rear seat | No splicing required |
Amplifier and Speaker Upgrades That Actually Work in a Tesla
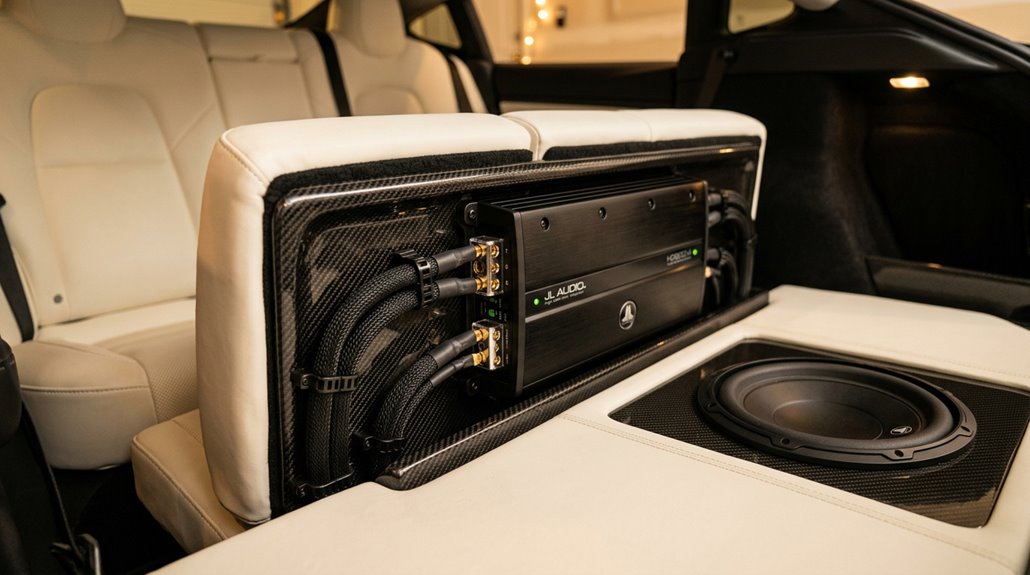
Tesla’s factory audio framework locks you into its integrated OEM head unit, which means you’re working around the infotainment system rather than replacing it — a constraint that actually narrows your upgrade path to four productive targets: DSP processing, amplification, speakers, and subwoofers.
Compatible amplifiers like Audison’s AF M12.14 bit (1,080 W with factory-tuned DSP maps) and BimmerTech’s Alpha One (840 W RMS, 1,680 W peak) solve the root problem — frequency response errors, time alignment drift, and phase cancellation — without touching the touchscreen or voiding controls.
Once you’ve got amplification sorted, upgraded speakers (Audison’s Tesla sound pack runs 29 mm Tetolon tweeters, 100 mm midranges, and a 200 mm woofer pair) slot into factory locations via plug-and-play lead assemblies, letting you pull real imaging and vocal clarity out of a cabin that was acoustically underserved from the factory.
Tesla Audio System Basics
- Bass authority — door speakers handle low-end duty without dedicated support
- Speaker clarity — OEM drivers compress and distort under real listening pressure
- DSP tuning — no factory correction for Tesla’s acoustically challenging cabin geometry
Fix those three gaps, and you’ve built a genuinely competitive system.
Compatible Amplifier Options
Matching an aftermarket amplifier to a Tesla isn’t as simple as picking the highest wattage option and hoping the cable fits — Tesla’s audio design varies by model year, trim, and factory package in ways that’ll kill a build before you turn the first bolt. Pre-2024 Model 3 runs a 7.1 framework; 2024+ Highland uses 6.2. Different animals entirely.
Plug-and-play kits (Alpine’s Model Y package being the benchmark) eliminate custom fabrication by pairing Tesla-specific cables with OEM integration — the factory amp stays for digital signal control while the aftermarket unit handles speaker power. Voltage matching matters equally: Tesla’s DC-to-DC converter outputs roughly 14–16V, so confirm your amplifier supports that range before purchasing. High power compatibility means nothing if the electrical framework rejects it.
Speaker Installation Tips
Getting the right amplifier on paper means nothing if the speakers behind it are rattling against misaligned brackets or fighting Tesla’s factory cavity dimensions. Depth matching prevents grille interference before it starts. Pull panels using proper panel alignment technique—work clips evenly rather than forcing one edge.
Key habits that separate clean installs from callback jobs:
- Torx tips matter: T20 and T25 fasteners appear constantly; stripping them creates expensive headaches
- Connector care: seat every factory plug fully before reassembly—missed connections trigger computer faults
- Depth matching: confirm aftermarket speaker depth clears the cavity before tightening anything permanently
Sound-deadening behind door panels reduces road-noise intrusion, letting your new speakers actually perform. Methodical reassembly beats rushing every single time.
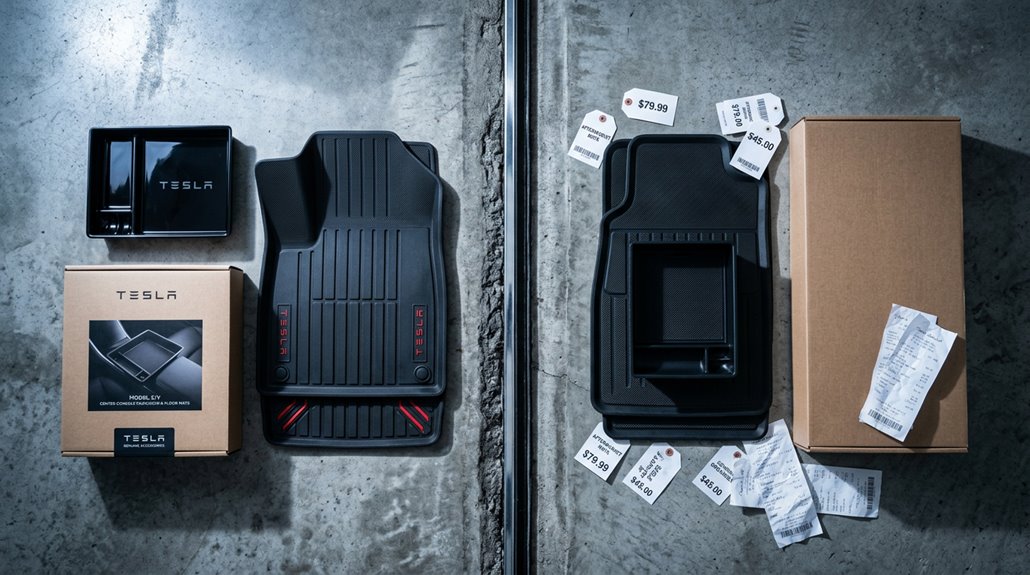
All-Weather Floor Mats and Trunk Liners That Actually Fit Tesla Models

Cheap universal mats are one of those purchases that seem fine until the first muddy boot or spilled coffee reminds you why fit actually matters. Tesla’s cabin geometry varies markedly across Model 3, Y, S, X, and Cybertruck, meaning a mat designed for one model creates gaps in another.
Prioritize laser fit options from brands like 3D MAXpider, WeatherTech, 3W, or Tesla OEM. That precision eliminates bunching near pedals, which is genuinely a safety concern, not just an aesthetic one.
Material matters equally. TPE benefits include odorless construction, temperature flexibility, and easy rinse-and-reinstall maintenance. Vertical sidewalls contain slush and spills before they reach carpet. Pair cabin liners with a dedicated trunk liner, since cargo areas take disproportionate abuse.
Frunk and Trunk Organizers for Daily Use and Road Trips
Tesla’s dual-cargo layout—frunk up front, trunk in back—sounds like a luxury until you’re fishing around a cavernous, unorganized space for a charging cable buried under a grocery bag. The fix isn’t complicated. Match the organizer type to the space:
- Foldable organizers collapse flat when empty, making them ideal for Tesla’s compact frunk dimensions
- Rigid-edge box organizers stabilize groceries, tools, and glass bottles during hard braking
- Insulated compartments (available on models like Knodel’s) preserve snack and drink temperatures on extended road trips
Hook-based mounting prevents shifting during cornering. Removable dividers separate clean gear from dirty equipment. Side pockets handle chargers, wipes, and documentation. Structure your cargo space deliberately—Tesla’s smooth cargo floors offer zero friction forgiveness otherwise.
Auto Frunk and Trunk Openers: How They Install and What They Cost
Organizers solve the chaos inside the frunk and trunk, but they still require you to lift the hood or liftgate manually every single time—which gets old fast when your hands are full of grocery bags.
Powered retrofit kits fix that by replacing factory struts with electric actuators, adding a control module, vehicle-specific brackets, and exterior buttons. Most installations use basic 10mm sockets and plastic pry tools, keeping the installation timeline around two to four hours.
Expect noise testing results below 30 decibels on quality frunk kits—virtually silent operation.
Pricing runs $800 through Tesla’s own Model 3 trunk retrofit, $899 installed through shops like Distinct Teslas, and up to $1,200 for premium aftermarket frunk setups. Anti-pinch protection is standard on reputable kits.
Sunshades and Roof Films That Reduce Tesla Cabin Heat
When parked in direct sunlight, a Tesla’s glass roof turns the cabin into something approaching a greenhouse—temperatures can spike 40°F above ambient before you even open the door. That’s not hyperbole; it’s physics.
Park in direct sunlight and your Tesla’s glass roof doesn’t just warm the cabin—it cooks it.
Your options break down cleanly:
- Reflective coatings and metalized polyester films block up to 90% of solar heat gain
- Mesh variants can eliminate up to 99% of UV penetration while maintaining some light diffusion
- Multi-layer foam-backed shades combine blackout backing with thermal resistance for maximum effect
Beyond comfort, lower cabin temperatures reduce A/C demand, preserving driving range.
Tesla’s official 2025+ Model Y shade uses a collapsible rigid frame with clips—no magnets, no guesswork. Aftermarket options typically specify pre-Juniper fitment, so confirm your model year before purchasing.
Tow Accessories and Hitch Receivers Compatible With Model Y and X
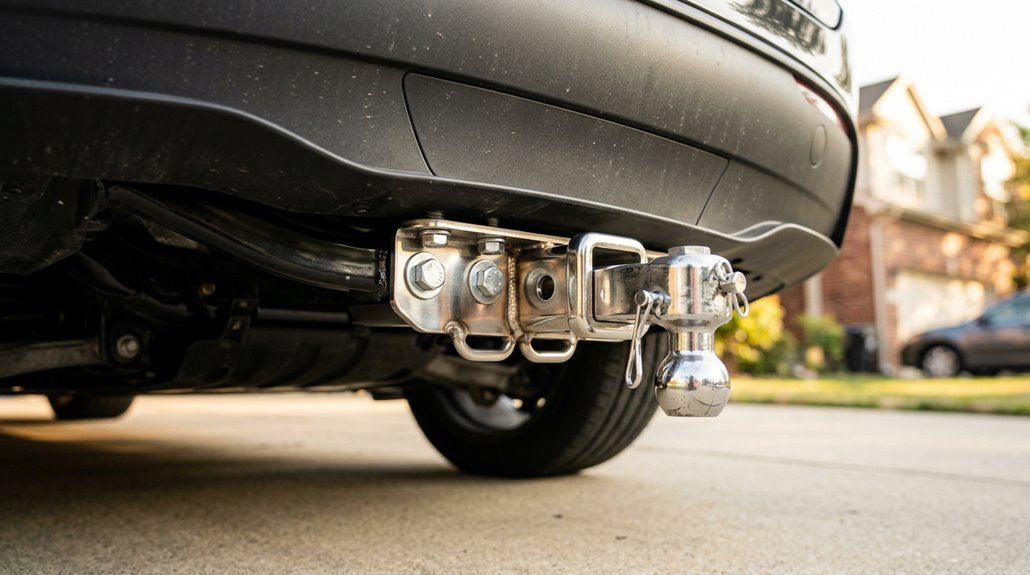
Towing with a Model Y or X isn’t an afterthought—both platforms ship with a proper 2-inch hitch receiver as part of their respective towing packages, though the hardware layouts differ enough that you can’t treat them as interchangeable systems.
The Model Y uses a hidden receiver design with an internal hitch bar, rated at 160 lbs vertical accessory load. Cantilever effects matter here: cantilevered weight stresses the receiver disproportionately compared to trailer ball compatibility setups.
Model X caps accessory load at 120 lbs within 24 inches. Drop ball mounts? Banned on X.
Trailer wiring comes standard with Model Y, enabling light-equipped carriers immediately.
Factor hitch maintenance into your routine—corrosion kills receiver sizes faster than you’d expect on either platform.
Dashcams and Sentry Mode Upgrades That Improve on Tesla’s Built-In System
Tesla’s built-in TeslaCam and Sentry Mode get plenty of credit—and they deserve some of it—but let’s be honest about what they’re actually tuned for: driver-assistance geometry and perimeter security, not courtroom-grade evidence capture.
Dedicated aftermarket dashcams close that gap fast. Three upgrades worth knowing:
- BlackVue DR900X-2CH — 4K front, 1080p rear, built-in LTE for cloud integration, and parking analytics with live push alerts
- Vantrue E2 Lite — 4K front, 2K rear, Sony STARVIS sensors, HDR handling for harsh lighting
- Viofo A229 Plus — 2K dual-channel coverage, solid parking mode, no subscription required
You’re not replacing Sentry Mode—you’re reinforcing it with hardware that was actually built for evidence.
Which Aftermarket Charging Accessories Are Safe to Use With Tesla?
Charging accessories are where a lot of Tesla owners trip up—not because the options are scarce, but because the quality gap between a well-rated product and a fire hazard can be invisible at the point of purchase.
Adapter safety starts with verified compatibility—J1772-to-Tesla adaptors handle Level 1 and Level 2 AC charging reliably, while CCS1 adaptors require explicit DC fast-charge ratings before you trust them.
Cable ratings matter equally: continuous current capacity must match your circuit, voltage ratings should clear 250V AC, and outdoor units need IP54 ingress protection minimum.
Skip anything lacking documentation on amperage limits or thermal protection.
Certified gear from established EV brands protects both your car and your garage.
Tesla Performance Upgrades That Actually Exist and What Is Pure Marketing
The performance upgrade market for Teslas splits cleanly into two camps: hardware and software changes that produce measurable results, and marketing copy that sells the idea of performance without supplying any. Verified upgrades have receipts—dyno sheets, lap times, consistent 0–60 data.
Legitimate upgrades include:
- Forged wheels from Unplugged Performance or Mountain Pass Performance, reducing unsprung weight for sharper handling response
- Tesla’s Acceleration lift OTA upgrade, supplying documented quarter-mile improvements on eligible trims
- Brake kits engineered for fade resistance under repeated hard stops
Marketing myths typically involve plug-in devices promising 50–150 hp gains on stock drivetrains. No independent timing data supports those claims.
If the product page skips measured results entirely, your wallet already knows the answer.
How Aftermarket Wheel and Tire Changes Affect Tesla Autopilot Calibration

Swapping wheels and tires on your Tesla does more than change the look—it quietly nudges several interconnected systems that Autopilot depends on to grasp the world around it. Wrong wheel diameter throws off speed readings, corrupts range estimates, and makes Autopilot behave inconsistently until the vehicle recalibrates. That recalibration isn’t instant.
Lowering ride height compounds the problem, since suspension geometry shifts affect camera and sensor alignment expectations. Autopilot isn’t killed by aftermarket wheels alone, but incorrect configuration settings create measurable behavioral drift you’ll actually feel.
Always perform a TPMS reset after swapping wheels—non-OEM sensors trigger pressure warning faults that mask real underinflation data. Update your wheel configuration in Tesla’s settings immediately. Match dimensions precisely. Everything downstream depends on it.
How to Sequence Tesla Mods by Budget, Fitment, and Warranty Risk
Most Tesla owners plunge wallet-first into the fun stuff—wheels, wraps, suspension drops—then spend months untangling rattles, warranty disputes, and Autopilot quirks they could’ve avoided entirely. Smart budget sequencing fixes that.
Build your fitment checklist before spending a dollar on anything installed.
Follow this order:
- Protection first: Floor mats, PPF, trunk liners—reversible, zero warranty exposure, immediate payoff
- Cosmetic second: Wraps, tinted glass, ambient lighting—high visibility, low system interference
- Functional third: Suspension, charging accessories, electronics—higher risk, requires documentation
Each tier depends on the previous one being stable. Don’t stack suspension changes with new wheels simultaneously; overlapping variables make diagnosing squeaks impossible. One category at a time keeps your build clean, your warranty defensible, and your diagnostic logic intact.