Most technicians swap a Tesla bumper like it’s sheet metal and plastic. It isn’t. Hidden behind that fascia are radar emitters, ultrasonic sensors, and camera housings that Autopilot depends on completely—and a misalignment of just a few millimeters can quietly destroy your ADAS accuracy. One wrong torque sequence. One painted-over radar transparency zone. The consequences aren’t cosmetic. Before you pull a single fastener, there’s critical information you need to understand.
What Tesla Bumper Replacement Actually Requires Front and Rear
Whether you’re dealing with front or rear damage, Tesla bumper replacement isn’t just swapping a painted shell — it’s a coordinated scope of work that pulls in sensors, trim transfers, fastener sequences, and in some cases, ADAS calibration.
Tesla bumper replacement isn’t a parts swap — it’s a coordinated scope involving sensors, calibration, and sequenced disassembly.
Up front, radar-equipped vehicles add a hard constraint: paint thickness in the radar zone can’t exceed 300 microns (12 mils), and the base plastic beneath it stays untouched. That’s not a suggestion — it affects sensor accuracy.
Out back, you’re managing parking sensor looms, reflectors, lower valance transfers, and a fastener mix of 10mm bolts, T20 Torx screws, and panel clips before the cover moves at all.
Material sourcing affects fit and finish directly, so OEM versus aftermarket decisions carry real consequences here. And warranty implications follow any repair that disturbs ADAS components without proper calibration verification afterward. Know the full scope before you pull a single fastener.
Tesla’s broader hardware ecosystem follows a similar philosophy of standardization, where the NACS connector standard unifies Supercharger, Destination, and home charging under one plug design — the same discipline toward integration that carries over into how bumper-mounted components are engineered to work within tightly specified tolerances.
When installing parking sensors, each unit requires a rubber grommet seated correctly around the sensor body before pressing it into the bumper opening — if the grommet bulges or shifts during installation, the sensor must come back out and the process repeats until the seal sits flush.
After replacing a Tesla bumper, the real mistake is leaving it unprotected—because one stray stone, tight parking move, or highway kick-up can undo expensive repairs faster than most owners expect. Keep that fresh finish protected from day one by adding protection so the bumper stays looking new long after the replacement work is done.
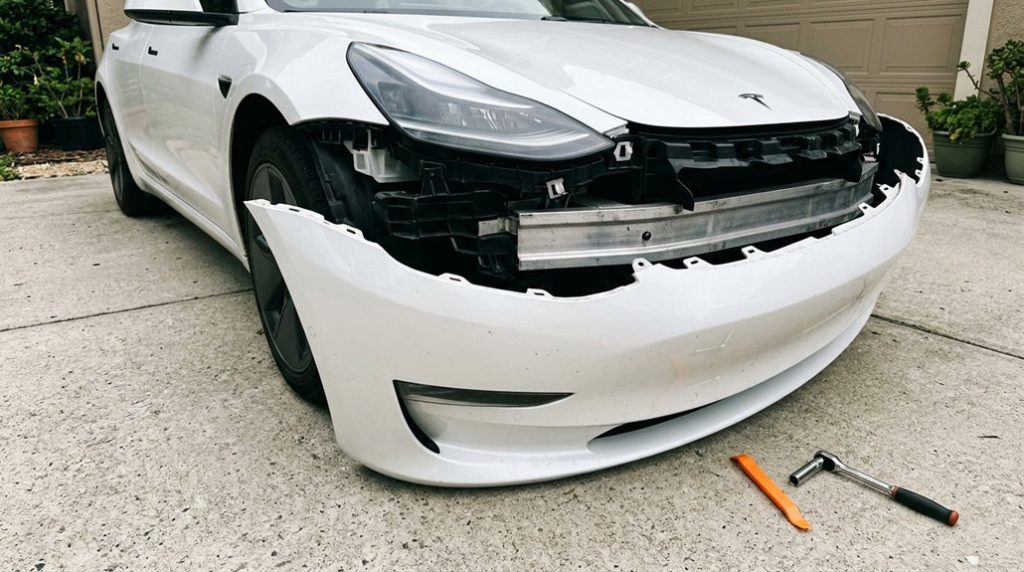
How to Remove a Tesla Bumper Without Damaging Sensors
Sensor damage during bumper removal almost always traces back to sequencing errors — pulling the fascia before releasing what’s holding it. Tesla’s service documentation is deliberate here: release the surrounding fasteners first, then address the sensor tabs. Those tabs retain the sensor to the fascia, and prying directly at the housing instead of working the adjacent clips is how sensors crack.
Use trim tools along the lower edge and wheel wells, applying light, controlled pressure rather than torquing against the bumper skin. Aggressive pulls flex the carrier and distort the sensor mount. Tesla’s eight-camera system relies on overlapping fields of view to maintain 360-degree coverage, meaning a misaligned or damaged front-fascia camera can compromise the adjacent-view compensation the system depends on.
Once you’ve got clearance, double-sided tape helps reposition sensors cleanly without letting them drift during reassembly. Disconnect each electrical connector before fully pulling the fascia away — wiring hides behind the skin and won’t announce themselves until something tears.
After reinstallation, verify sensor status in Driver Assist. Green means functional. Red means you skipped a step. If you’re applying paint protection film afterward, note that the Tesla Model 3 bumper kit is also compatible with Model Y due to similar bumper stretch, which means you won’t need a separate kit if you’re working across both platforms.
Most bumper damage doesn’t come from major accidents—it happens in slow, everyday moments like tight parking spots, garage edges, and those “I thought I had more space” situations that quietly add up over time. Add a simple layer of protection before it happens again by installing it so your newly replaced Tesla bumper stays protected from repeat scrapes and avoidable repair costs.
Tesla Radar Zone Rules You Cannot Ignore During Any Repair
Before you pull a single clip on any Tesla bumper, you need to know whether the car in front of you is running radar or not — because the rules change completely depending on the answer. Tesla shifted U.S. Model 3 and Model Y production to camera-only Tesla Vision in May 2021, but earlier builds still depend on 76–77 GHz millimeter-wave radar for Autopilot functions.
Know your Tesla’s sensing setup before touching the bumper — radar and camera-only vehicles follow completely different rules.
Three non-negotiable checkpoints before touching the bumper:
- Confirm the build date and sensing framework — radar and Vision vehicles follow different reinstallation tolerances
- Identify any cabin radar hardware (occupant detection systems reported on 2022+ Model Y) before disassembly
- Treat radar calibration as mandatory, not optional — even minor bracket misalignment corrupts distance and Doppler calculations
Cosmetic repairs near radar zones aren’t cosmetic. You’re handling precision sensing equipment, and post-repair software updates can activate previously dormant perception behavior without warning. Tesla’s sensor fusion architecture combines radar inputs with camera-based lane marking and surrounding-vehicle detection to produce the control decisions that Autopilot depends on, meaning a misaligned radar sensor doesn’t fail in isolation — it corrupts the entire perception stack. The radar sensor itself weighs approximately 190 grams and consumes around 4.5 watts, but its compact, solid-state construction with no mechanical moving parts means precise bracket positioning is the only mechanical protection it has — and any deviation from spec directly undermines its ±0.12-meter distance accuracy.
After Tesla Bumper Installation: Confirm Every Sensor Is Working
A bumper that looks correctly installed can still be hiding misaligned, partially seated, or electrically unconfirmed sensors — and the car won’t always throw an immediate fault to tell you.
Start with sensor seating. Each sensor must fully engage its fascia tabs before you move on. Rear outer sensors (S7, S12) and inner sensors (S8–S11) all require the same confirmation. Front positions S1–S6 follow the same logic.
Connector locking is equally non-negotiable. Rear sensor connectors use a red locking tab — push it toward the connector body to engage. Don’t pull it up or push it down. Do a disconnect/reconnect cycle on every sensor to confirm full mating.
Then run Tesla’s service mode. It’ll isolate any sensor reporting a communication error by location. If a fault exists, swap sensor positions — a fault that follows the sensor points to the hardware, not the wiring. Run TEST-RESET_PARK via Toolbox 3.0 to finalize. Keep professional installation records and receipts for every sensor replacement or reconnection, as documented service work strengthens your position if a warranty claim is later disputed. If you’re troubleshooting a sensor that appears correctly seated but still faults, note that drilling sensor holes with a pilot hole first before using the final sensor bit — as recommended in retrofit installations — reduces the risk of a deformed housing that prevents full seating engagement.
Frequently Asked Questions
Can a Tesla Bumper Be Repaired Instead of Fully Replaced?
Like a scratch on glass, some damage stays surface-level—yes, you can repair minor cosmetic issues. Run a structural assessment first; if there’s no sensor compromise, paint touchups and plastic welding are viable fixes.
Does Bumper Replacement Void Any Existing Tesla Warranty Coverage?
Bumper replacement doesn’t void your entire Tesla warranty. Under the Magnuson-Moss Warranty Act, aftermarket impacts must show direct causation to deny coverage. Warranty transferability remains intact for unrelated systems like your battery and drive unit.
Which Tesla Models Require Professional Alignment After Bumper Replacement?
All models can need professional alignment, but you’ll most likely need it on Model X and Model S. If your bumper involves a front sensor or paint matching across panels, professional alignment’s essential.
How Long Does a Full Tesla Bumper Replacement Typically Take?
You’re not waiting forever—but don’t expect an hour either. Typical duration runs 1–10 business days, depending on your labor breakdown: paint matching, sensor calibration, and parts availability stretch timelines considerably.
Are Aftermarket Tesla Replacement Bumpers Compatible With Factory Sensor Mounting?
It depends on the version you buy. Aftermarket bumpers split into sensor and no-sensor configurations, so you’ll need exact cutout alignment for proper sensor fitment and correct routing of your wiring looms.